Components and components location
| [This illustration shows the LHD type. RHD type is symmetrical.] |
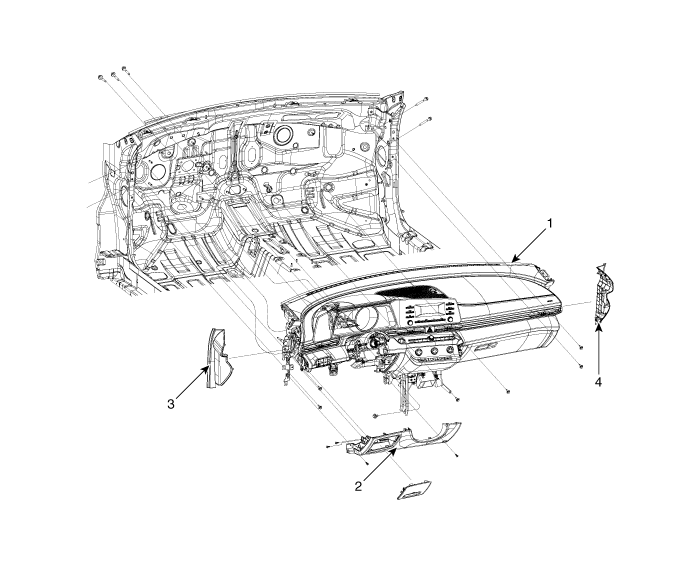
1. Crash pad assembly
2. Crash pad lower panel
| 3. Crash pad side cover [LH]
4. Crash pad side cover [RH]
|
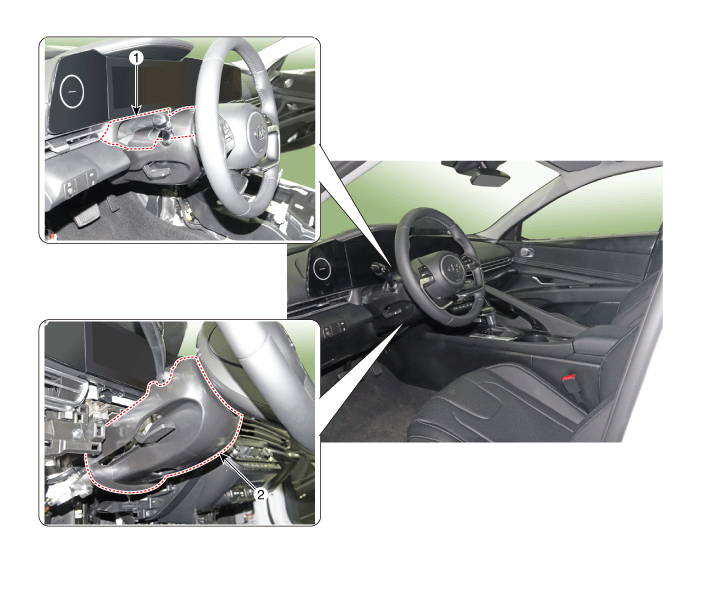
Cluster Fascia Side Panel
Repair procedures
| •
| When removing with a flat - tip screwdriver or remover, wrap protective tape around the tools to prevent damage to components. |
| •
| Put on gloves to prevent hand injuries. |
|
| •
| Take care not to bend or scratch the trim and panels. |
|
| 1. | Using a screwdriver or remover, remove the photo sensor cover (A). 
|
| 2. | Press the lock pin, separate the connectors (A). 
|
| 3. | Using a screwdriver or remover, remove the cluster fascia panel upper garnish (A). 
|
| 4. | Loosen the mounting screw, remove the cluster fascia side panel (A). [4.2" TFT LCD] 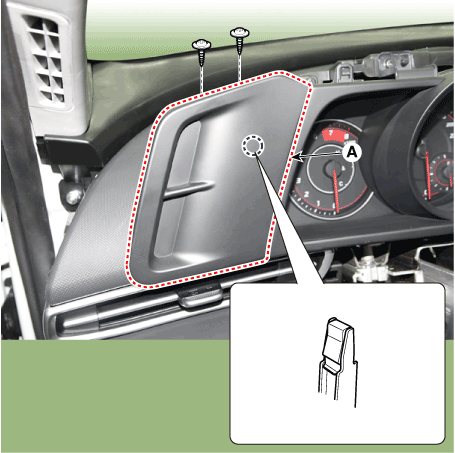
[10.25" TFT cluster] 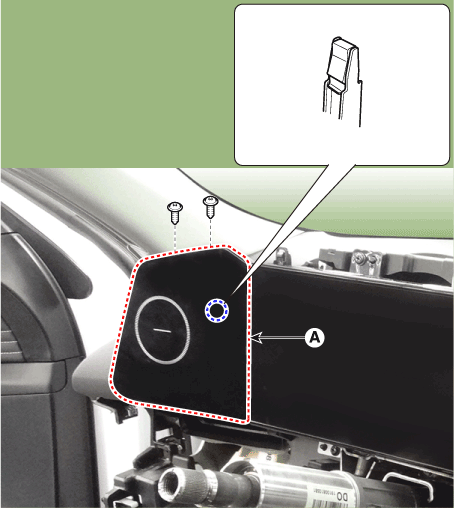
[N Line] 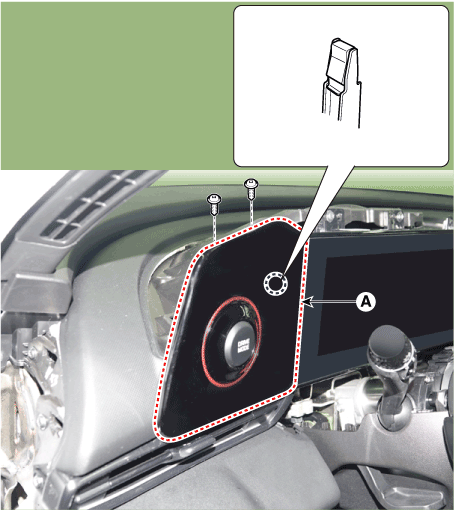
|
| 5. | Press the lock pin, separate the cluster fascia side panel connector (A). [N Line] 
|
| 6. | To install, reverse the removal procedure. | •
| Make sure the connector are connected in properly. |
| •
| Replace any damaged clips (or pin - type retainers). |
|
|
Cluster Fascia Panel
Components and components location
| [This illustration shows the LHD type. RHD type is symmetrical.] |

Repair procedures
| •
| When removing with a flat - tip screwdriver or remover, wrap protective tape around the tools to prevent damage to components. |
| •
| Put on gloves to prevent hand injuries. |
|
| •
| Take care not to bend or scratch the trim and panels. |
|
| 1. | Using a screwdriver or remover, remove the photo sensor cover (A).
|
| 2. | Press the lock pin, separate the connectors (A).
|
| 3. | Using a screwdriver or remover, remove the cluster fascia panel upper garnish (A).
|
| 4. | Loosen the mounting screws and remove the center fascia side panel (A).
|
| 5. | Loosen the mounting screws and remove the center fascia panel (A). 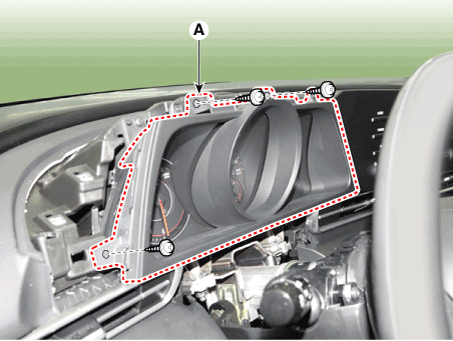
|
| 6. | To install, reverse the removal procedure. | •
| Replace any damaged clips (or pin - type retainers). |
|
|
Crash Pad Garnish
Components and components location
| [This illustration shows the LHD type. RHD type is symmetrical.] |
1. Crash pad garnish [LH]
3. Crash pad garnish [CTR]
| 2. Crash pad garnish [RH]
|
Repair procedures
| •
| When removing with a flat - tip screwdriver or remover, wrap protective tape around the tools to prevent damage to components. |
| •
| Put on gloves to prevent hand injuries. |
|
| •
| Take care not to bend or scratch the trim and panels. |
|
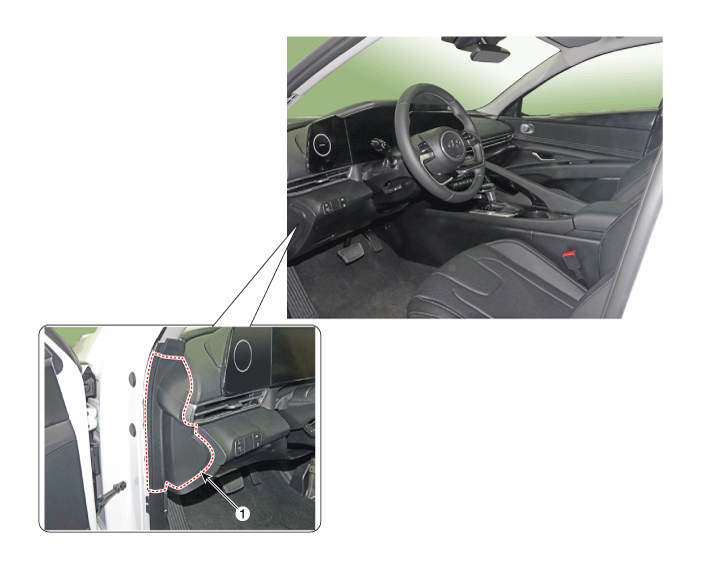
| 1. | Detach the clips, then remove the front door body side weatherstrip (A). [LH] 
[RH] 
|
| 2. | Using a screwdriver or remover, remove the crash pad side cover (A). [LH] 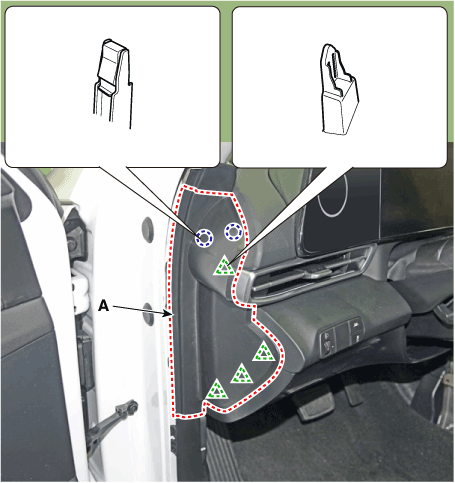
[RH] 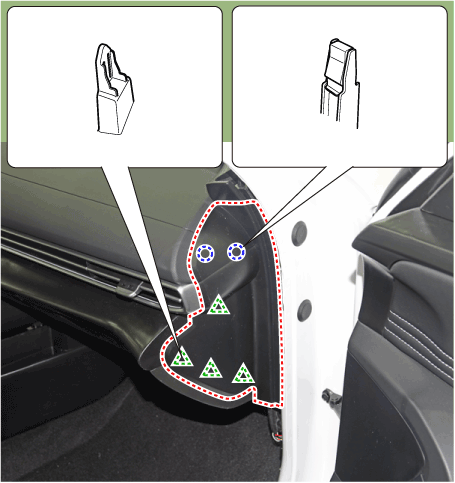
|
| 3. | Remove the crash pad garnish [LH] | 1) | Using screwdriver or remover, remove the steering column shroud upper panel (A). 
|
| 2) | Loosening the mounting screws, using a screwdriver or remover, remove the crash pad garnish (A). 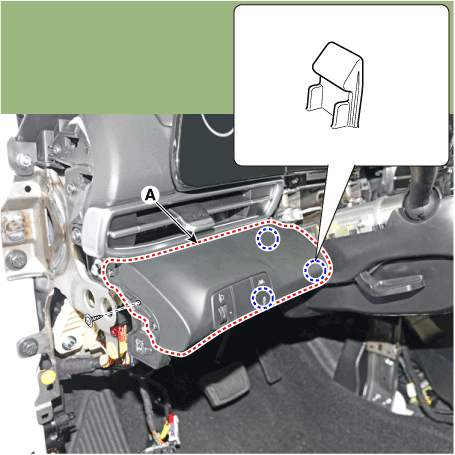
|
| 3) | Press the lock pin, separate the connector (A). 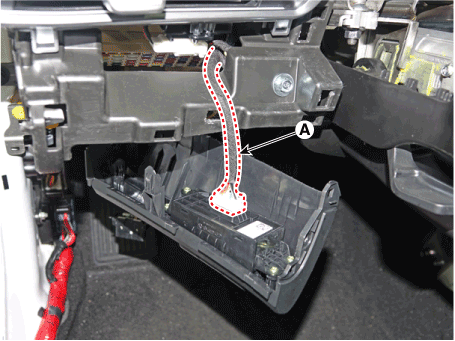
|
[RH] | 1) | Using screwdriver or remover, remove the steering column shroud upper panel (A).
|
| 2) | Using screwdriver or remover, remove the floor console side garnish (A). 
|
| 3) | Using a screwdriver or remover, remove the crash pad garnish [CTR] (A). 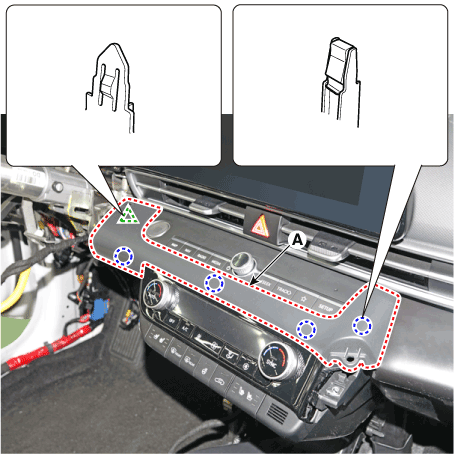
|
| 4) | Loosening the mounting screws, using a screwdriver or remover, remove the crash pad garnish (A). 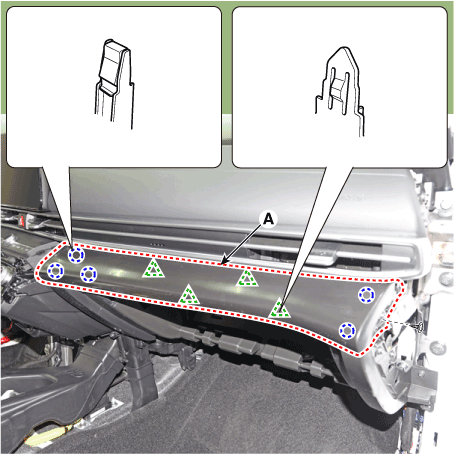
|
[CTR] | 1) | Using screwdriver or remover, remove the steering column shroud upper panel (A).
|
| 2) | Using screwdriver or remover, remove the floor console side garnish (A).
|
| 3) | Loosening the mounting screws, using a screwdriver or remover, remove the crash pad garnish (A).
|
|
| 4. | Install in the reverse order of removal. | •
| Make sure the connector is connected properly. |
| •
| Replace any damaged clips (or pin - type retainers). |
|
|
Crash Pad Lower Panel
Components and components location
| [This illustration shows the LHD type. RHD type is symmetrical.] |

Repair procedures
| •
| When removing with a flat - tip screwdriver or remover, wrap protective tape around the tools to prevent damage to components. |
| •
| Put on gloves to prevent hand injuries. |
|
| •
| Take care not to bend or scratch the trim and panels. |
|
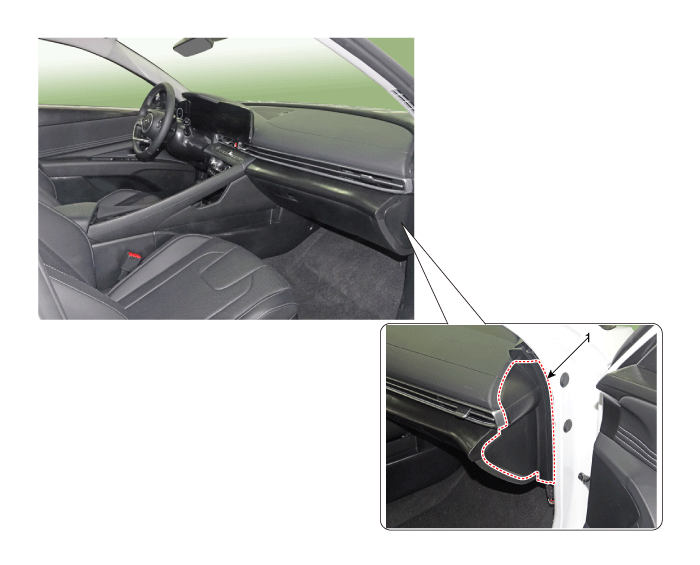
| 1. | Remove the cowl side trim. (Refer to Interior Trim - "Cowl Side Trim") |
| 2. | Detach the clips, then remove the front door body side weatherstrip (A).
|
| 3. | Using a screwdriver or remover, remove the crash pad side cover [LH] (A).
|
| 4. | Loosen the mounting screws and remove the crash pad lower panel (A). 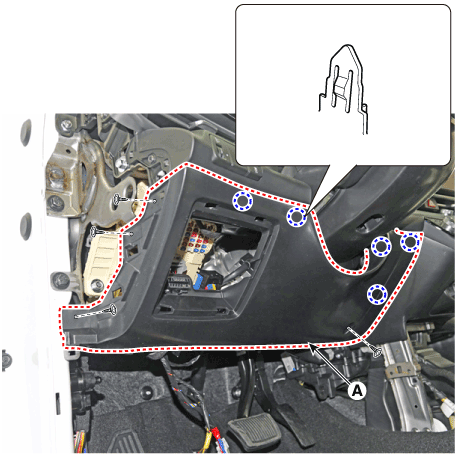
|
| 5. | Press the lock pin, separate diagnosis connector (A). 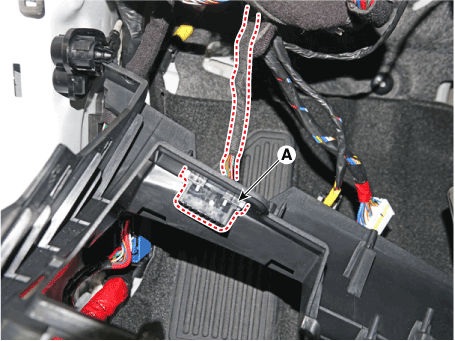
|
| 6. | To install, reverse the removal procedure. | •
| Make sure the connector are connected in properly. |
| •
| Replace any damaged clips (or pin - type retainers). |
|
|
Glove Box
Components and components location
| [This illustration shows the LHD type. RHD type is symmetrical.] |
Repair procedures
| •
| When removing with a flat - tip screwdriver or remover, wrap protective tape around the tools to prevent damage to components. |
| •
| Put on gloves to prevent hand injuries. |
|
| •
| Take care not to bend or scratch the trim and panels. |
|
| 1. | Open the glove box (A). 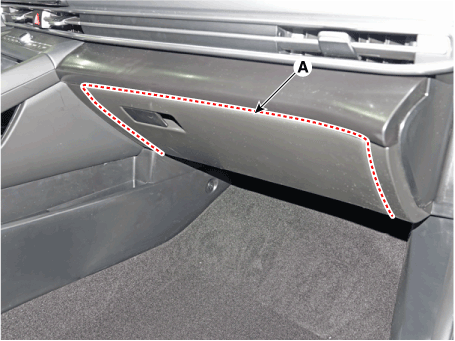
|
| 2. | Press the side of the glove box and remove the glove box (A). 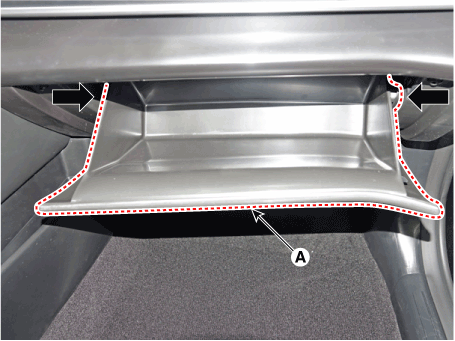
|
| 3. | Install in the reverse order of removal. | •
| Replace any damaged clips (or pin - type retainers). |
|
|
Glove Box Housing Cover
Components and components location
| [This illustration shows the LHD type. RHD type is symmetrical.] |
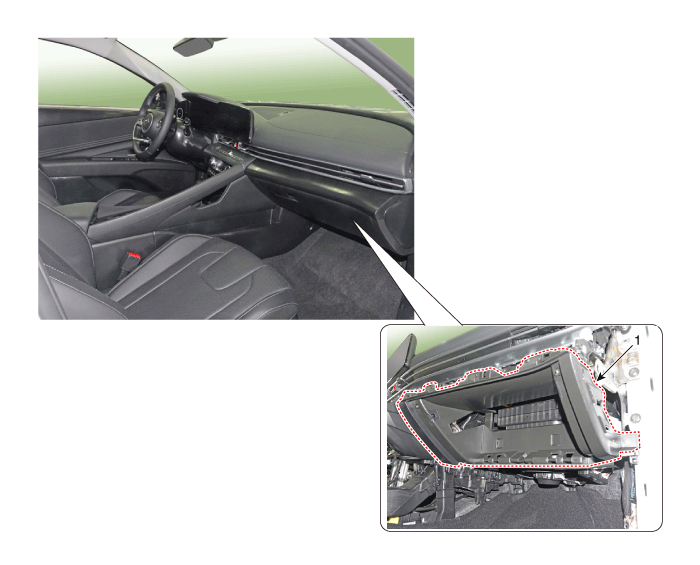
1. Glove box housing cover
|
|
Repair procedures
| •
| When removing with a flat - tip screwdriver or remover, wrap protective tape around the tools to prevent damage to components. |
| •
| Put on gloves to prevent hand injuries. |
|
| •
| Take care not to bend or scratch the trim and panels. |
|
| 1. | Remove the golve box. (Refer to Crash Pad - "Glove Box") |
| 2. | Remove the crash pad side cover [RH]. (Refer to Crash Pad - "Crash Pad Side Cover") |
| 3. | (Remove the crash pad garnish [RH]. (Refer to Crash Pad - "Crash Pad Garnish") |
| 4. | Loosen the mounting screws and bolts, remove the glove box housing cover (A). 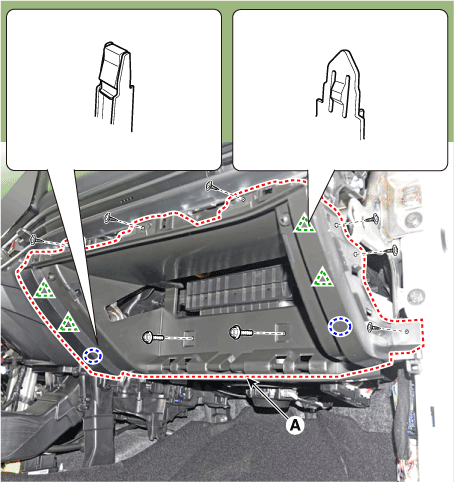
|
| 5. | To install, reverse the removal procedure. | •
| Replace any damaged clips (or pin - type retainers). |
|
|
Steering Column Shroud Panel
Components and components location
| [This illustration shows the LHD type. RHD type is symmetrical.] |
1. Steering column shroud upper panel
| 2. Steering column shroud lower panel
|
Repair procedures
[Steering column shroud upper panel]
| •
| When removing with a flat - tip screwdriver or remover, wrap protective tape around the tools to prevent damage to components. |
| •
| Put on gloves to prevent hand injuries. |
|
| •
| Take care not to bend or scratch the trim and panels. |
|
| 1. | Using a screwdriver or remover, remove the steering column shroud upper panel (A).
| •
| When removing the shroud upper panel, excessive force may be cause the leather to tear. 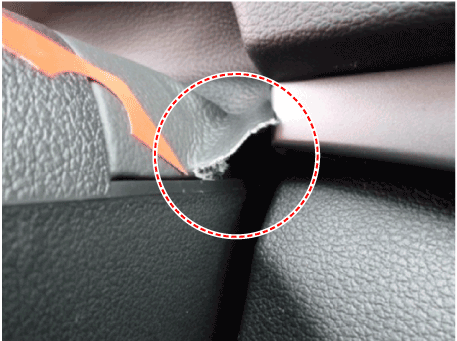
|
|
|
| 2. | To install, reverse the removal procedure. | •
| Replace any damaged clips (or pin - type retainers). |
|
|
[Steering column shroud lower panel]
| •
| When removing with a flat - tip screwdriver or remover, wrap protective tape around the tools to prevent damage to components. |
| •
| Put on gloves to prevent hand injuries. |
|
| •
| Take care not to bend or scratch the trim and panels. |
|
| 1. | Remove the crash pad lower panel. (Refer to Crash Pad - "Crash Pad Lower Panel") |
| 2. | Loosen the mounting screws by turning the steering wheel to the left and right, and remove the steering column shroud lower panel (A). 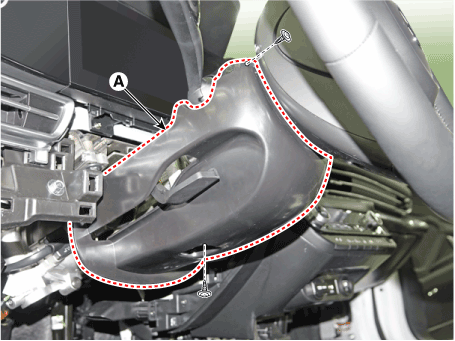
|
| 3. | To install, reverse the removal procedure. | •
| Replace any damaged clips (or pin - type retainers). |
|
|
Crash Pad Air Vent
Components and components location
| [This illustration shows the LHD type. RHD type is symmetrical.] |
1. Crash pad air vent [LH]
| 2. Crash pad air vent [RH]
|
Repair procedures
[LH]
| •
| When removing with a flat - tip screwdriver or remover, wrap protective tape around the tools to prevent damage to components. |
| •
| Put on gloves to prevent hand injuries. |
|
| •
| Take care not to bend or scratch the trim and panels. |
|
| 1. | Detach the clips, then remove the front door body side weatherstrip (A).
|
| 2. | Using a screwdriver or remover, remove the crash pad side cover (A).
|
| 3. | Remove the crash pad garnish [LH]. (Refer to Crash Pad - "Crash Pad Garnish") |
| 4. | Loosen the mounting screw, remove the crash pad air vent (A). 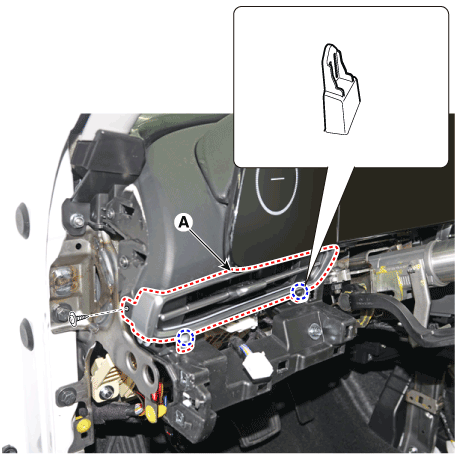
|
| 5. | Press the lock pin, separate the mood lamp connector (A). 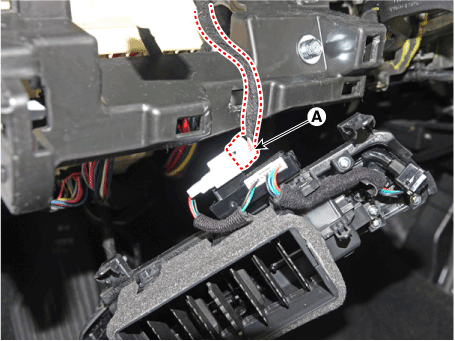
|
| 6. | To install, reverse the removal procedure. | •
| Make sure the connector are connected in properly. |
| •
| Replace any damaged clips (or pin - type retainers). |
|
|
[RH]
| •
| When removing with a flat - tip screwdriver or remover, wrap protective tape around the tools to prevent damage to components. |
| •
| Put on gloves to prevent hand injuries. |
|
| •
| Take care not to bend or scratch the trim and panels. |
|
| 1. | Remove the instrument cluster. (Refer to Body Electrical System - "Instrument Cluster") |
| 2. | Remove the crash pad lower panel. (Refer to Crash Pad - "Crash Pad Lower Panel") |
| 3. | Detach the clips, then remove the front door body side weatherstrip (A).
|
| 4. | Using a screwdriver or remover, remove the crash pad side cover (A).
|
| 5. | Using a screwdriver or remover, remove the steering column shroud upper panel (A).
|
| 6. | To remove the gear knob & gear boots (A) pull both of it up. 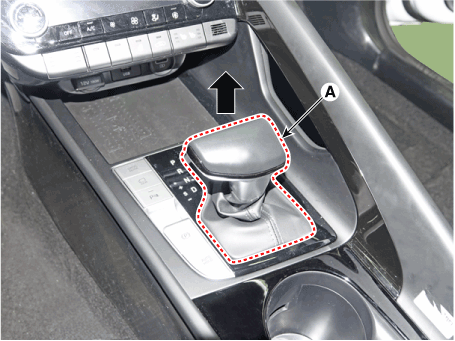
|
| 7. | Using a screwdriver or remover, remove the floor console side garnish (A).
|
| 8. | After loosening the mounting screw and then using a screwdriver or remover, remove the console upper cover (A). 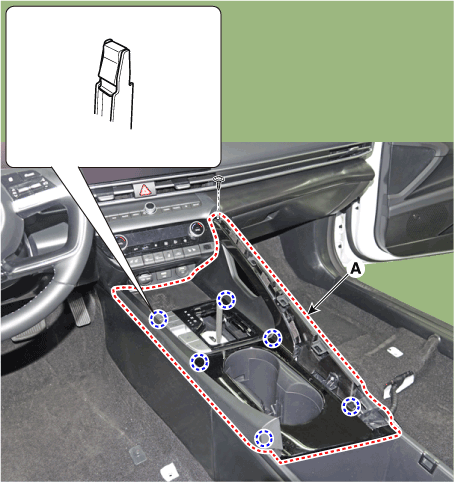
|
| 9. | Press the lock pin separate the console upper cover connector (A). 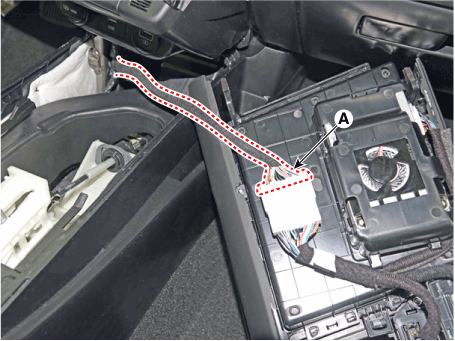
|
| 10. | Using a screwdriver or remover, remove the crash pad garnish [CTR] (A).
|
| 11. | Loosen the mounting screws, remove the A/C & heater controller unit (A). 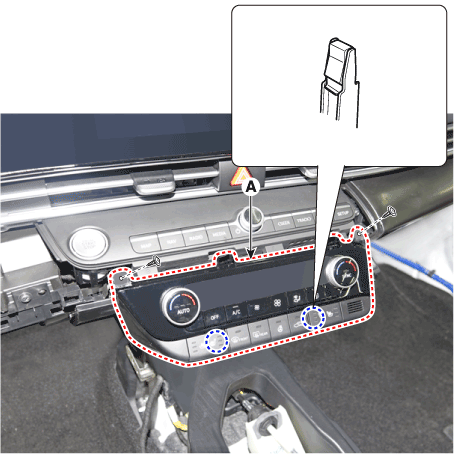
|
| 12. | Disconnect the A/C & heater controller connectors (A) and hose (B). 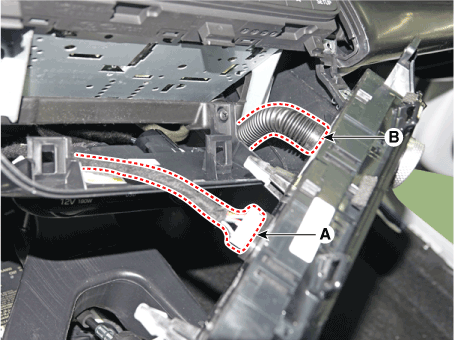
|
| 13. | Loosen the mounting screws, remove the AVN keyboard assembly (A). 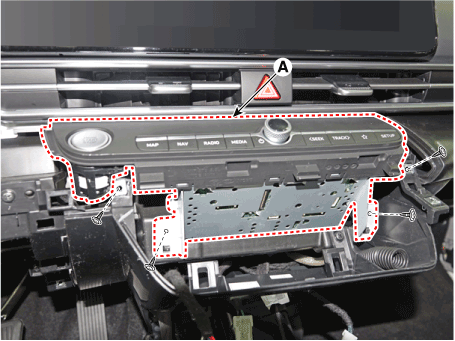
|
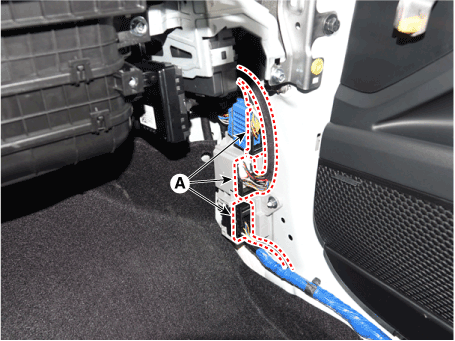
| 14. | Press the lock pin, separate the start button connector (A). 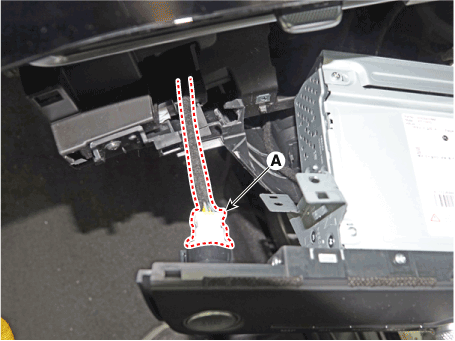
|
| 15. | Press the lock pin, separate the connectors (A). 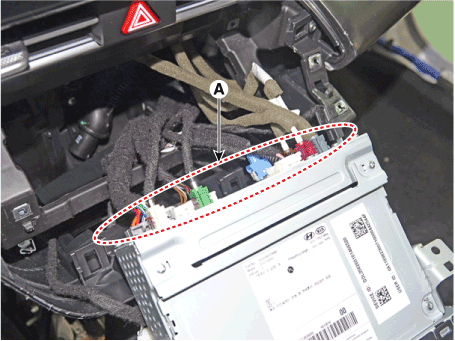
|
| 16. | Loosening the mounting screws, using a screwdriver or remover, remove the crash pad garnish (A).
|
| 17. | Loosen the mounting screw, remove the crash pad air vent (A). 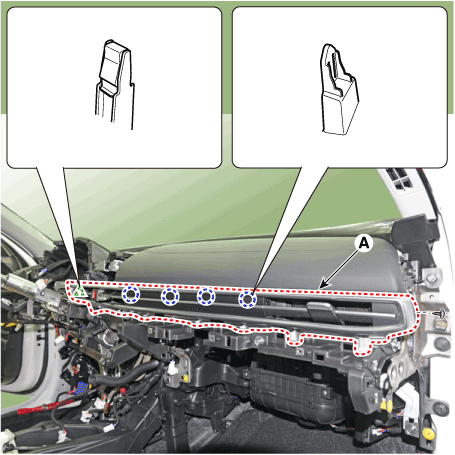
|
| 18. | Press the lock pin, separate the hazard switch connector (A). 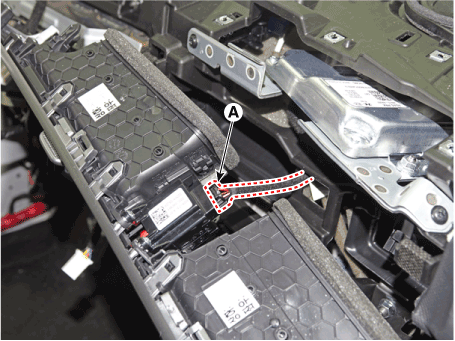
|
| 19. | Press the lock pin, separate the connectors (A). 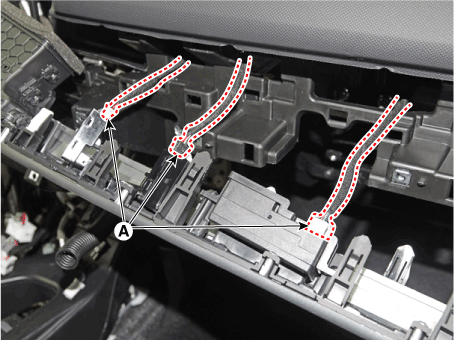
|
| 20. | To install, reverse the removal procedure. | •
| Make sure the connector are connected in properly. |
| •
| Replace any damaged clips (or pin - type retainers). |
|
|
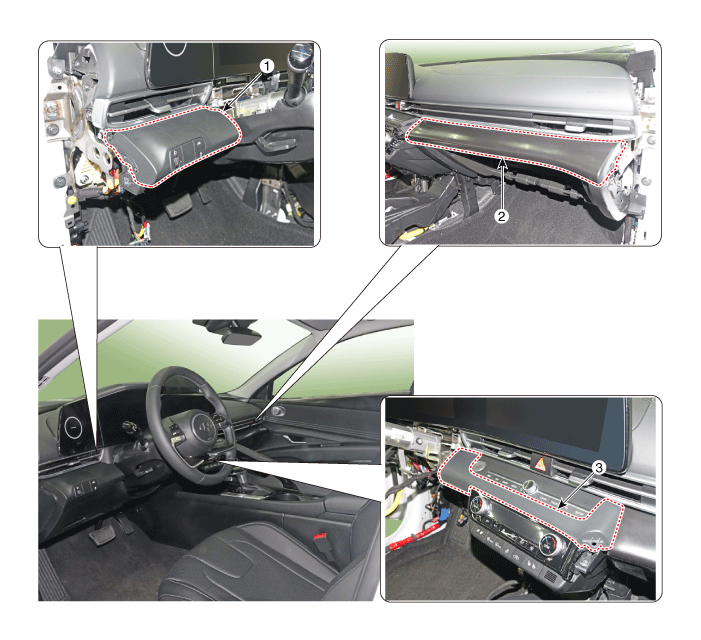
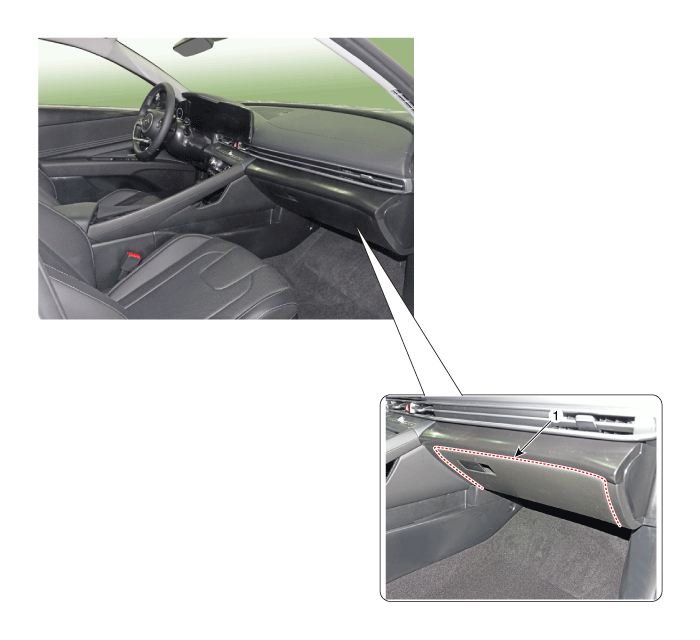
Crash Pad Side Cover
Components and components location
| [This illustration shows the LHD type. RHD type is symmetrical.] |
[LH]
1. Crash pad side cover [LH]
|
|
[RH]
1. Crash pad side cover [RH]
|
|
Repair procedures
| •
| When removing with a flat - tip screwdriver or remover, wrap protective tape around the tools to prevent damage to components. |
| •
| Put on gloves to prevent hand injuries. |
|
| •
| Take care not to bend or scratch the trim and panels. |
|
| 1. | Detach the clips, then remove the front door body side weatherstrip (A). [LH]
[RH]
|
| 2. | Using a screwdriver or remover, remove the crash pad side cover (A). [LH]
[RH]
|
| 3. | To install, reverse the removal procedure. | •
| Replace any damaged clips (or pin - type retainers). |
|
|
Crash Pad Center Panel
Components and components location
| [This illustration shows the LHD type. RHD type is symmetrical.] |
1. Crash pad center panel
|
|
Repair procedures
| •
| When removing with a flat - tip screwdriver or remover, wrap protective tape around the tools to prevent damage to components. |
| •
| Use a plastic panel removal tool to remove interior trim pieces without marring the surface. |
| •
| Put on gloves to prevent hand injuries. |
|
| 1. | Remove the crash pad garnish [CTR,RH]. (Refer to Crash Pad -"Crash Pad Garnish") |
| 2. | Remove the glove box housing cover. (Refer to Crash Pad -"Glove Box Housing Cover") |
| 3. | Remove the crash pad lower panel. (Refer to Crah Pad -"Crash Pad Lower Panel") |
| 4. | To remove the gear knob & gear boots (A) pull both of it up.
|
| 5. | Using a screwdriver or remover, remove the floor console side garnish (A).
|
| 6. | After loosening the mounting screw and then using a screwdriver or remover, remove the console upper cover (A).
|
| 7. | Press the lock pin separate the console upper cover connector (A).
|
| 8. | Loosen the mounting screws, remove the A/C & heater controller unit (A).
|
| 9. | Disconnect the A/C & heater controller connectors (A) and hose (B).
|
| 10. | Loosen the mounting screws, remove the AVN keyboard assembly (A).
|
| 11. | Press the lock pin, separate the start button connector (A).
|
| 12. | Press the lock pin, separate the connectors (A).
|
| 13. | Remove the USB port assembly (A) by pulling it in the direction of the arrow. 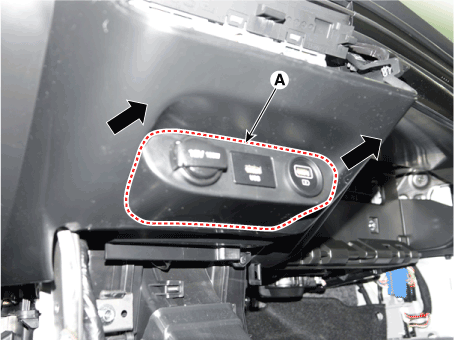
|
| 14. | Press the lock pin, separate the connectors (A). 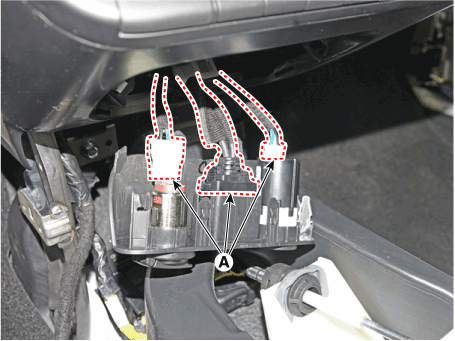
|
| 15. | Loosen the mounting screws, remove the crash pad center panel (A). 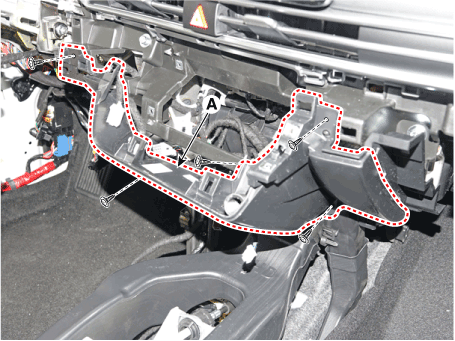
|
| 16. | To install, reverse the removal procedure. | •
| Make sure the connector are connected in properly. |
| •
| Replace any damaged clips (or pin - type retainers). |
|
|
Main Crash Pad Assembly
Components and components location
| [This illustration shows the LHD type. RHD type is symmetrical.] |
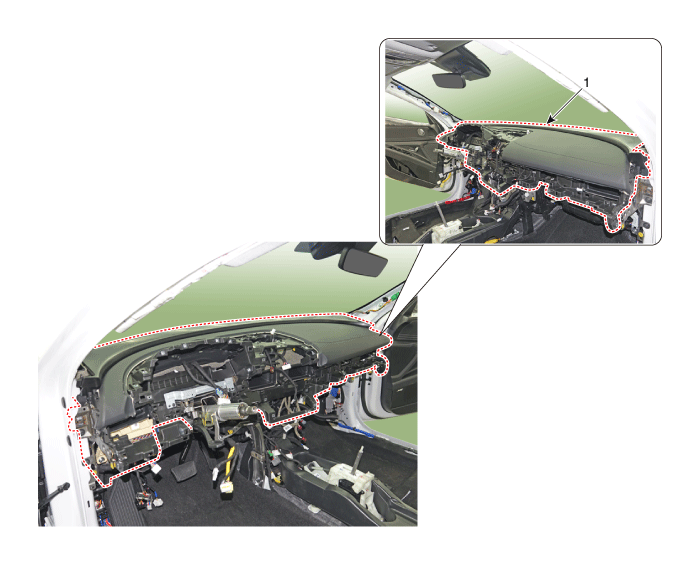
1. Main crash pad assembly
|
|
Repair procedures
| •
| When removing with a flat - tip screwdriver or remover, wrap protective tape around the tools to prevent damage to components. |
| •
| Put on gloves to prevent hand injuries. |
|
| •
| Take care not to bend or scratch the trim and panels. |
|
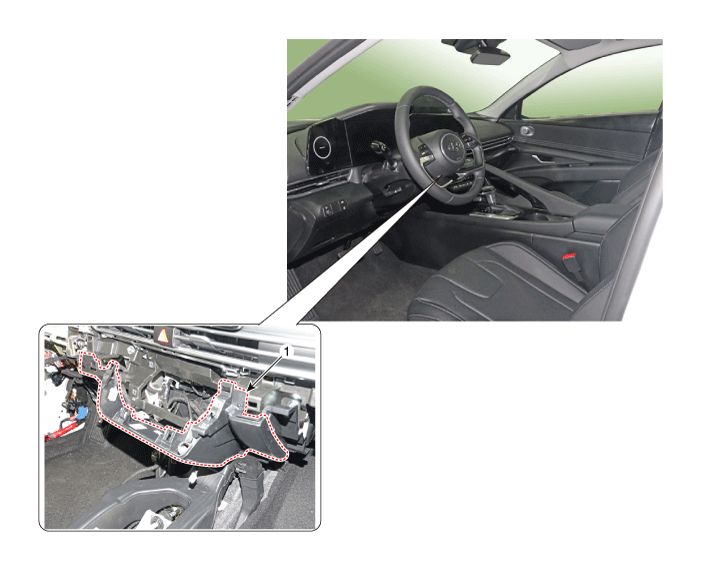
| 1. | Disconnect the negative ( - ) battery terminal. |
| 2. | Remove the floor console assembly. (Refer to Floor Console - "Floor Console Assembly") |
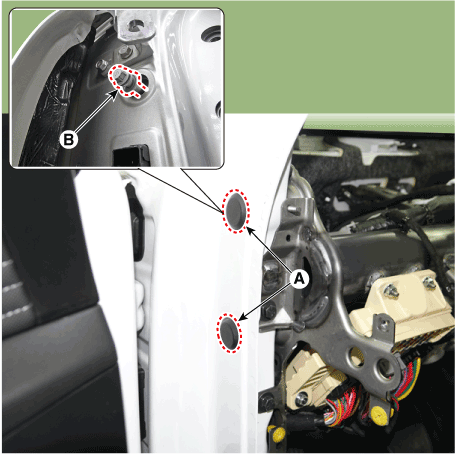
| 3. | Remove the front pillar trim. | 1) | To remove the front pillar trim, the fastener remover (A) below must be used. 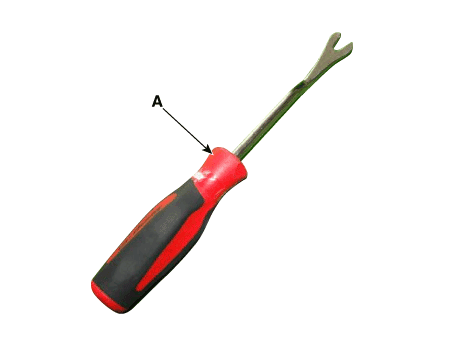
|
| 2) | After slightly lifting up the front pillar trim and putting the tool in, remove the mounting clip (A) by pulling it. | •
| Be sure to replace the existing clips with new ones when removing or replacing the front pillar trim. 
|
|
|
| 3) | Remove the front pillar trim (A). [LH] 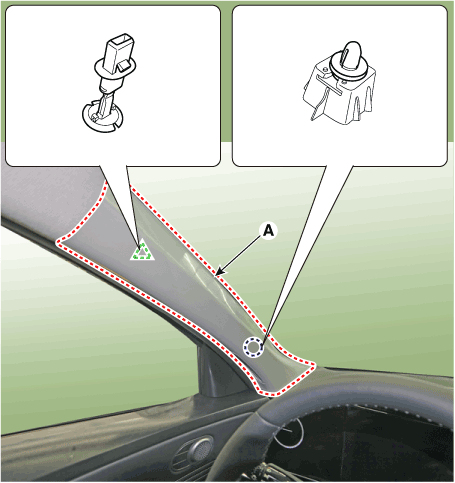
[RH] 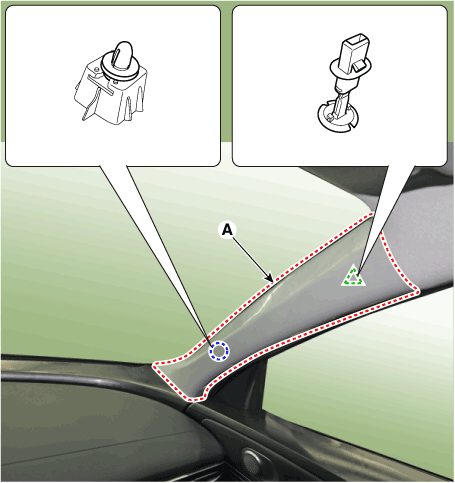
|
|
| 4. | Detach the clips, then remove the front door body side weatherstrip (A). [LH]
[RH]
|
| 5. | Using a screwdriver or remover, remove the crash pad side cover (A). [LH]
[RH]
|
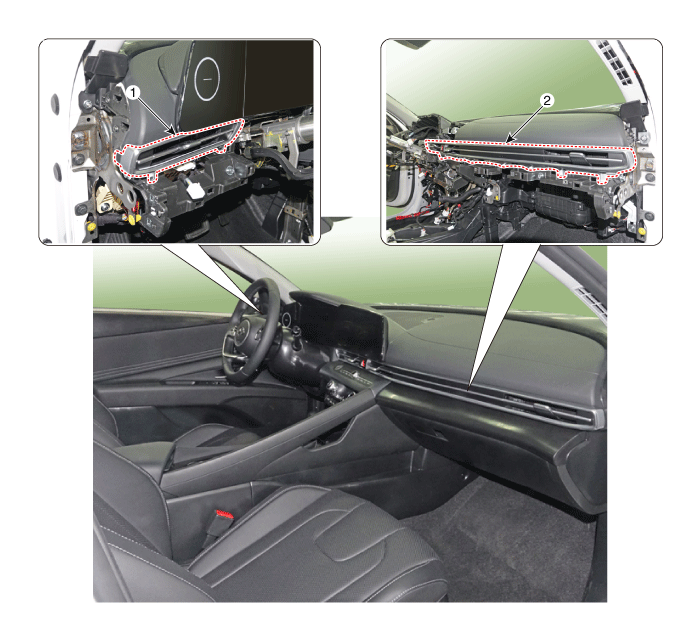
| 6. | Loosen the mounting screws, remove the crash pad lower panel (A).
|
| 7. | Press the lock pin, separate diagnosis connector (A).
|
| 8. | Using a screwdriver or remover, remove the photo sensor cover (A).
|
| 9. | Press the lock pin, separate the connectors (A).
|
| 10. | Using a screwdriver or remover, remove the cluster fascia panel upper garnish (A).
|
| 11. | Remove the crash pad garnish [LH] | 1) | Using screwdriver or remover, remove the steering column shroud upper panel (A).
|
| 2) | Loosening the mounting screws, using a screwdriver or remover, remove the crash pad garnish (A).
|
| 3) | Press the lock pin, separate the connector (A).
|
[RH] | 1) | Using a screwdriver or remover, remove the crash pad garnish [CTR] (A).
|
| 2) | Loosening the mounting screws, using a screwdriver or remover, remove the crash pad garnish (A).
|
|
| 12. | Loosen the mounting screws by turning the steering wheel to the left and right, and remove the steering column shroud lower panel (A).
|
| 13. | Remove the instrument cluster. (Refer to Body Electrical System - "Instrument Cluster") |
| 14. | Loosen the mounting screw, remove the center speaker (A). 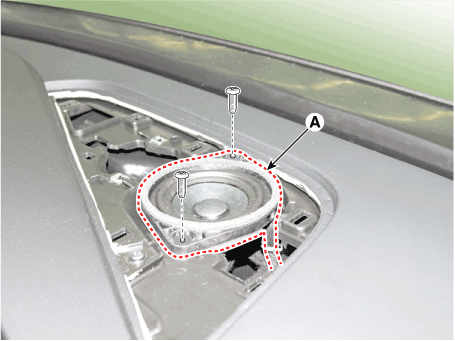
|
| 15. | Press the lock pin, separate the center speaker connector (A). 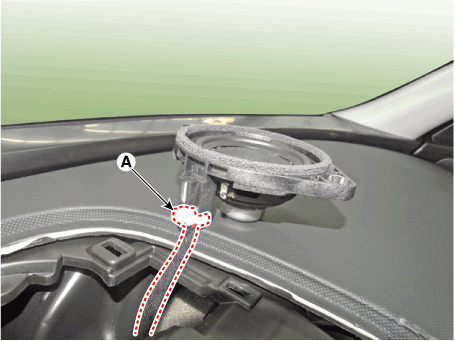
|
| 16. | Remove the glove box housing cover. (Refer to Crash Pad - "Glove Box Housing Cover") |
| 17. | Loosen the mounting screws, remove the A/C & heater controller unit (A).
|
| 18. | Disconnect the A/C & heater controller connectors (A) and hose (B).
|
| 19. | Loosen the mounting screws, remove the AVN keyboard assembly (A).
|
| 20. | Press the lock pin, separate the start button connector (A).
|
| 21. | Press the lock pin, separate the connectors (A).
|
| 22. | Remove the USB port assembly (A) by pulling it in the direction of the arrow.
|
| 23. | Press the lock pin, separate the connectors (A).
|
| 24. | Loosen the mounting screws, remove the crash pad center panel (A).
|
| 25. | Remove the steering wheel. (Refer to Steering System - "Steering Wheel") |
| 26. | Remove the multifunction switch assembly. (Refer to Body Electrical System - "Multifunction Switch") |
| 27. | Remove the crash pad air vent. [LH] | 1) | Loosen the mounting screw, remove the crash pad air vent (A).
|
| 2) | Press the lock pin, separate the mood lamp connector (A).
|
[RH] | 1) | Loosen the mounting screw, remove the crash pad air vent (A).
|
| 2) | Press the lock pin, separate the hazard switch connector (A).
|
| 3) | Press the lock pin, separate the connectors (A).
|
|
| 28. | Loosen the passenger's airbag (PAB) mounting nuts (A). Tightening torque : 3.9 - 5.9 N.m (0.4 - 0.6 kgf.m, 2.9 - 4.3 lb-ft) |
|
| 29. | Loosen the mounting bolts and nuts and remove the main crash pad assembly (A). Tightening torque : 16.7 - 25.5 N.m (1.7 - 2.6 kgf.m, 12.3 - 18.8 lb-ft) |

|
| 30. | Press the lock pin, separate the passenger's airbag (PAB) connectors (A). 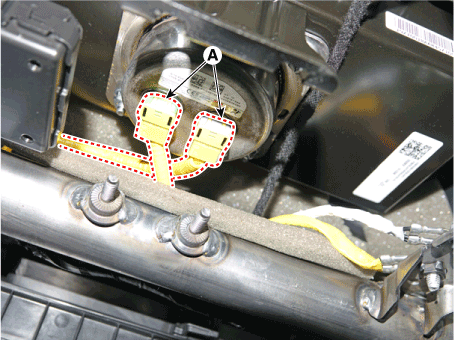
|
| 31. | To install, reverse the removal procedure. | •
| Make sure the crash pad fits onto the guide pins correctly. |
| •
| Before tightening the bolts, make sure the crash pad wire harnesses are not pinched. |
| •
| Make sure the connectors are plugged in properly, and the antenna lead is connected properly. |
| •
| Make sure that each of the assembly components operates properly. |
| •
| Replace any damaged clips (or pin - type retainers). |
|
|
Cowl Cross Bar Assembly
Components and components location
| [This illustration shows the LHD type. RHD type is symmetrical.] |

1. Cowl cross bar assembly
|
|
Repair procedures
| •
| When removing with a flat - tip screwdriver or remover, wrap protective tape around the tools to prevent damage to components. |
| •
| Put on gloves to prevent hand injuries. |
|
| •
| Take care not to bend or scratch the trim and panels. |
|
| 1. | Disconnect the negative ( - ) battery terminal. |
| 2. | Recover the refrigerant with a recovery/recycling/charging station. |
| 3. | When the engine is cool, drain the engine coolant from the radiator. (Refer to Engine Mechanical System - “Coolant”) |
| 4. | Remove the cowl top cover. (Refer to "Cowl Top Cover") |
| 5. | Remove the front door scuff trim. (Refer to Interior Trim - "Front Door Scuff Trim") |
| 6. | Remove the hood latch release handle. (Refer to hood -"Hood Latch Release Handle") |
| 7. | Remove the cowl side trim. (Refer to Interior Trim - "Cowl Side Trim") |
| 8. | Remove the battery. (Refer to Engine Electrical System - "Battery") |
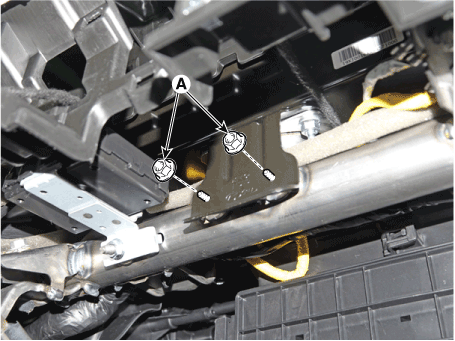
| 9. | Loosen the cowl cross member mounting bolts. 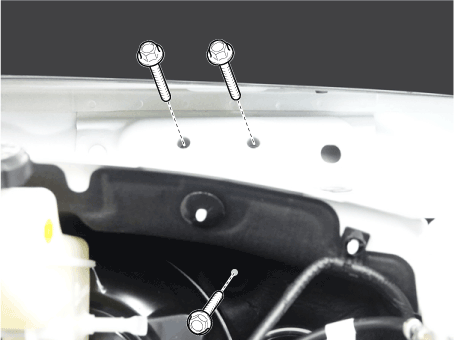
|
| 10. | Remove both sides of front seat assembly. (Refer to Front Seat - "Front Seat Assembly") |
| 11. | Remove the main crash pad assembly. (Refer to Crash Pad - "Main Crash Pad Assembly") |
| 12. | Disconnect the steering column connectors. (Refer to Steering System - "Steering Column and Shaft") |
| 13. | Loosen the mounting nuts and through bolts in the frontal area and lower the steering column. (Refer to Steering System - "Steering Column and Shaft") |
| 14. | Remove the shift lever assembly. (Refer to Manual Transaxle System - "Shift lever") (Refer to Automatic Transaxle System - "Shift lever") |
| 15. | Loosen the mounting nut and remove the center console duct (A). 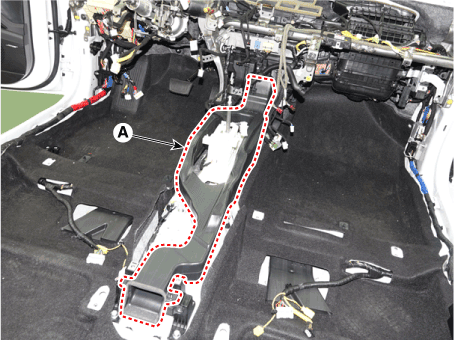
|
| 16. | Disconnect the airbag control module (SRSCM) connector (A). 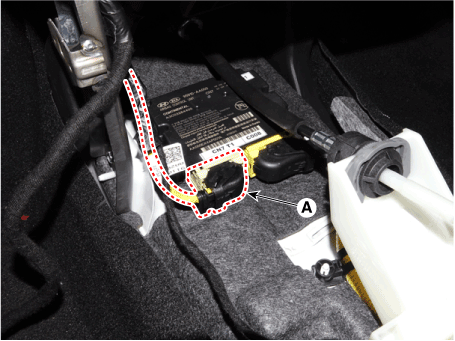
|
| 17. | Remove the rear air duct (A) and remove the floor carpet (B) from the rear. 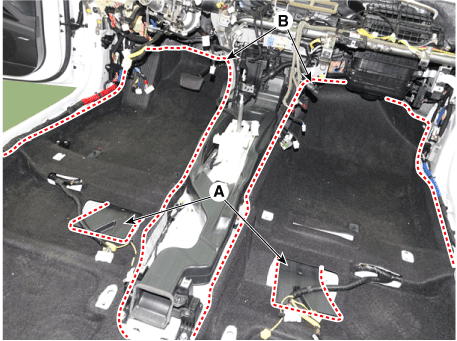
|
| 18. | Remove the rear air duct (A). 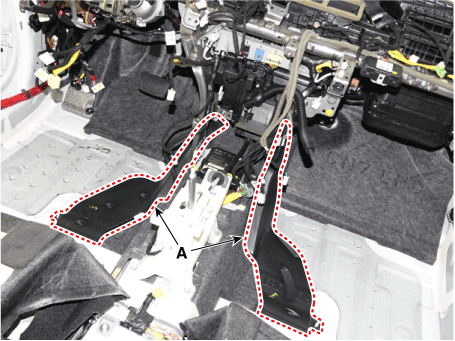
|
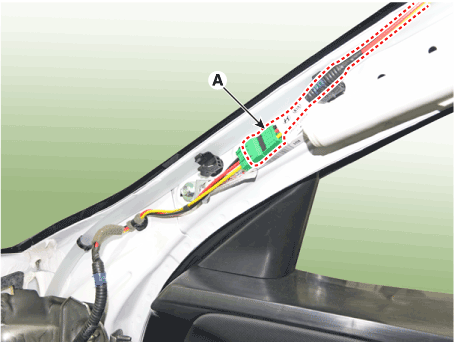
| 19. | Detach the various connector of front pillar (A). 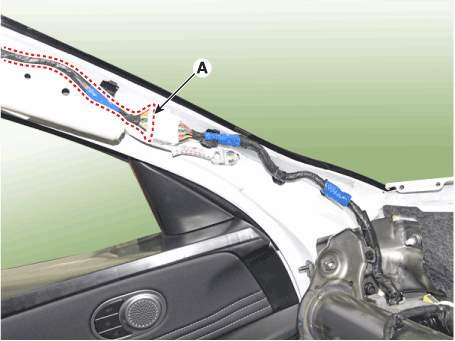
|
| 20. | Disconnect the junction box connectors (A). 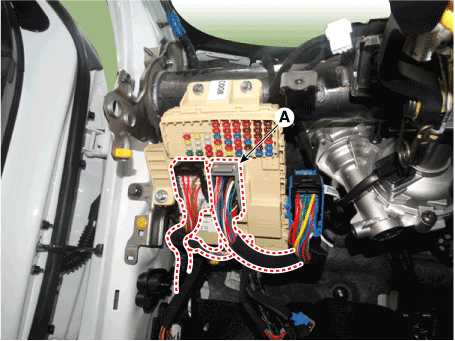
|
| 21. | Disconnect the multi box connectors (A). 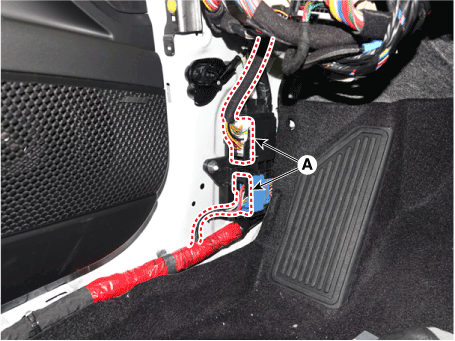
|
| 22. | Disconnect the heater & blower unit connectors. | (1) | Loosening the mounting screw, remove the driver shower duct (A). 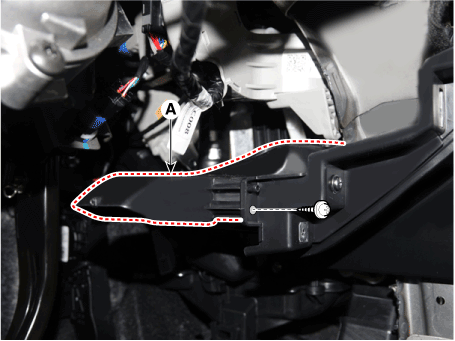
|
| (2) | Press the lock pin, separate the driver temperature actuator connector (A). 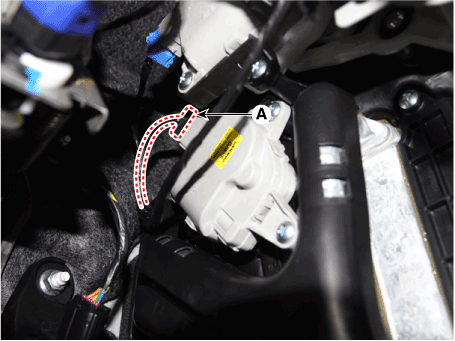
|
| (3) | Press the lock pin, separate the mode control actuator connector (A). 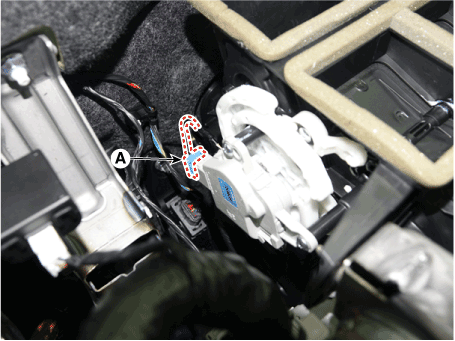
|
| (4) | Loosening the mounting screw, remove the passenger shower duct (A). 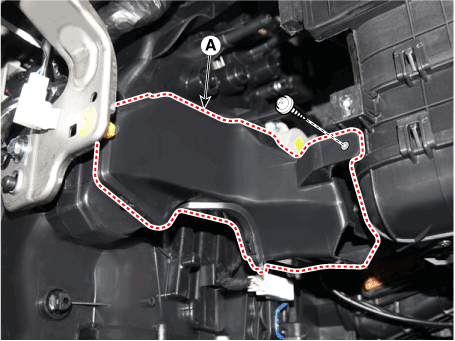
|
| (5) | Press the lock pin, separate the intake actuator connector (A). 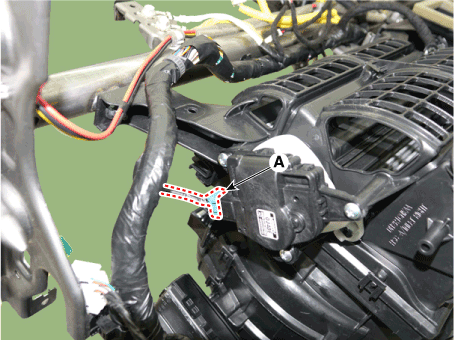
|
| (6) | Press the lock pin, separate the passenger temperature actuator connector (A). 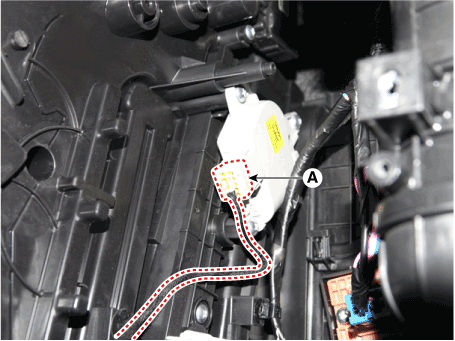
|
| (7) | Press the lock pin, separate the power mosfet connector (A). 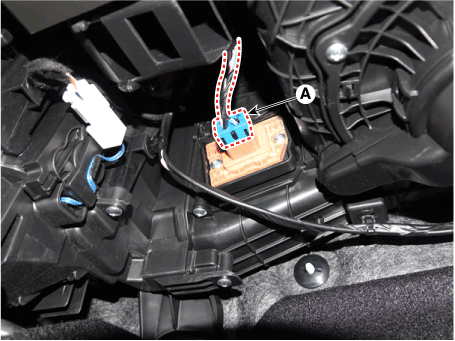
|
| (8) | Press the lock pin, separate the blower motor connector (A). 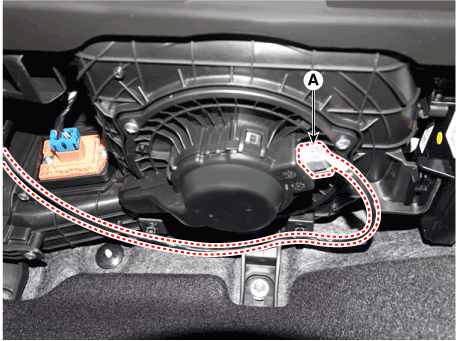
|
| (9) | Press the lock pin, separate the evaporator temperature sensor connector (A). 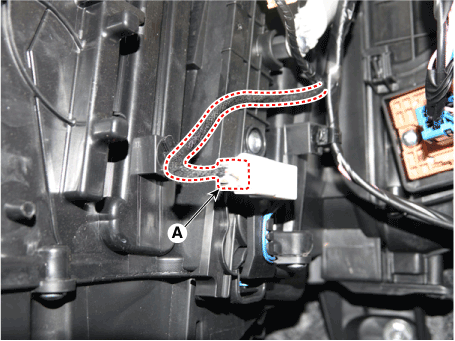
|
|
| 23. | Remove the integrated body control unit (IBU). (Refer to Body Electrical System - "Integrated Body control Unit (IBU)" |
| 24. | Loosening the cowl cross bar side mounting bolt (B) after loosening the plug hole (A). Tightening torque : 16.7 - 25.5 N.m (1.7 - 2.6 kgf.m, 12.3 - 18.8 lb-ft) |
|
| 25. | Loosen the mounting bolts, remove the cowl crossbar assembly (A). Tightening torque : 16.7 - 25.5 N.m (1.7 - 2.6 kgf.m, 12.3 - 18.8 lb-ft) |

|
| 26. | Install in the reverse order of removal. | •
| Make sure the crash pad fits onto the guide pins correctly. |
| •
| Before tightening the bolts, make sure the crash pad wire harnesses are not pinched. |
| •
| Make sure the connectors are plugged in properly, and the antenna lead is connected properly. |
| •
| Enter the anti- theft code for the radio, then enter the customer`s radio station presets. |
| •
| Make sure that each of the assembly components operates properly. |
| •
| Replace any damaged clips (pin-type retainers). |
|
|
Components and components location
Components[This illustration shows the LHD type. RHD type is symmetrical.]1. Floor console side cover [LH]2. Floor console side cover [RH]3. Floor console upper c ...
Components and components location
Components[General Type]1 . Roof trim 2 . Sunvisor [LH] 3. Sunvisor [RH] 4. Assist handle bracket[Sunroof Type]1 . Roof trim 2 . Sunvisor [LH] 3. Sunvisor [RH] 4. ...
 Hyundai Elantra CN7: Crash Pad


