 Hyundai Elantra CN7: Audio
Components and components location
| Component Location |
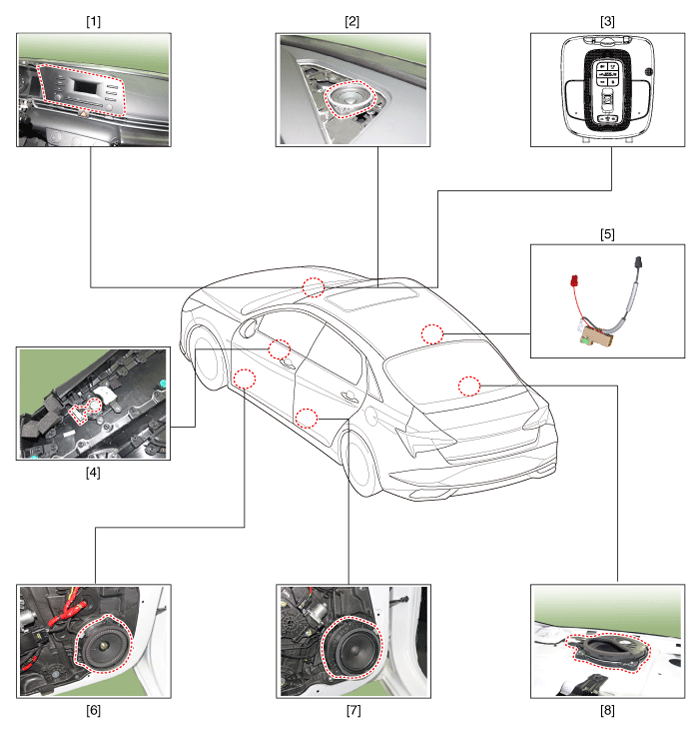
| 1. Audio unit 2. Center speaker 3. Hands-free mic (Built-in overhead console) 4. Tweeter speaker | 5. Glass antenna amplifier 6. Front door speaker 7. Rear door speaker 8. Woofer speaker |
Specifications
| Specifications |
Audio
|
Items
|
AUDIO
|
| Model | RADIO/MP3 |
| Power supply | DC 14.4V |
| Parasitic current | Max 21W X 4 |
| Antenna | 80PF 75Ω |
| Tuning type | PLL SYNTHESIZED TUNING |
Audio Unit
Components and components location
| Components |
Audio
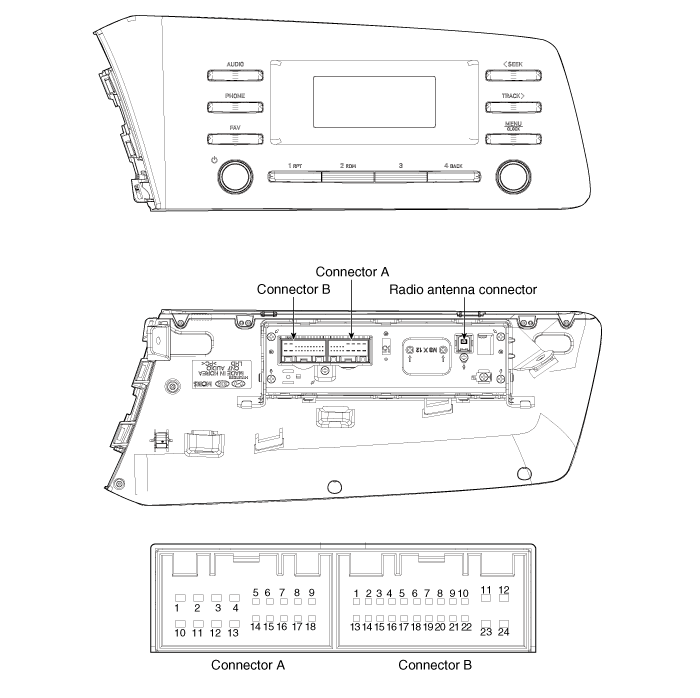
Connector Pin Information
|
No
|
Connector A
|
Connector B
|
| 1 | Rear left speaker (+) | MM_CAN High |
| 2 | Front left speaker (+) | - |
| 3 | Front right speaker (+) | - |
| 4 | Rear right speaker (+) | Steering wheel remote |
| 5 | - | - |
| 6 | Door open | USB DATA (+) |
| 7 | IGN1 | USB VOC |
| 8 | Illumination (+) | - |
| 9 | Detent | - |
| 10 | Rear left speaker (-) | Mic (+) |
| 11 | Front left speaker (-) | ACC |
| 12 | Front right speaker (-) | B+ |
| 13 | Rear right speaker (-) | MM_CAN Low |
| 14 | - | - |
| 15 | - | - |
| 16 | - | Vehicle Speed |
| 17 | Illumination (-) | Steering wheel remote GND |
| 18 | - | USB DATA (-) |
| 19 | USB GND | |
| 20 | - | |
| 21 | - | |
| 22 | Mic (-) | |
| 23 | - | |
| 24 | GND |
[Display Audio]
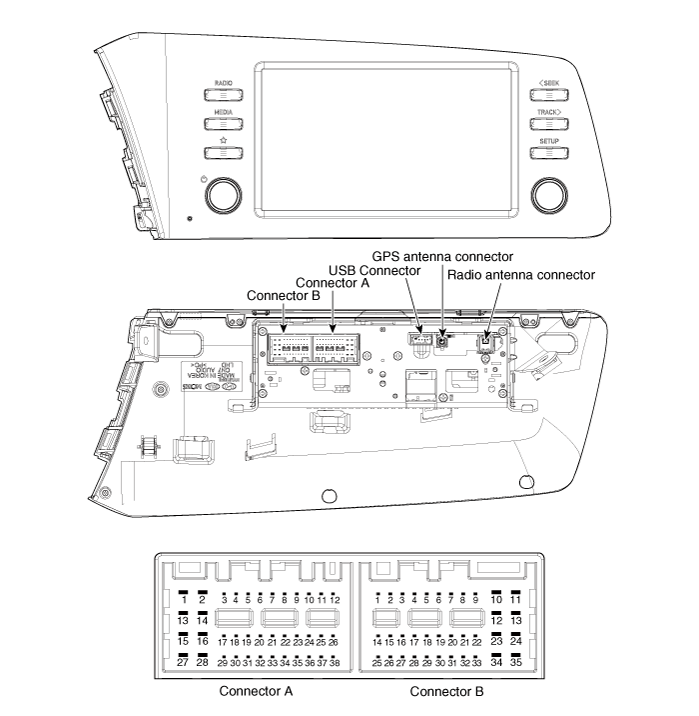
Connector Pin Information
|
No
|
Connector A (Int AMP)
|
Connector A (Ext AMP)
|
Connector B
|
| 1 | Rear left speaker (+) | - | - |
| 2 | Reart left speaker (-) | - | MIC Signal (+) |
| 3 | - | AMP Navi Voice (+) | - |
| 4 | - | AMP SPDIF (HI) | - |
| 5 | - | - | Antenna Powr |
| 6 | Camera Power | Camera Power | ILL (+) |
| 7 | Camera Video | Camera Video | MM CAN (HI) |
| 8 | - | - | - |
| 9 | - | - | - |
| 10 | - | - | B+ |
| 11 | - | - | B+ |
| 12 | Steering wheel remote | Steering wheel remote | GND |
| 13 | Front lift speaker (+) | - | GND |
| 14 | Front lift speaker (-) | - | MIC GND |
| 15 | Front right speaker (-) | - | MIC Signal (-) |
| 16 | Front right speaker (+) | - | - |
| 17 | - | AMP Navi Voice (-) | - |
| 18 | - | AMP SPDIF (LOW) | - |
| 19 | - | AMP SPDIF GND | - |
| 20 | Camera Power GND | Camera Power GND | MM CAN (LOW) |
| 21 | Camera Video GND | Camera Video GND | - |
| 22 | - | - | ACC |
| 23 | - | - | - |
| 24 | - | - | - |
| 25 | - | - | - |
| 26 | Steering wheel remote GND | Steering wheel remote GND | - |
| 27 | Rear right speaker (-) | - | - |
| 28 | Rear right speaker (+) | - | - |
| 29 | - | - | - |
| 30 | - | - | - |
| 31 | - | - | - |
| 32 | - | - | - |
| 33 | - | - | IGN 1 |
| 34 | - | - | - |
| 35 | - | - | - |
| 36 | - | - | |
| 37 | - | - | |
| 38 | Speed | Speed |
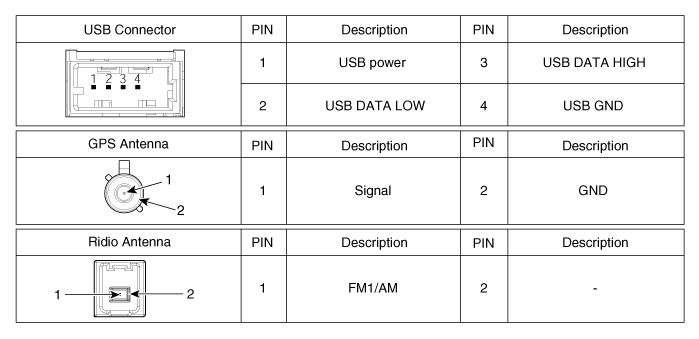
Repair procedures
| Removal |
|
| 1. | Disconnect the negative (-) battery terminal. |
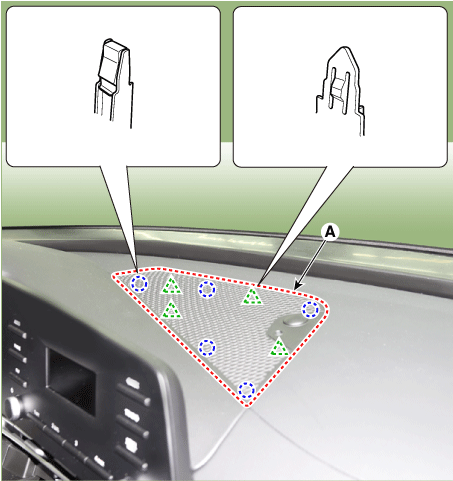
| 2. | Using a flat-tip screwdriver or remover, remove the photo sensor cover (A).
|
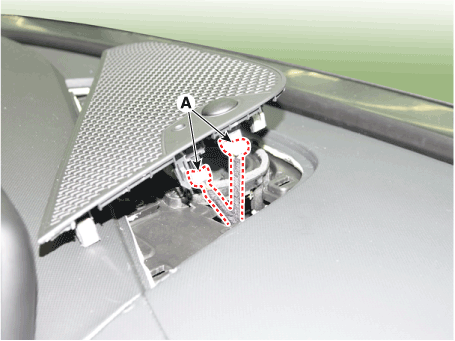
| 3. | Disconnect photo sensor connector and security sensor connector (A).
|
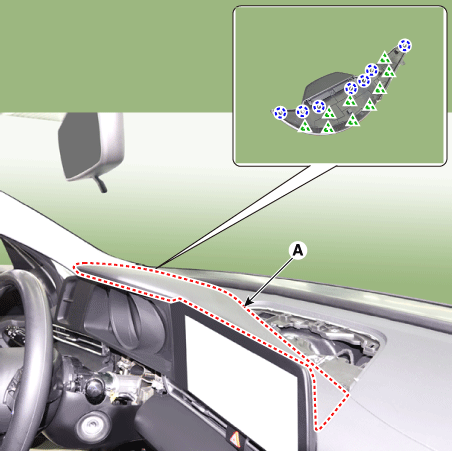
| 4. | Using a flat-tip screwdriver or remover, remove the cluster fascia upper garnish (A).
|
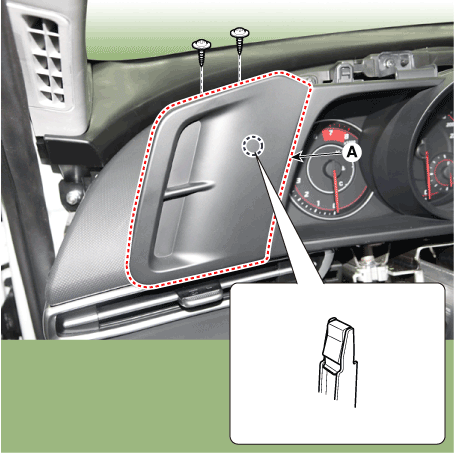
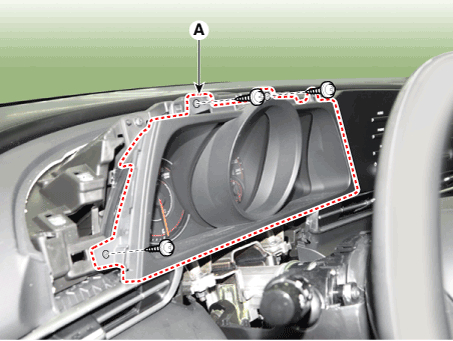
| 5. | Remove the cluster fascia side panel (A) after mounting screws.
|
| 6. | Remove the cluster fascia panel (A) after loosening mounting screws.
|
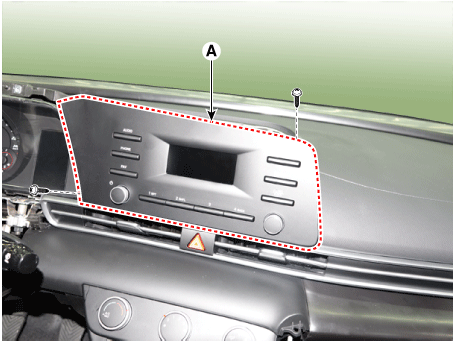
| 7. | Remove the audio head unit (A) after loosening the screws.
|
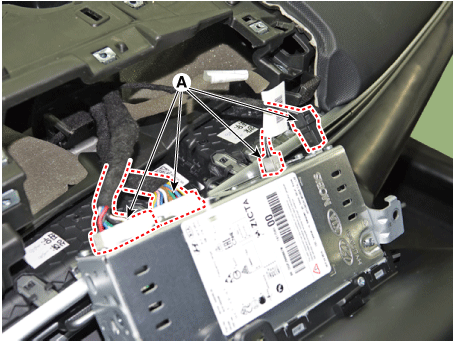
| 8. | Remove the audio head unit after disconnecting the connectors and cable (A).
|
| Installation |
| 1. | Connect the audio unit connectors and cable. |
| 2. | Install the audio head unit. |
| 3. | Install the cluster fascia panal. |
| 4. | Install the cluster fascia side panal. |
| 5. | Install the cluster fascia upper garnish. |
| 6. | Install the photo sensor cover. |
| 7. | Connect the negative (-) battery terminal.
|
Speakers
Repair procedures
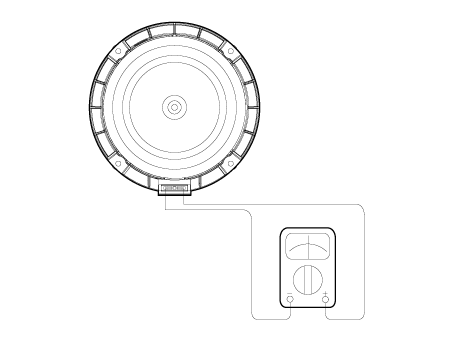
| Inspection |
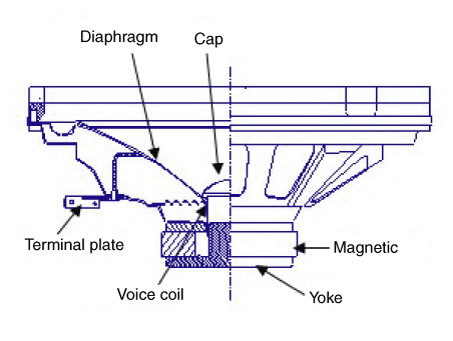
| 1. | Troubleshooting for Speaker
|
| Removal |
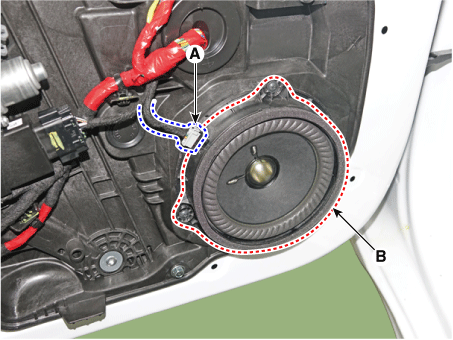
[Front Door Speakers]
| 1. | Disconnect the negative (-) battery terminal. |
| 2. | Remove the front door trim. (Refer to Body - "Front Door Trim") |
| 3. | Remove the front door speaker (B) after disconnecting the connector (A) and loosening screws.
|
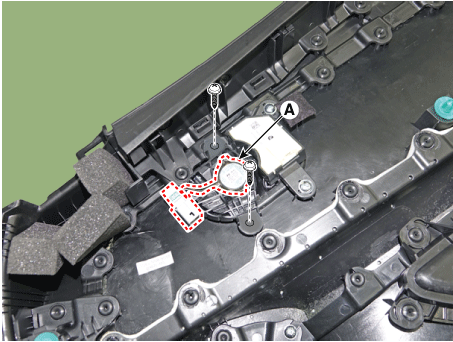
[Front Door Tweeter Speaker]
| 1. | Disconnect the negative (-) battery terminal. |
| 2. | Remove the front door trim. (Refer to Body - "Front Door Trim") |
| 3. | Remove the tweeter speaker (A) after loosening screws.
|
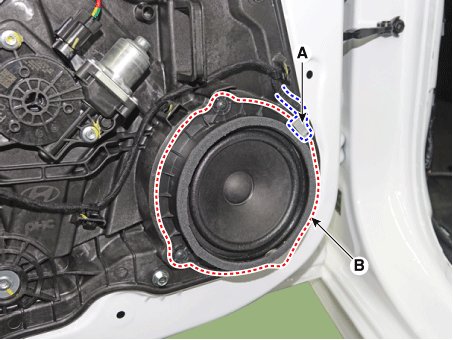
[Rear Door Speakers ]
| 1. | Disconnect the negative (-) battery terminal. |
| 2. | Remove the rear door trim. (Refer to Body - "Rear Door Trim") |
| 3. | Remove the rear door speaker (B) after disconnecting the connector (A) and loosening screws.
|
| Installation |
Front Door Speaker
| 1. | Install the front door speaker. |
| 2. | Install the front door trim. |
| 3. | Connect the negative (-) battery terminal. |
Front Door Tweeter Speakers
| 1. | Install the front door tweeter speaker. |
| 2. | Install the front door trim. |
| 3. | Connect the negative (-) battery terminal. |
Rear Door Speaker
| 1. | Install the rear door speaker. |
| 2. | Install the front door trim. |
| 3. | Connect the negative (-) battery terminal. |
|
Antenna
Repair procedures
| Inspection |
Glass Antenna Test
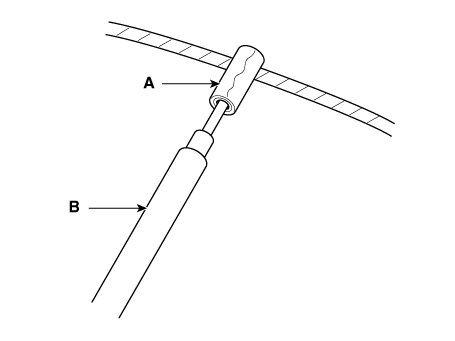
| 1. | Wrap aluminum foil (A) around the tip of the tester probe (B) as shown.
|
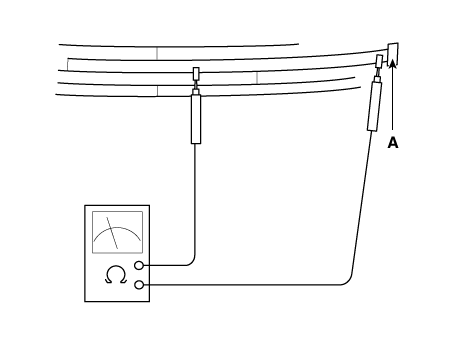
| 2. | Touch one tester probe to the glass antenna terminal (A) and move the other tester probe along the antenna wires to check that continuity exists.
|
Glass Antenna Repair
|
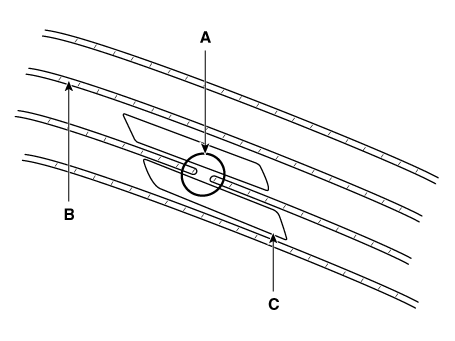
| 1. | Lightly rub the area around the broken section (A) with fine steel wool, and then clean it with alcohol.
|
| 2. | Carefully mask above and below the broken portion of the glass antenna wire (B) with cellophane tape (C). |
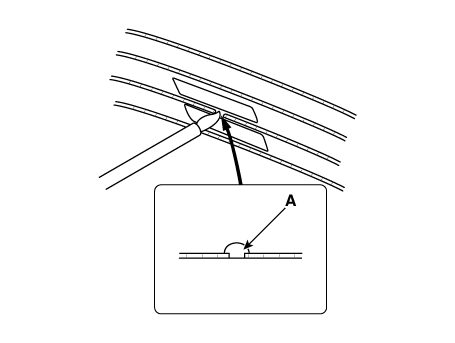
| 3. | Using a small brush, apply a heavy coat of silver conductive paint (A) extending about 1/8″on both sides of the break. Allow 30 minutes to dry.
|
| 4. | Check for continuity in the repaired wire. |
| 5. | Apply a second coat of paint in the same way. Let it dry three hours before removing the tape. |
Glass Antenna Circuit Inspection
| 1. | Remove the rear pillar trim. (Refer to Body - "Rear Pillar Trim") |
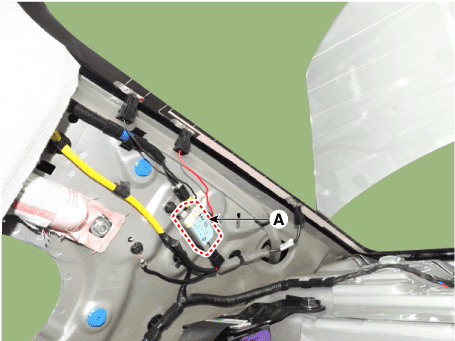
| 2. | Disconnect the antenna amp power connector from the glass antenna amp (A).
|
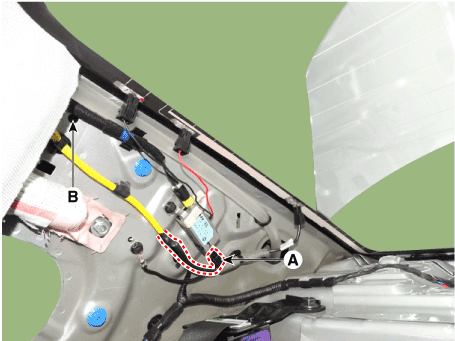
| 3. | Turn the radio ON. Measure the voltage between terminals of the antenna amp power connector (A) and body ground (B).
|
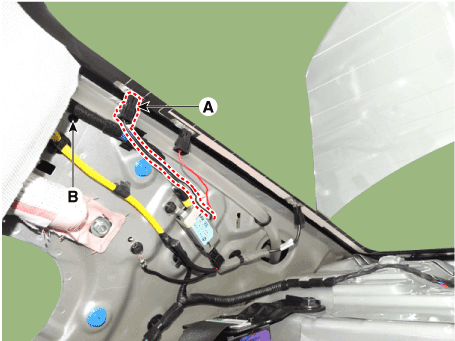
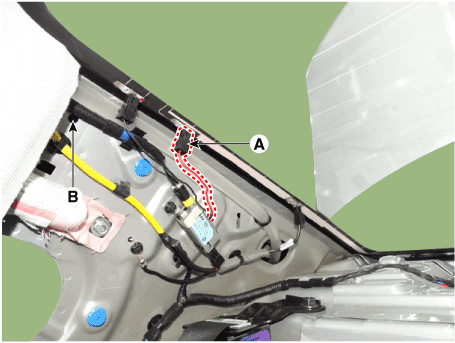
| 4. | Check for radio antenna wire resistance between terminals of the antenna connector (A) and body ground (B).
|
| 5. | Check the grid lines for continuity. |
| 6. | When a poor radio reception is not repaired through the above inspection methods, replace the amp. If the radio reception is still poor, check the radio cable for short and radio head unit for failure. |
Antenna Cable
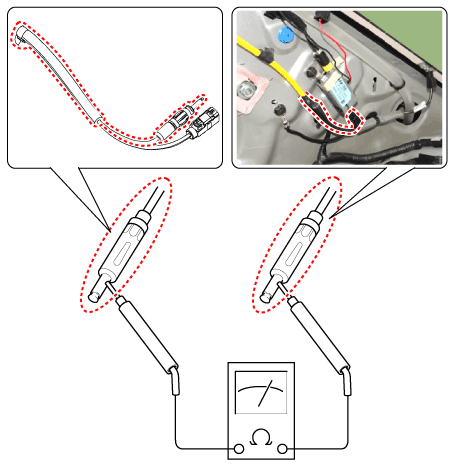
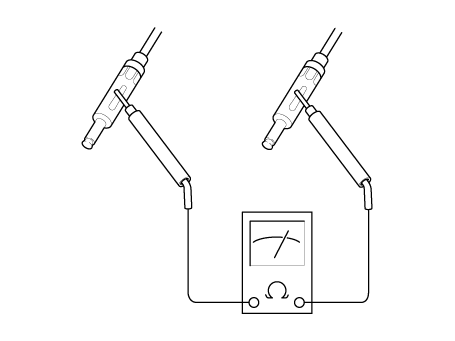
| 1. | Check for continuity between the center poles of antenna cable.
|
| 2. | Check for continuity between the outer poles of antenna cable. There should be continuity.
|
| 3. | If there is no continuity, replace the antenna cable. |
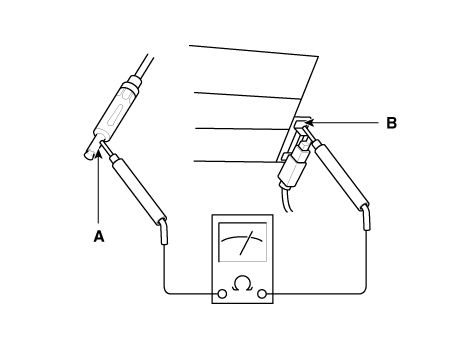
| 4. | Check for continuity between the center pole (A) of antenna cable and terminal of glass antenna (B). There should be continuity.
|
| 5. | If there is no continuity, replace the antenna amplifier. |
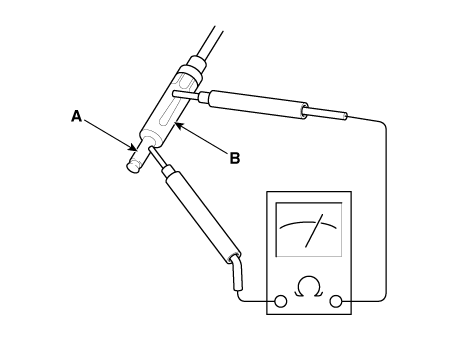
| 6. | Check for continuity between the center pole (A) and outer pole (B) of antenna cable. There should be no continuity.
|
| 7. | If there is continuity, replace the antenna cable. |
Audio Remote Control
Components and components location
| Components |
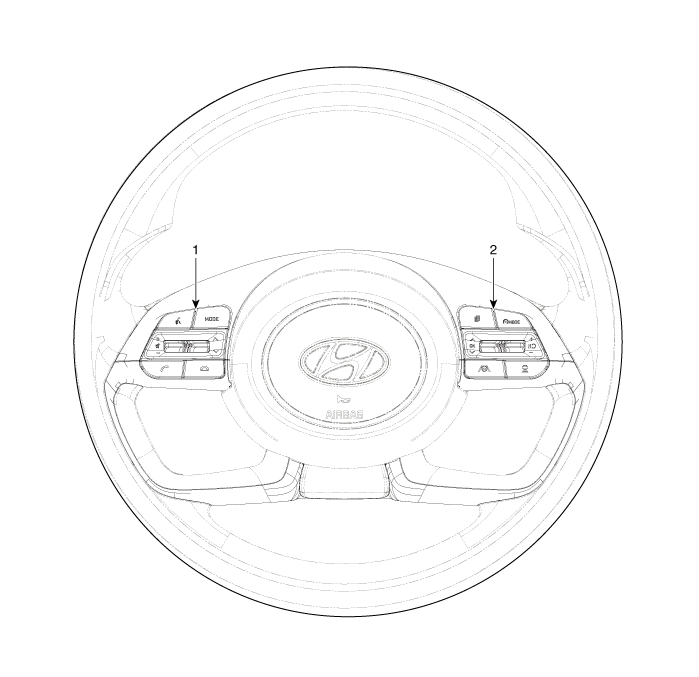
| 1. Left Remote Control Switch (Audio + Bluetooth) | 2. Right Remote Control Switch (Cruise + Trip) |
Schematic diagrams
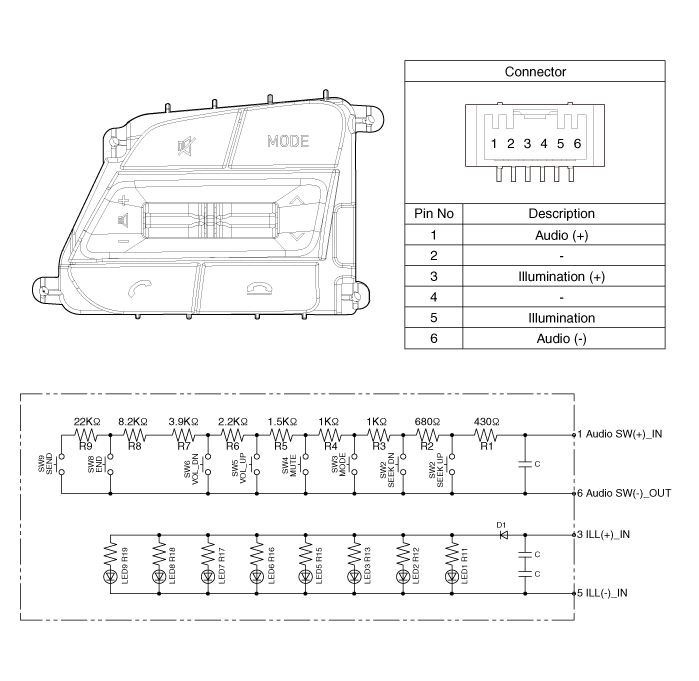
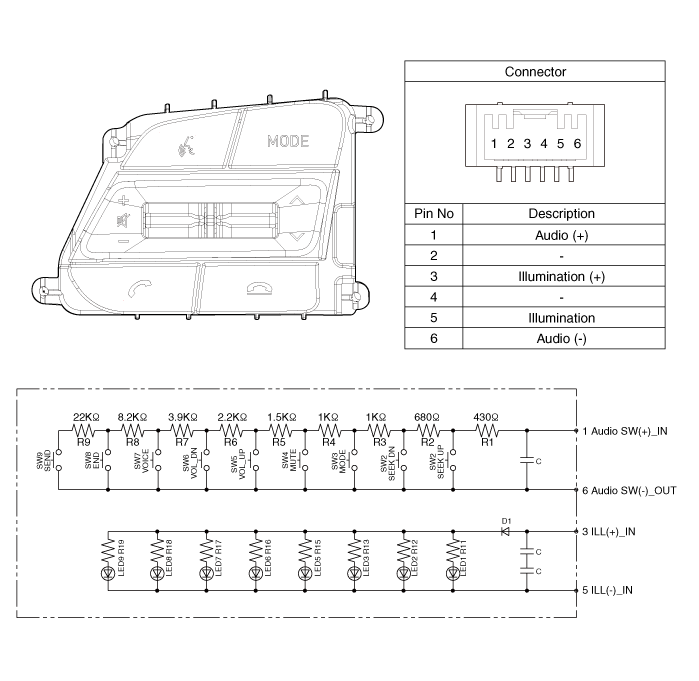
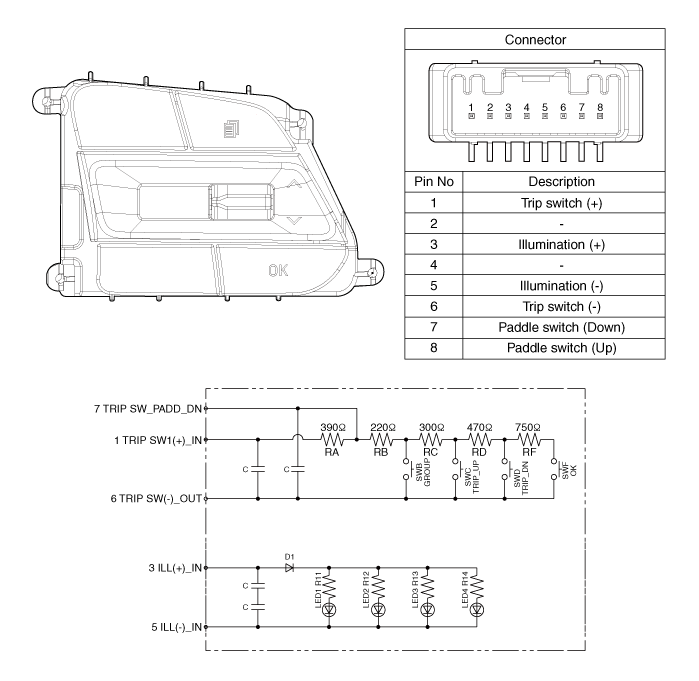
| Circuit Diagram |
| [Without paddle shift] |
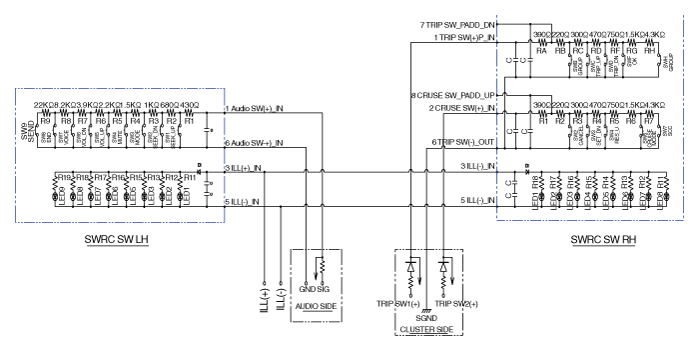
| [With paddle shift] |
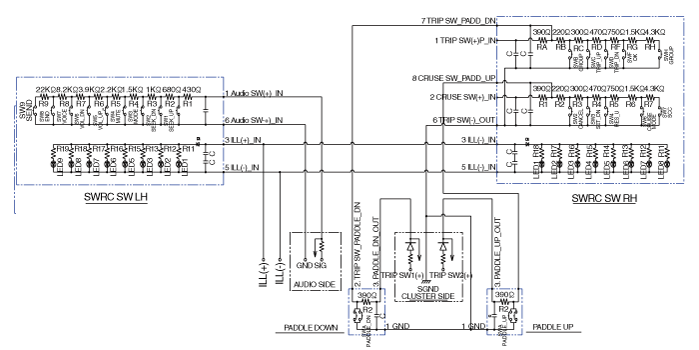
[Audio + B/Tooth]
[Audio + B/Tooth + Voice]
[Trip]
[Trip / Cruise]
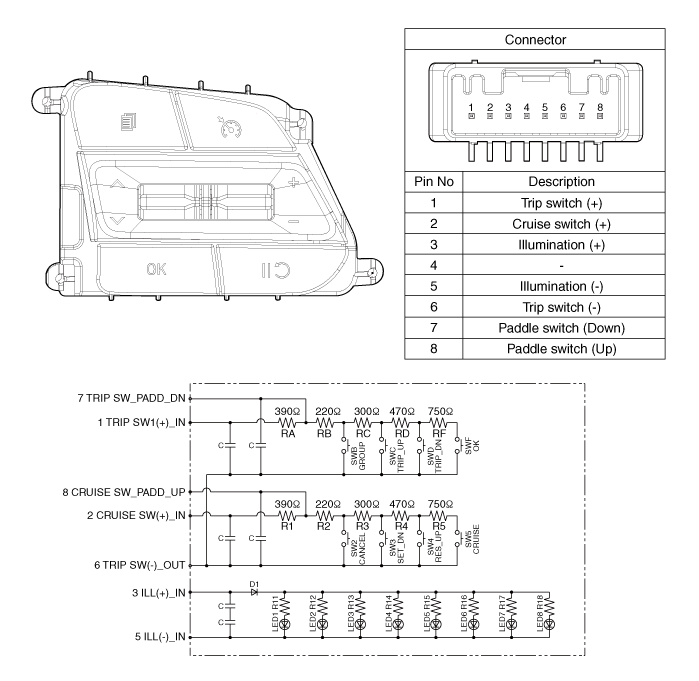
[Trip + Cruise + LFA)
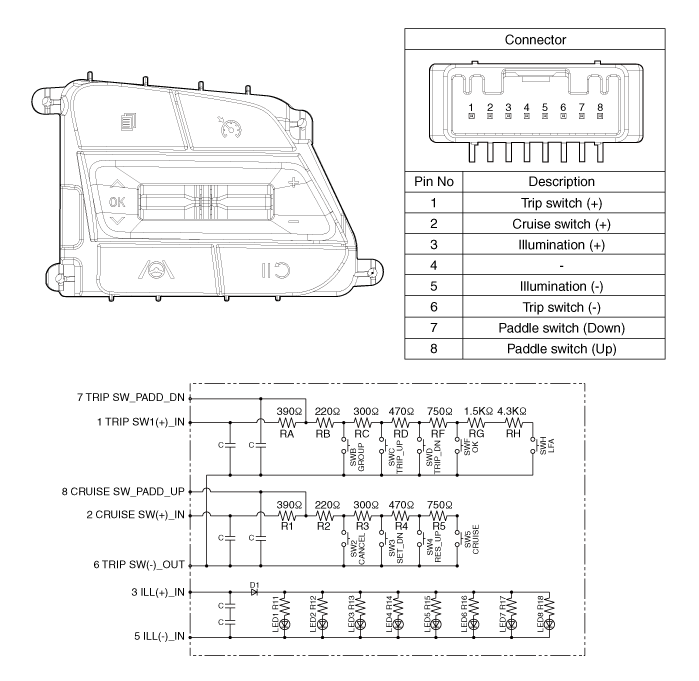
[Trip + Cruise + LFA + MSLA)
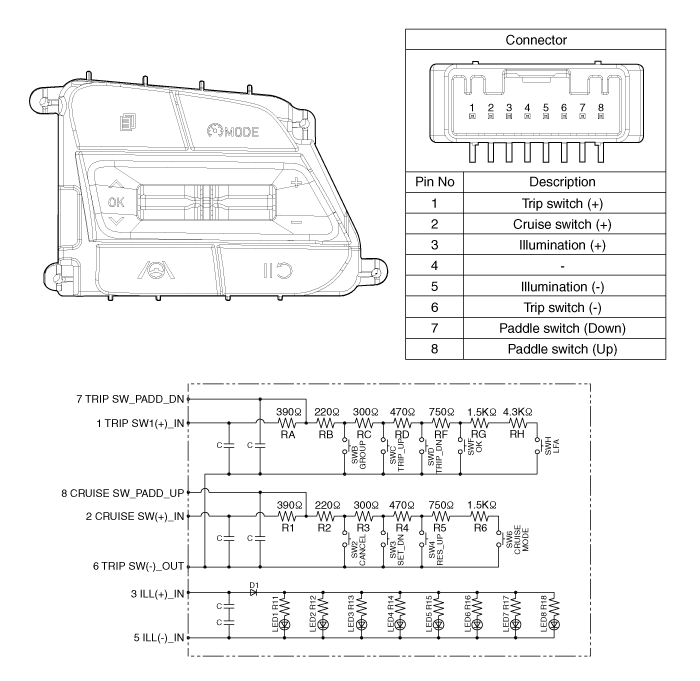
[Trip + Smart Cruise + LFA)
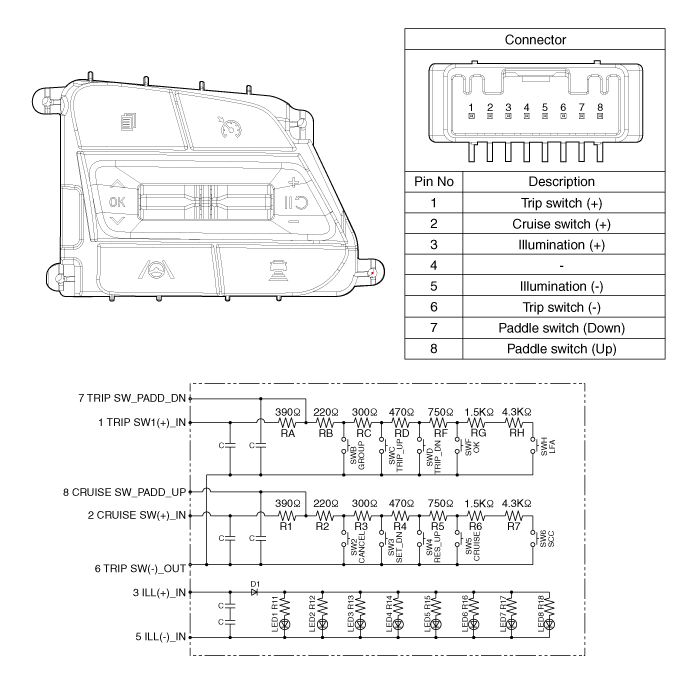
[Trip + Smart Cruise + LFA + MSLA)
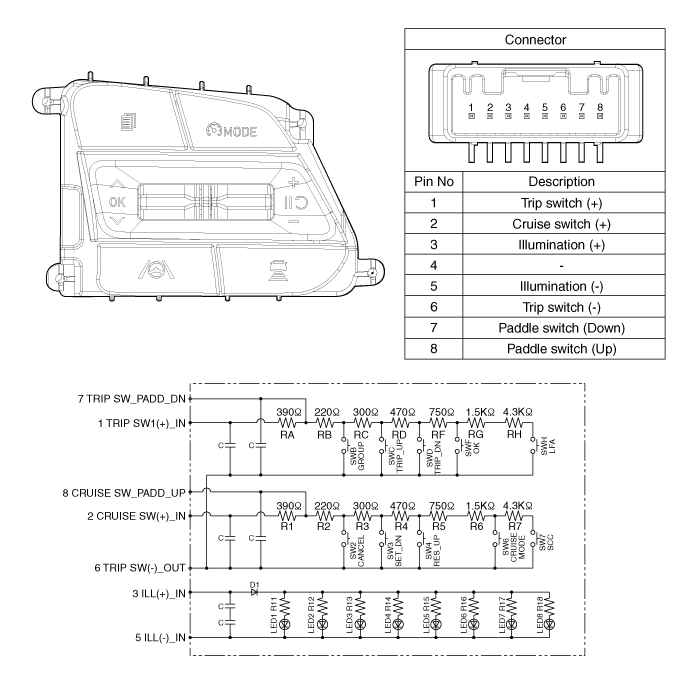
Repair procedures
| Inspection |
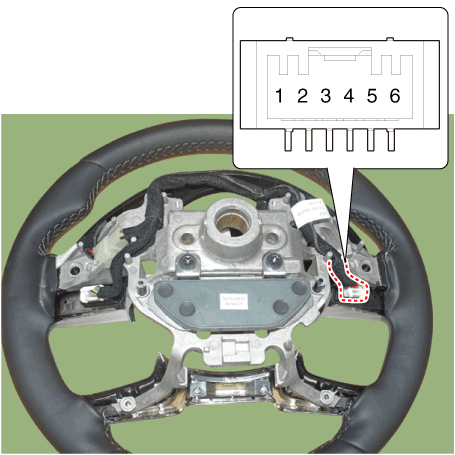
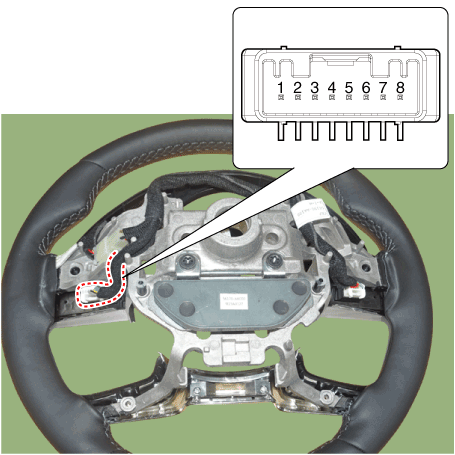
| 1. | Check for resistance between terminals in each switch position (LH).
[LH : Audio + Hands free]
|
| 2. | Check for resistance between terminals in each switch position (RH).
[Cruise]
[Trip]
|
| Removal |
| 1. | Disconnect the negative (-) battery terminal. |
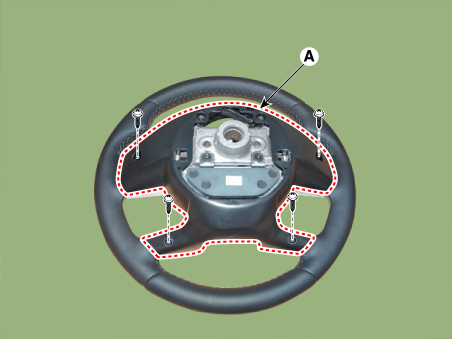
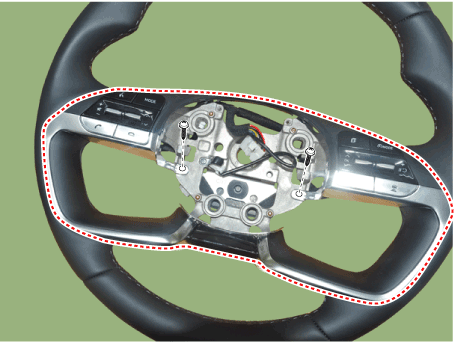
| 2. | Remove the steering wheel assembly. (Refer to Steering System - "Steering Wheel") |
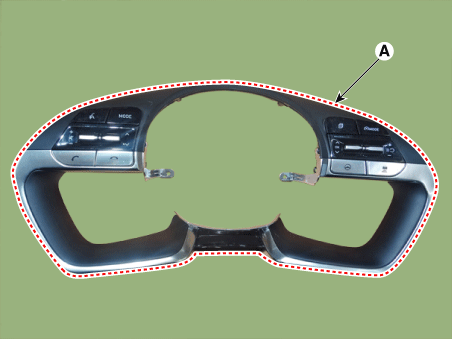
| 3. | Remove the steering back cover (A).
|
| 4. | Remove the steering remote control connector (A).
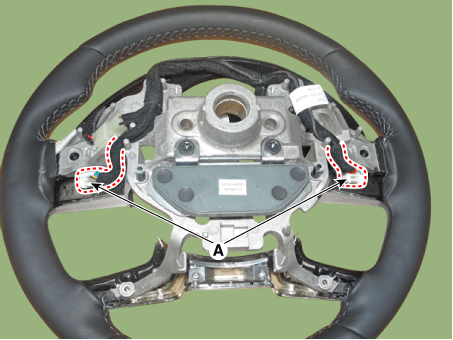
|
| 5. | Remove the steering remote control switch (A) after loosening the screws.
|
| Installation |
| 1. | Install the steering wheel remote control after connecting the connector. |
| 2. | Install the steering wheel. |
| 3. | Connect the negative (-) battery terminal. |
USB Jack
Description and operation
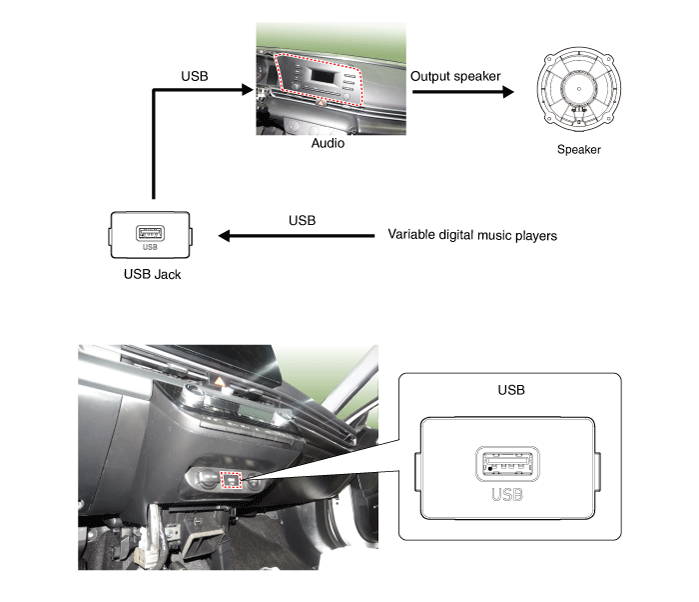
| Description |
The multimedia jack on the console upper cover is for customers who like to listen to external portable music players like the MP3 etc., through the vehicle's sound system when it is linked to this jack.
Schematic diagrams
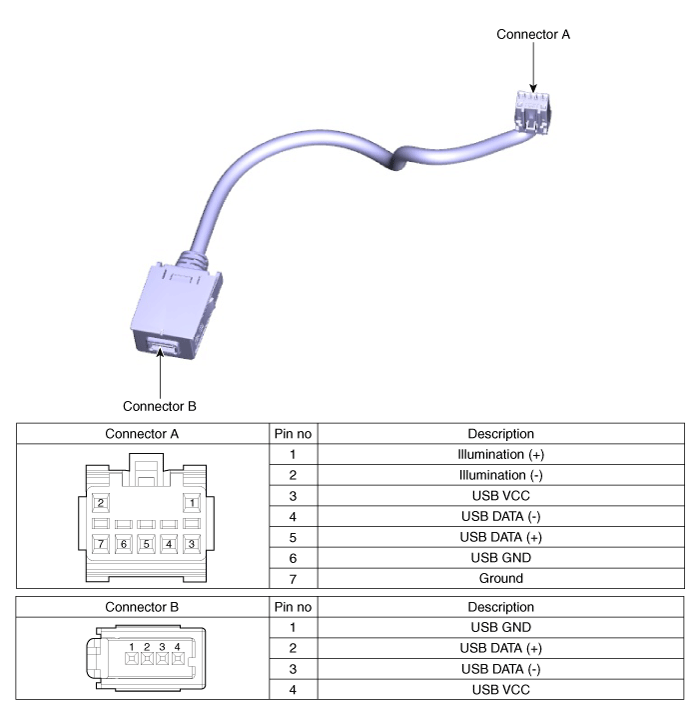
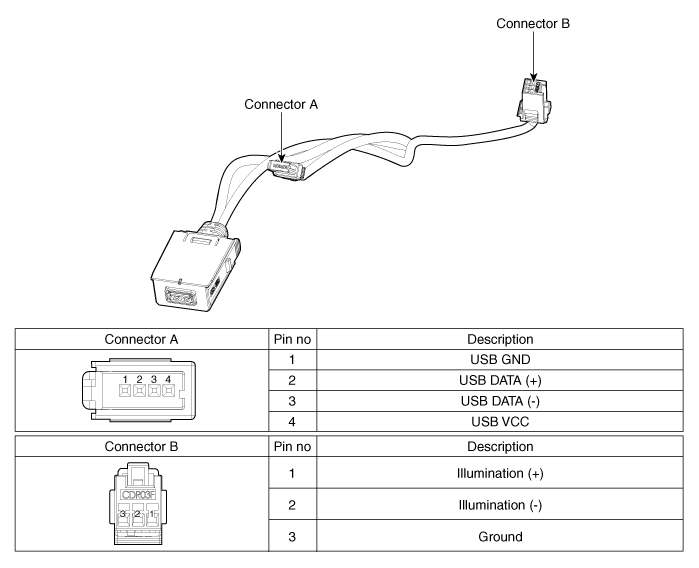
| Circuit Diagram |
Audio
Display Audio
Repair procedures
| Removal |
| 1. | Disconnect the battery (-) terminals. |
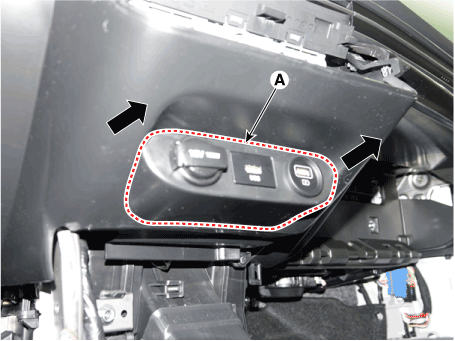
| 2. | Remove the floor console assembly. (Refer to Body - "Floor Console Assembly") |
| 3. | Remove the USB port assembly (A).
|
| 4. | Remove the audio unit. (Refer to Audio - "Audio Unit") |
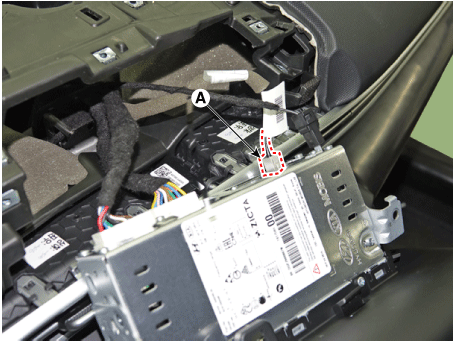
| 5. | Disconect the USB connector (A).
|
| 6. | Disconect the USB connector (B). [Display Audio only]
|
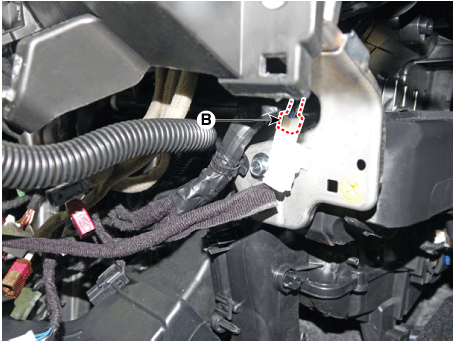
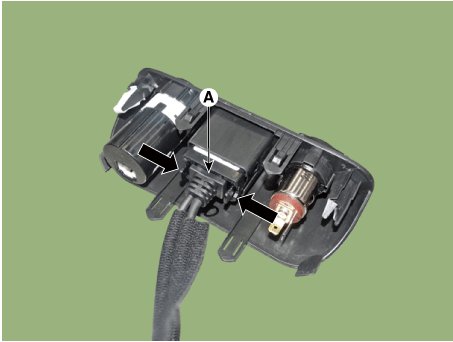
| 7. | Remove the USB jack (A) after releasing the fixed hooks.
|
| Installation |
| 1. | Connect the USB jack connector. |
| 2. | Install the audio unit. |
| 3. | Install the USB jack. |
| 4. | Install the USB port assembly. |


