 Hyundai Elantra CN7: Motor Driven Power Steering
Description and operation
| Description |
MDPS (Motor Dirven Power Steering) system uses an electric motor to assist the steering force and it is an engine operation independent steering system.
MDPS control module controls the motor operation according to information received from the each sensor and CAN (Controller Area Network),
resulting in a more precise and timely control of steering assist than conventional engine-driven hydraulic systems. Components (Steering Angle Sensor, Torque Sensor, Fail-safe relay, etc.) of the MDPS system are located inside the steering column. MDPS unit assembly, steering column, and MDPS unit assembly must not be disassembled for inspection. They must be replaced if necessary.
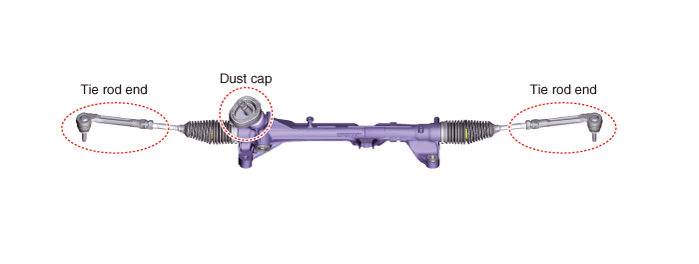
Components and components location
| Components |

| 1. Steering wheel 2. Steering column 3. MDPS power pack 4. Universal joint | 5. Dust cap 6. Tie rod end 7. Bellows 8. Steering gear box |
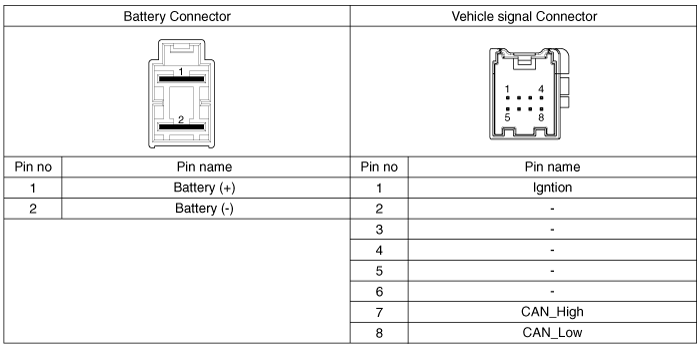
Schematic diagrams
| Schematic Diagrams |
C-MDPS
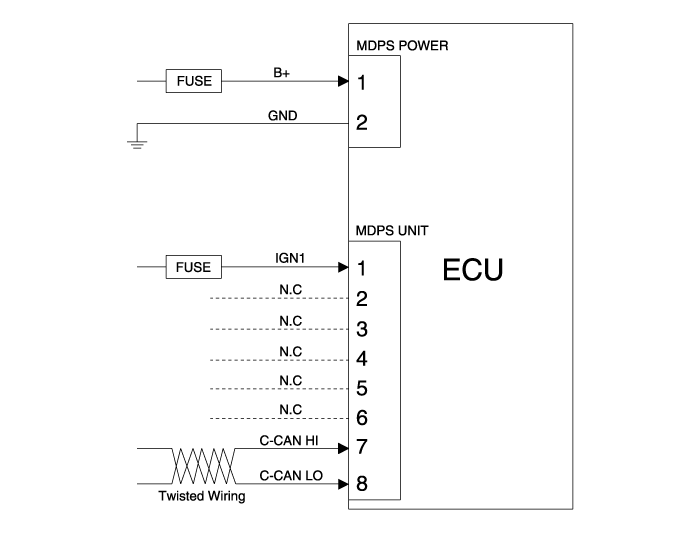
| Terminal function |
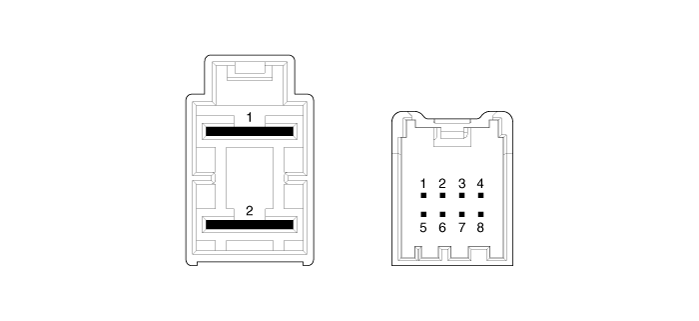
|
Type
|
Pin No
|
Description
|
| Battery | 1 | Battery + |
| 2 | Battery - | |
| VSS | 1 | IGN |
| 2 | - | |
| 3 | - | |
| 4 | - | |
| 5 | - | |
| 6 | - | |
| 7 | HIGH CAN | |
| 8 | LOW CAN |
Repair procedures
| A/S Repair produres |
MDPS System A/S Workflow
※ For detailed DTC or other DTC A/S procedures, see "CN7 MDPS DTC Diagnostic Guide"
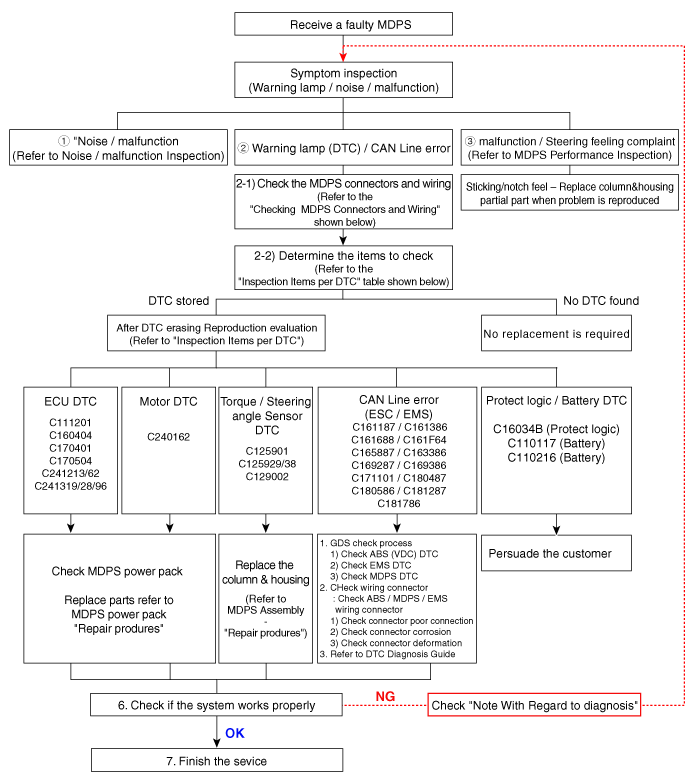
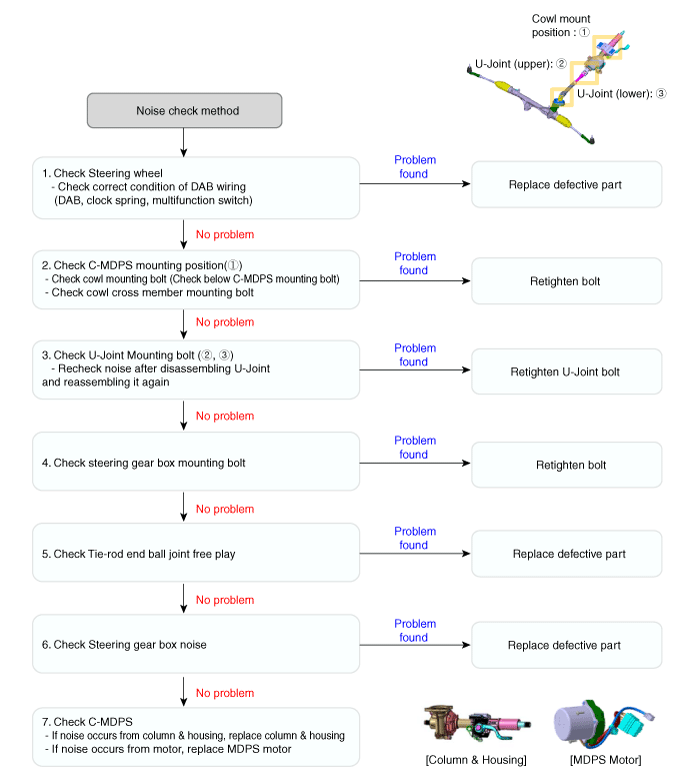
① Noise / malfunction Inspection
② Warning lamp (DTC) / CAN Line error
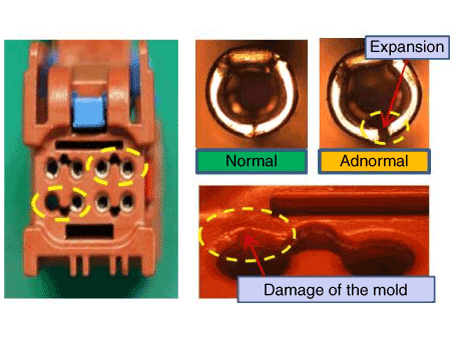
2 - 1 Checking Connectors and Wiring
| 1. | Checking Connectors and Wiring. Check for damage, push-back, or improper connection in each connector and wiring.
|

2 - 2 Inspection Items per DTC
※ For detailed DTC or other DTC A/S procedures, see "CN7 MDPS DTC Diagnostic Guide"
| DTC | Problem | First analysis method | How to repair |
| C129002 | Torque sensor signal error | First erase DTC, | When the sensor connector flows, the warning lamp reoccurs Replace the sensor cable, and replace the column & housing (56390) |
| check connector connection | |||
| C125901 | Steering angle signal error | Earase DTC after resetting Steering angle zero point | |
| C125929 | check connector connection | ||
| C125938 | |||
| C111201 | Torque sensor power supply error | First erase DTC, check connector connection | When the sensor connector flows, the warning lamp reoccurs Replace the sensor cable, and replace the power pack (56370) |
| C160404 | ECU hardware error | Check after erasing the DTC | In case of reoccurrence, replace MDPS power pack (56370) |
| C170401 | Relay breaking of a wire | ||
| C170504 | ECU over/discharge error | ||
| C241216 | Motor circuit break / short | ||
| C241262 | Motor current error | ||
| C241319 | Over current error | ||
| C241328 | Motor electric current gate error | ||
| C241396 | Broken the motor current sensor | ||
| C240162 | Motor circuit error | ||
| C126154 | Steering angle zero point error | Check after resetting Steering angle zero point | Resetting Steering angle zero point or replace column & housing (56390) |
| Check sensor connector poor connect | |||
| C161187 | Not received the EMS CAN message | 1. Check chassis CAN condition | |
| C161F64 | Vehicle speed monitoring error | 2. Check connector connection | Earase DTC (No MDPS replacement) |
| C161F86 | Vehicle speed signal error | 3. Check engine ECU | |
| C161688 | CAN BUS OFF | 4. Start OFF history confirmation message while driving | |
| C162887 | Not received the cluster CAN signal | 2. Check cluster connector connection | |
| C163386 | Cluster display vehicle speed error | ||
| C169287 | Not received the VSM message | Check ESC, check chassis CAN condition | |
| C169386 | ESC signal error | ||
| C171101 | ECU abnormal end | Recheck after erasing the DTC | |
| C180487 | Cannot be received the LKA message | Check LKA, check CAN line | |
| C180586 | LKA signal error | ||
| C181287 | Not received the gateway CAN message | Check gateway | |
| C181786 | Gateway CAN signal error |
③ MDPS Performance Inspection
| 1. | Inspect steering angle and DTCs relevant to the steering system. |
| 2. | Inspection for heavy steering effort
|
④ MDPS common problems
| Case 1 | Case 2 | Case 3 |
|
|
|
| Multifunction switch noise | Clock spring noise | DAB / Wire noise |
| Retighten the bolt | Replace clock spring | Rearrange and replace DAB |
| Case 4 | Case 5 | Case 6 |
|
|
|
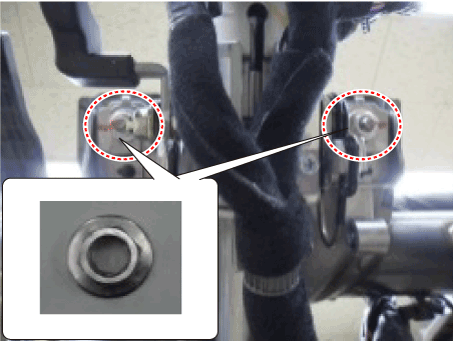
| Multifunction switch noise | MB nut mount defect | M10 nut mount defect |
| Replace multifunction switch | Retighten nut | Retighten nut |

| Case 7 | Case 8 |
|
|
| Cowl top bolt mount defect | Cowl bar nut mount defect |
| Retighten cowl top bolt | Replace clock spring |
Cautions to be taken when handling the MDPS (Motor Driven Power Steering)
|

MDPS PowerPack Assembly
Repair procedures
| Replacement |
| 1. | Turn the steering wheel so that the front wheels are placed in the straight ahead position.
|
| 2. | Turn the ignition switch OFF and disconnect the battery negative (-) cable.
|

| 3. | Remove driver airbag (DAB) module. (Refer to Restraint - "Driver Airbag (DAB) Module and Clock Spring") |
| 4. | Remove the steering wheel. (Refer to Steering System - "Steering Wheel") |
| 5. | Remove the clock spring. (Refer to Restraint - "Driver Airbag (DAB) Module and Clock Spring") |
| 6. | Remove the steering column shroud panel. (Refer to Body - "Steering Column Shroud Panel") |
| 7. | Remove the crash pad lower panel. (Refer to Body - "Crash Pad") |
| 8. | Remove the brake booster. (Only RHD) (Refer to Brake System - "Brake Booster") |
| 9. | Remove the brake pedal. (Only RHD) (Refer to Brake System - "Brake Pedal") |
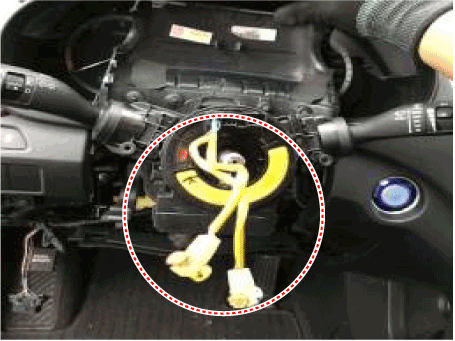
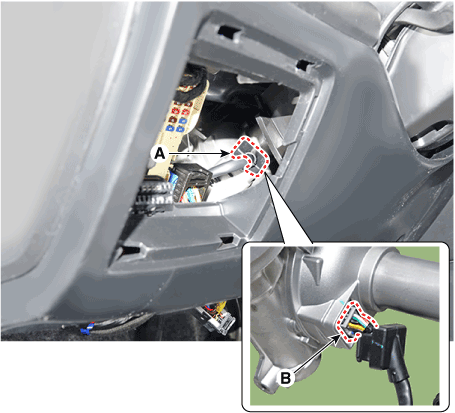
| 10. | Disconnect the MDPS connector (A).
|
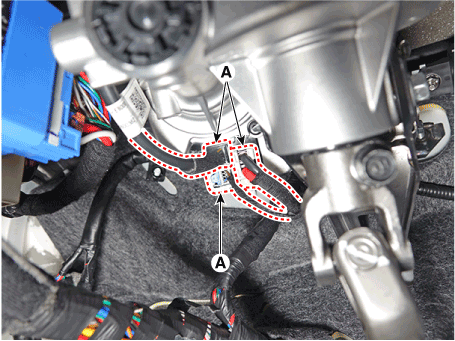
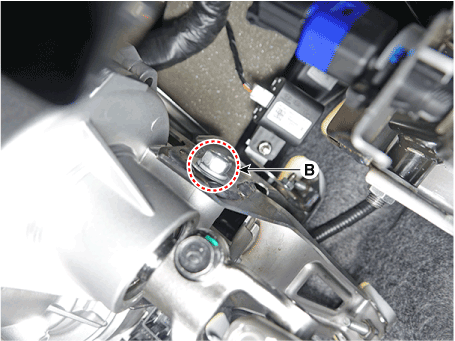
| 11. | Remove the wiring clip (A) from the steering column.
|
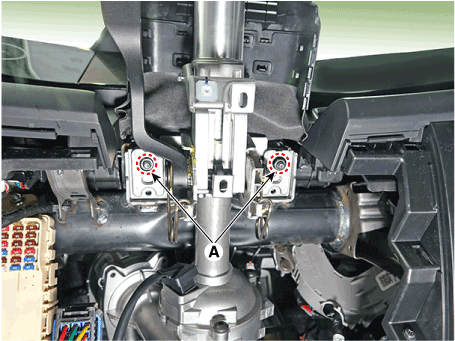
| 12. | Remove the steering column assembly after loosening the mounting nuts (A) and bolt (B).
|
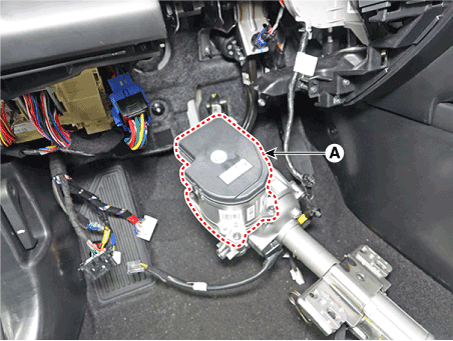
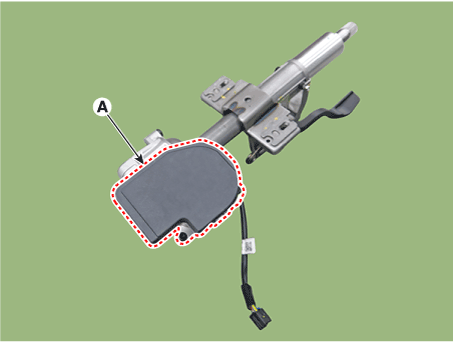
| 13. | Remove the MDPS power pack (A) after loosening the bolts.
|
| 14. | Install the new MDPS powerpack.
|
| 15. | To reassembly, reverse the disassembly procedure. |
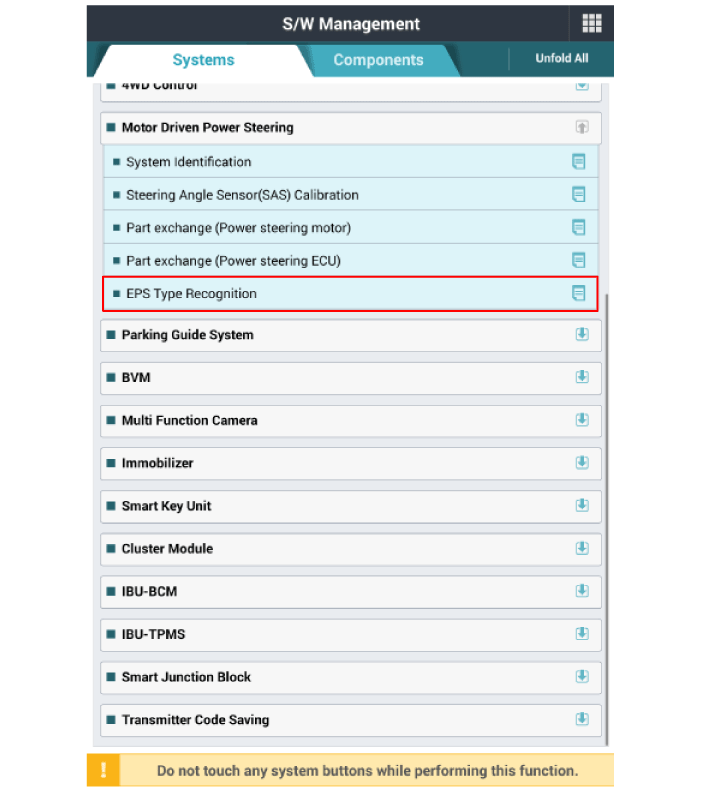
| 16. | Conduct the "EPS Type Recognition" by diagnostic tool. (Refer to MDPS PowerPack Assembly - "Diagnosis with Diagnostic tool") |
| 17. | Conduct the "ASP Calibration" by diagnostic tool. (Refer to MDPS PowerPack Assembly - "Diagnosis with Diagnostic tool") |
| 18. | Erase DTC. |
| Diagnosis with Diagnostic tool |
| EPS Type Recognition |
|
EPS Type Recognition procedures
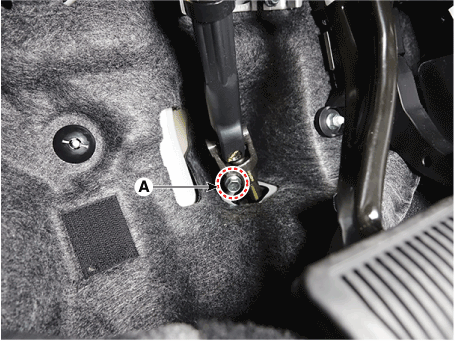
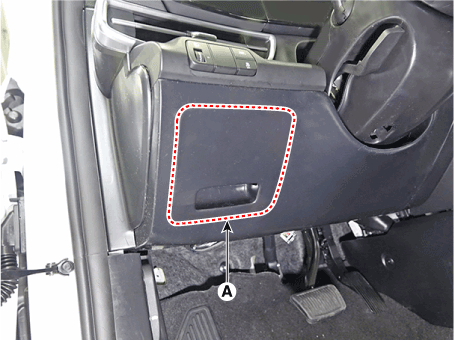
| 1. | Connect self-diagnosis connector(16pins) located in the lower of driver side crash pad to self-diagnosis device. |
| 2. | Turn the self-diagnosis device after key is ON. |
| 3. | Turn the steering wheel to straight ahead position. |
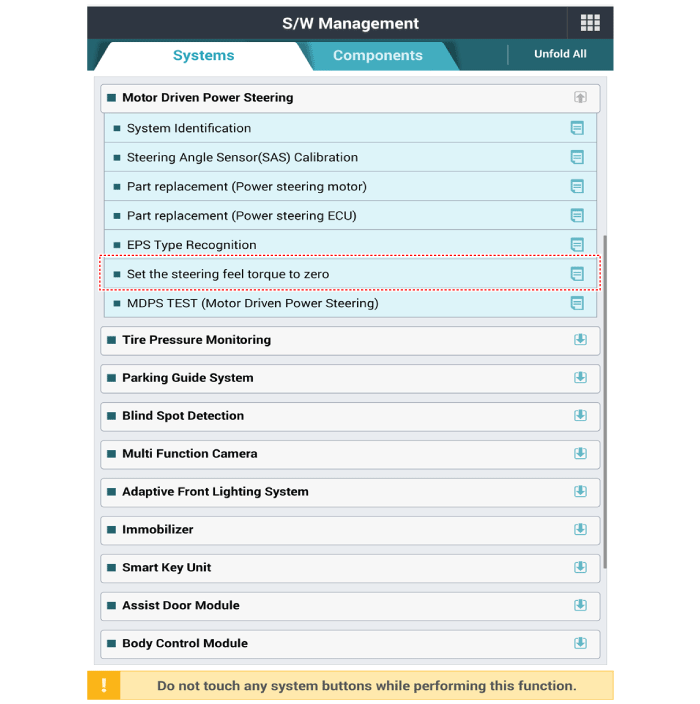
| 4. | After Selecting the "vehicle model" and "system", select the "EPS Type Recognition" on diagnostic tool vehicle selection screen.
|
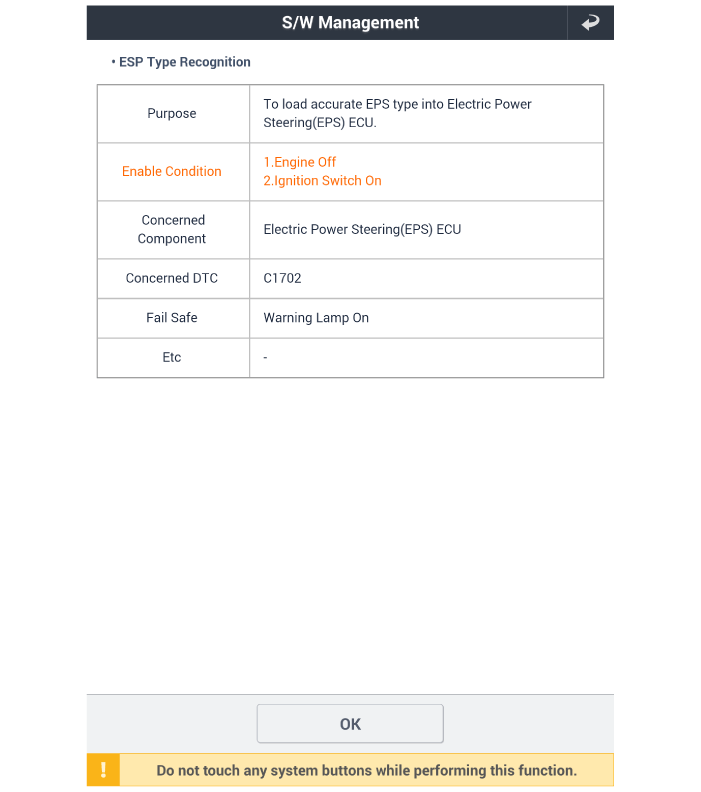
| 5. | Remove the DTC. |
| 6. | Turn off the IG switch and wait for 20 seconds or more before starting the engine. And then make sure that MDPS works properly. SAS Calibration
|
SAS Calibration procedures
| 1. | Connect self - diagnosis connector (16pins) located in the lower of driver side crash pad to self - diagnosis device. |
| 2. | Turn the self - diagnosis device after key is ON. |
| 3. | Turn the steering wheel to straight ahead position. |
| 4. | After Selecting the "vehicle model" and "system", select the "SAS Calibration" on diagnostic tool vehicle selection screen.
|

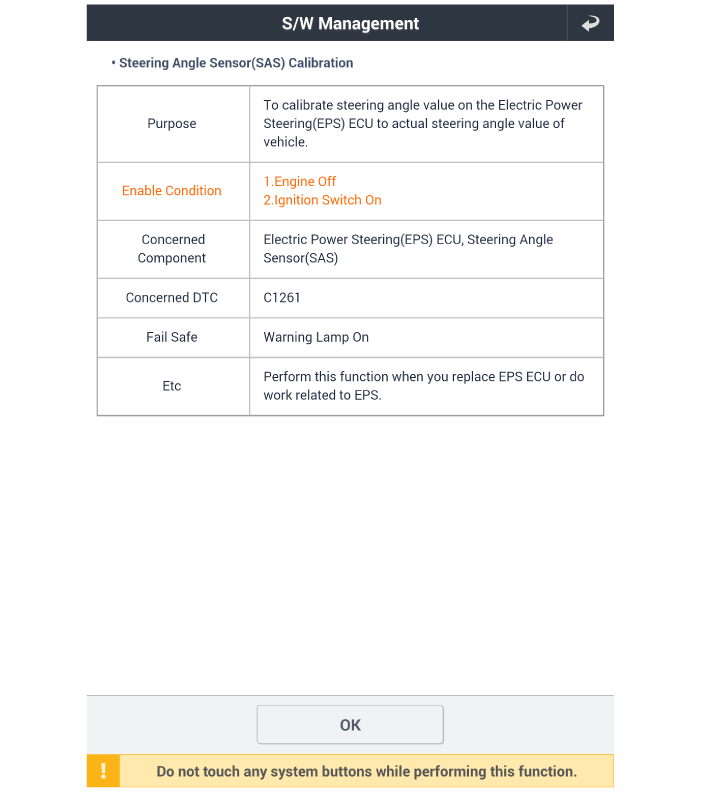
| 5. | Remove the DTC. |
| 6. | Turn off the IG switch and wait for 10 seconds or more before starting the engine. And then make sure that MDPS works properly. |
MDPS Column and Housing
Repair procedures
| Replacement |
| 1. | Turn the steering wheel so that the front wheels are placed in the straight ahead position.
|
| 2. | Turn the ignition switch OFF and disconnect the battery negative (-) cable.
|
| 3. | Remove driver airbag (DAB) module. (Refer to Restraint - "Driver Airbag (DAB) Module and Clock Spring") |
| 4. | Remove the steering wheel. (Refer to Steering System - "Steering Wheel") |
| 5. | Remove the clock spring. (Refer to Restraint - "Driver Airbag (DAB) Module and Clock Spring") |
| 6. | Remove the steering column shroud panel. (Refer to Body - "Steering Column Shroud Panel") |
| 7. | Remove the crash pad lower panel. (Refer to Body - "Crash Pad") |
| 8. | Remove the brake booster. (Only RHD) (Refer to Brake System - "Brake Booster") |
| 9. | Remove the brake pedal. (Only RHD) (Refer to Brake System - "Brake Pedal") |
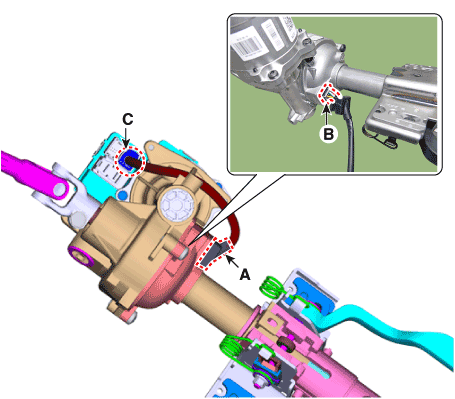
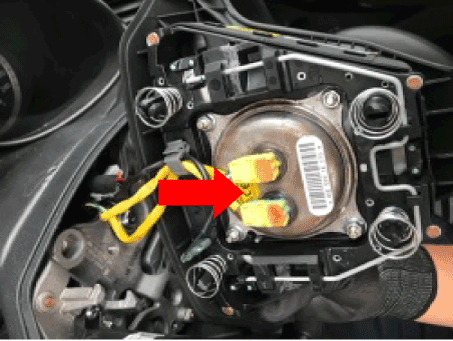
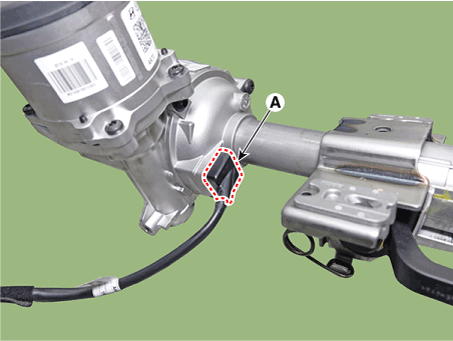
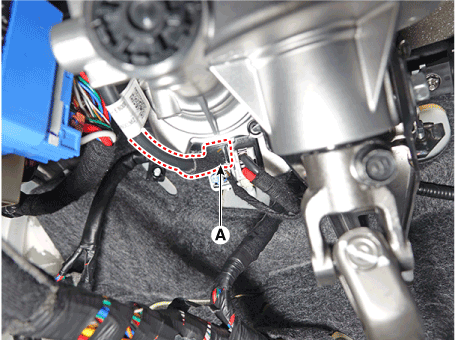
| 10. | Disconnect the MDPS connector (A).
|
| 11. | Remove the wiring clip (A) from the steering column.
|
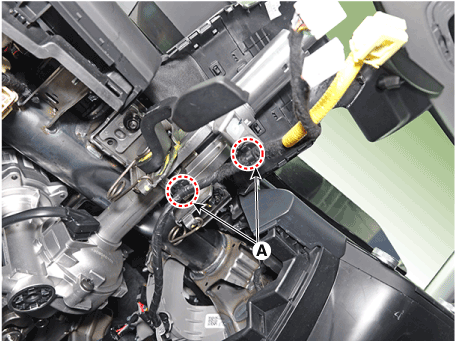
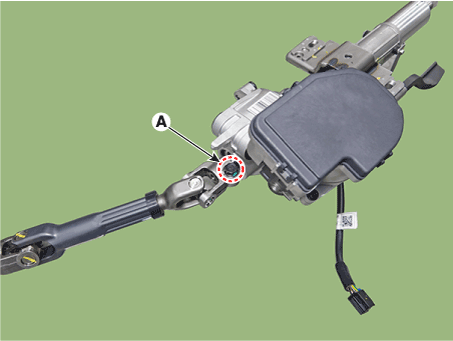
| 12. | Separate the universal joint from the steering gear box after loosening the universal joint mounting bolt (A).
|
| 13. | Remove the steering column assembly after loosening the mounting nuts (A) and bolt (B).
|
| 14. | Separate the steering column assembly and universal joint assembly after loosening the mounting bolt (A).
|
| 15. | Disconnet the grommet (A).
|
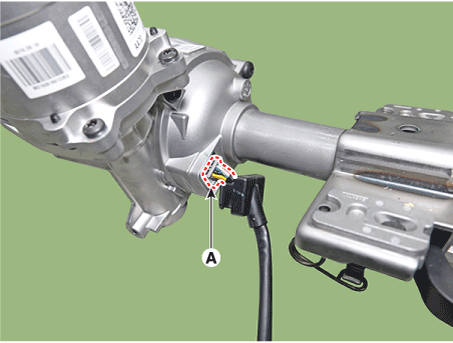
| 16. | Disconnect the MDPS wiring connector (A).
|
| 17. | Remove the MDPS power pack (A) after loosening the mounting bolts.
|
| 18. | To install, reverse the removal procedures. |
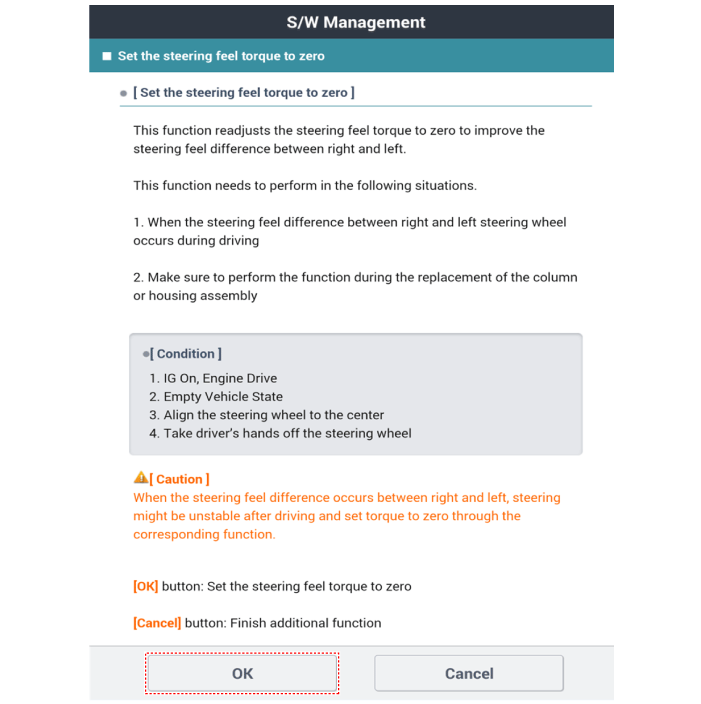
| 19. | Set the Steering angle zero point by using the diagnostic tool.
|
| 20. | Conduct the "EPS Type Recognition" by diagnostic tool. (Refer to MDPS PowerPack Assembly - "Diagnosis with diagnostic tool") |
| 21. | Conduct the "ASP Calibration" by diagnostic tool. (Refer to MDPS PowerPack Assembly - "Diagnosis with Diagnostic tool") |
| 22. | Conduct the MDPS Performance Inspection using the diagnostic tool. (Refer to Motor Driven Power Steering - "MDPS Performance Inspection") |
| 23. | Check the DTC. |
| 24. | Turn off the IGN switch and wait for 20 seconds or more. Then check the operation after starting the engine. |
Small bearing
| 1. | Remove the crash pad lower panel. (Refer to Body (Interior and Exterior) - "Crash Pad Lower Pannel") |
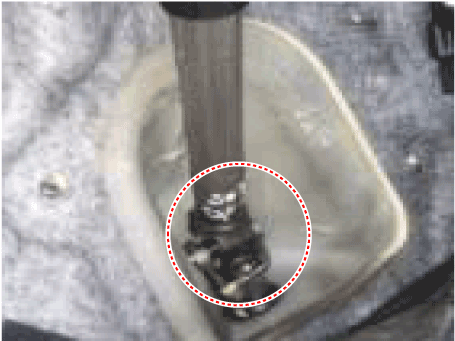
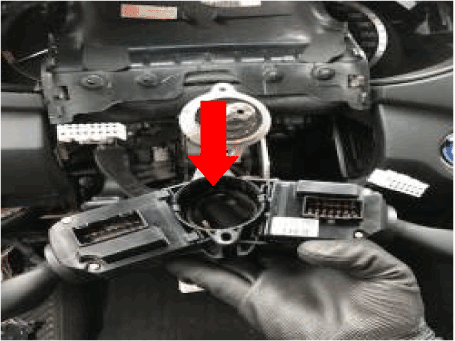
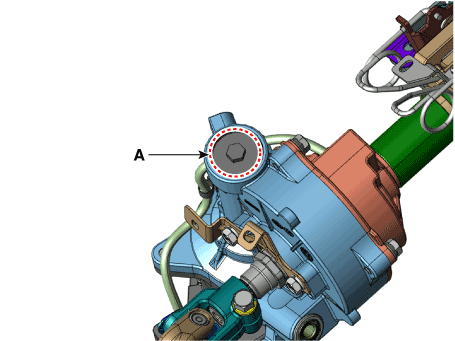
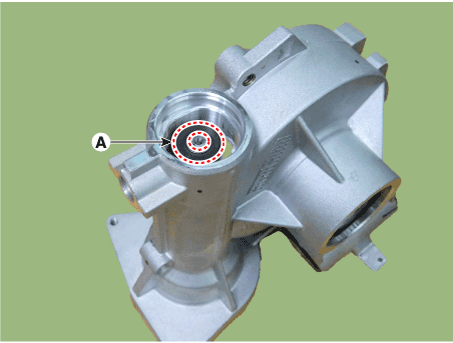
| 2. | Remove the small bearing cover (A).
|
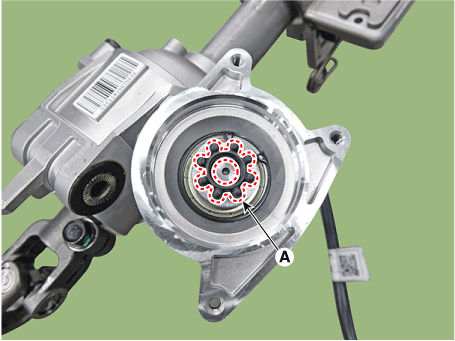
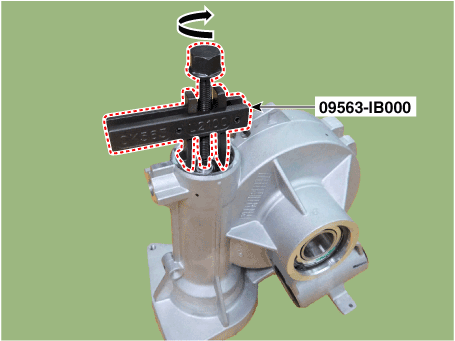
| 3. | Remove the small bearing (A) by rotating in the direction of the arrow after installing the SST (09563-IB000).
|
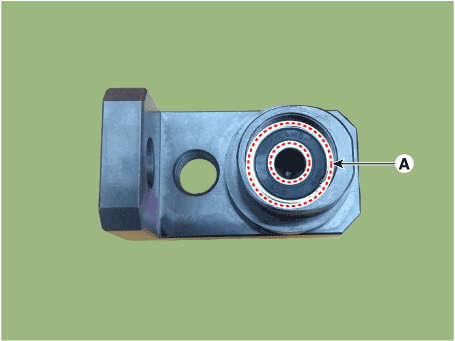
| 4. | Install the new small bearing (A) to the SST (0956-IB200).
|
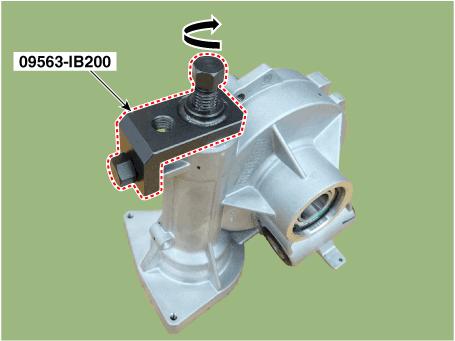
| 5. | Press the small bearing by rotating in the direction of the arrow after installing the SST (09563-IB000).
|
Steering Gear Box
Repair procedures
| Removal |
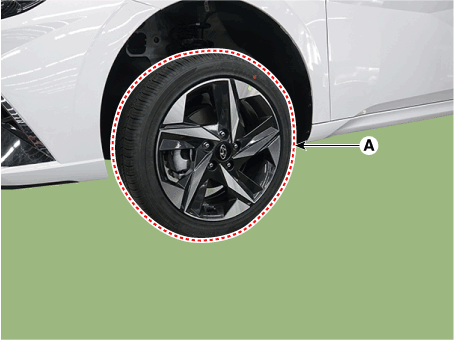
| 1. | Loosen the wheel nuts slightly. Raise the vehicle, and make sure it is securely supported. |
| 2. | Remove the front wheel and tire (A) from the front hub.
|
| 3. | Remove stabilizer bar link from the front strut after loosening the mounting nut.
|
| 4. | Remove the tie rod end ball joint by using the special service tool.
|
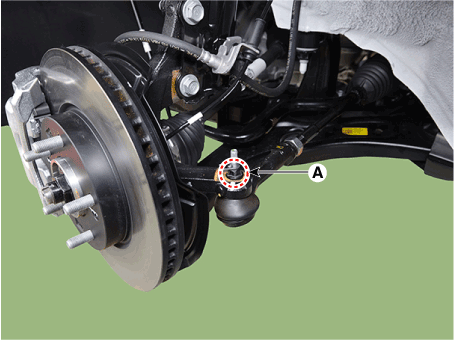
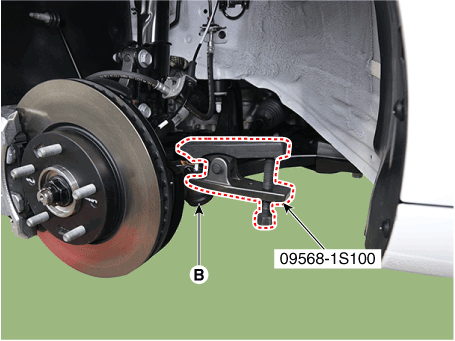
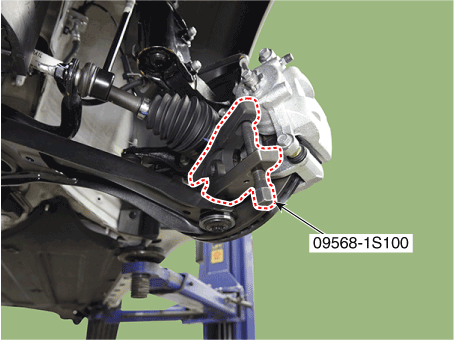
| 5. | Separate the lower arm ball joint by using the SST (09568-1S100) after loosening the lower arm mounting nut (A).
|

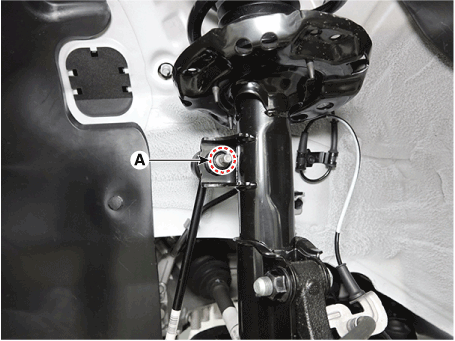
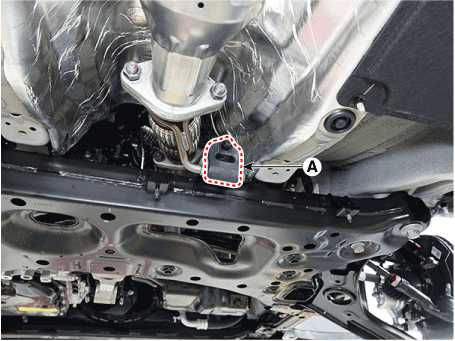
| 6. | Separate the universal joint from the steering gear box after loosening the universal joint mounting bolt (A).
|
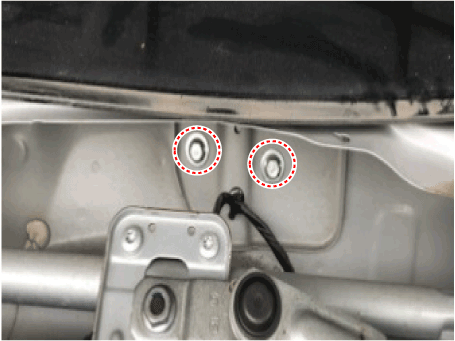
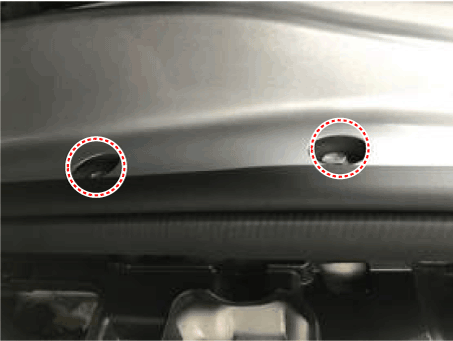
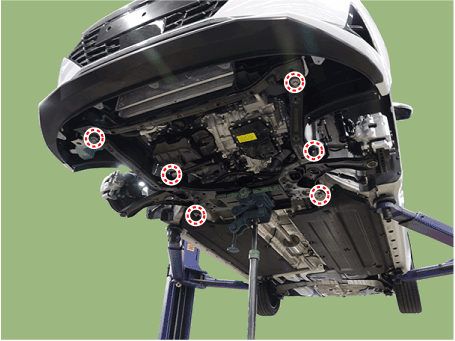
| 7. | Remove the engine room under cover. (Refer to Engine Mechanical System - "Engine Room Under Cover") |
| 8. | Remove the heat protector (A).
|
| 9. | Remove the muffler rubber hanger (A).
|
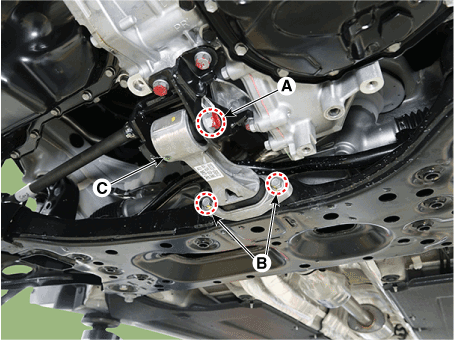
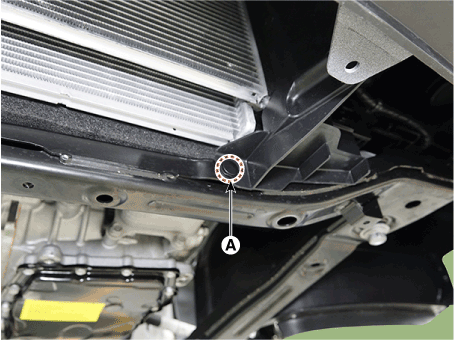
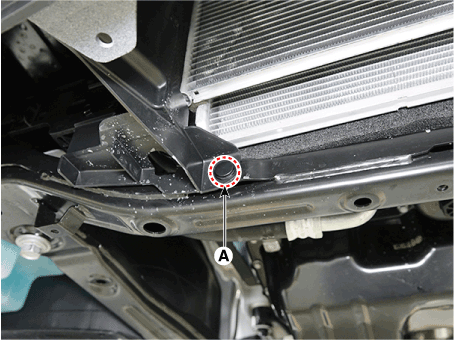
| 10. | Remove the roll rod bracket (C) after loosening the mounting bolts (A, B).
|
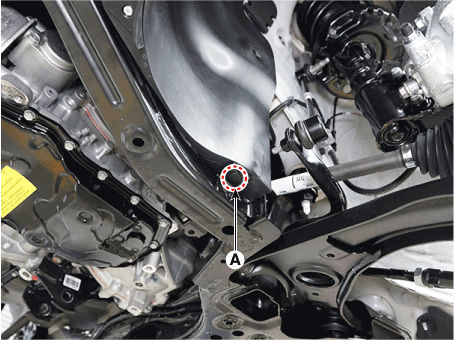
| 11. | Remove the fastener (A). [LH]
[RH]
|
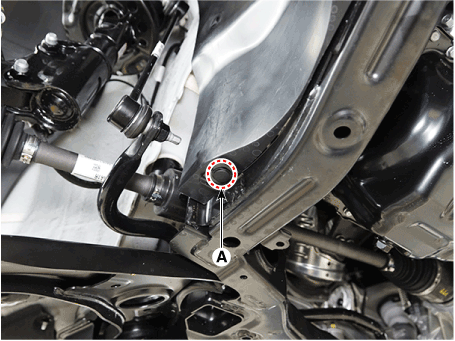
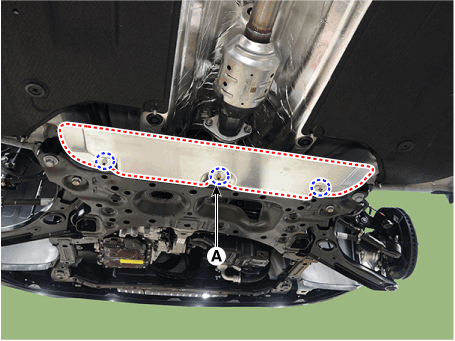
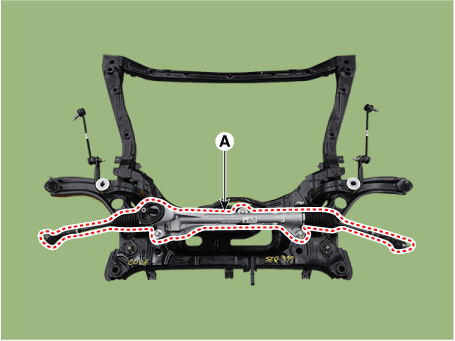
| 12. | Remove the sub frame after loosening the mounting bolts and nuts.
|
| 13. | Remove the heat protector (A).
|
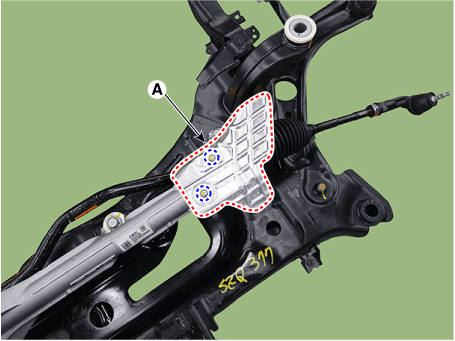
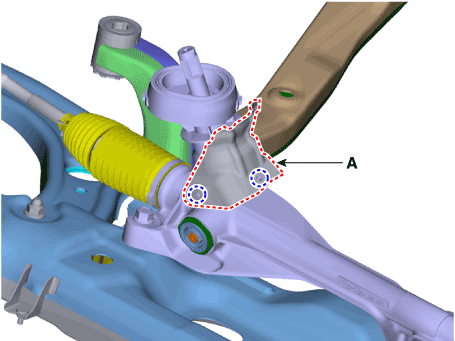
| 14. | Remove the steering gear box (A) from the sub frame after loosening the mounting bolts.
|
| Replacement |
|
Tie rod end
| 1. | Remove the tie rod end after loosening the nut.
|
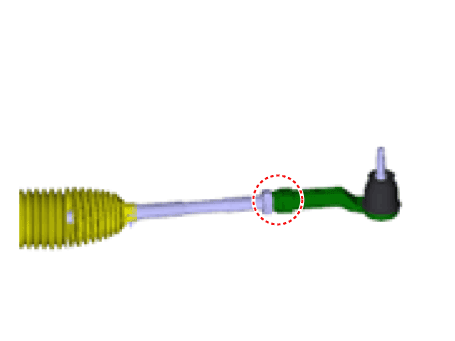
| 2. | Replace with new parts. |
| 3. | Check the front alignment. (Refer to Tires / Wheels - "Alignment") |
| Installation |
| 1. | To install, reverse the removal procedures. |
| 2. | Check the alignment. (Refer to Suspension System - "Alignment") |
MDPS Wiring
Repair procedures
| Removal |
|

| 1. | Turn the ignition switch OFF and disconnect the battery negative (-) cable.
|
| 2. | Remove the fuse cover (A).
|
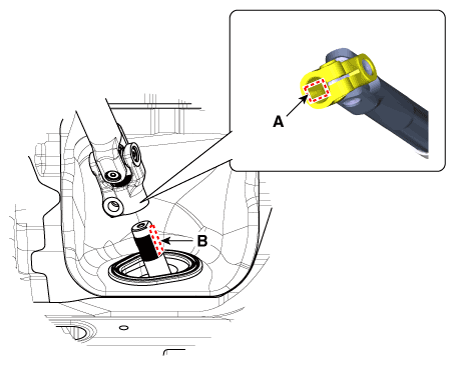
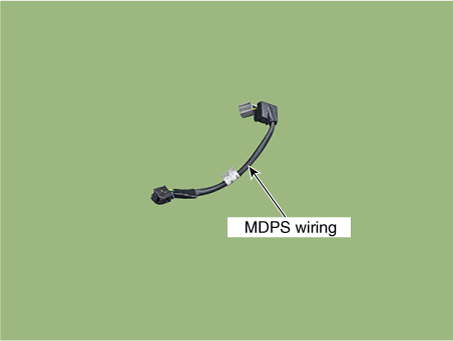
| 3. | Disconnect the grommet (A) and MDPS connector (B).
|
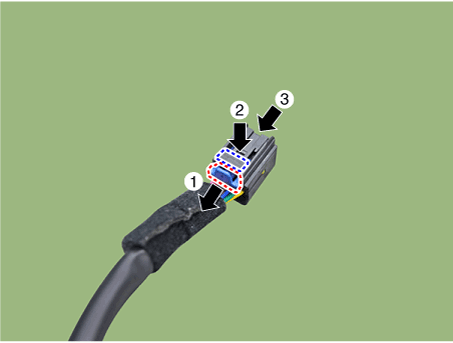
| 4. | Remove the wiring after disconnecting the MDPS connector (A).
|
| Installation |
| 1. | To install, reverse the removal procedures. |


