Components and Components Location
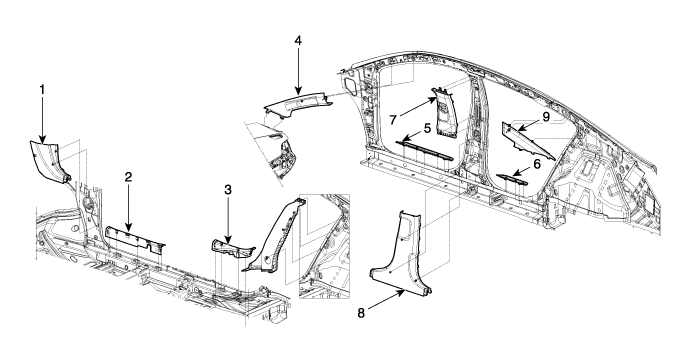
1. Cowl side trim
2. Front door scuff trim
3. Rear door scuff trim
4. Front pillar trim
5. Front door step trim
|
6. Rear door step trim
7. Center pillar upper trim
8. Center pillar lower trim
9. Rear pillar trim
|
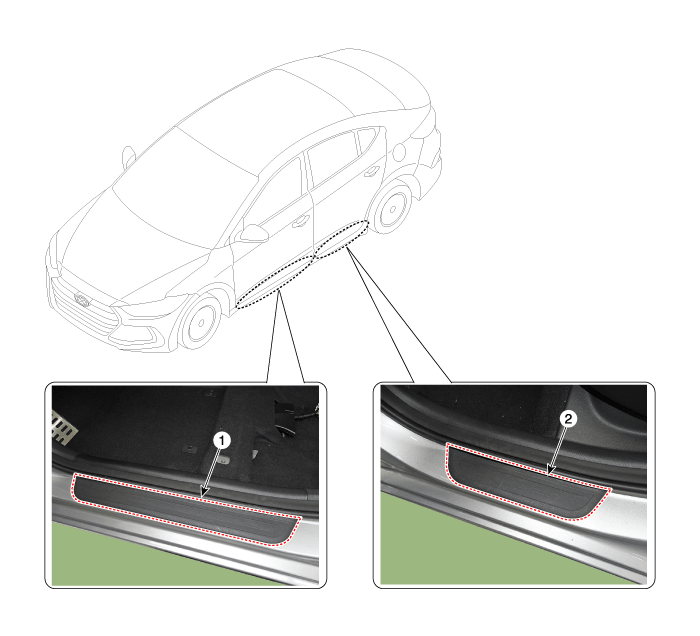
Door Scuff Trim Components and Components Location
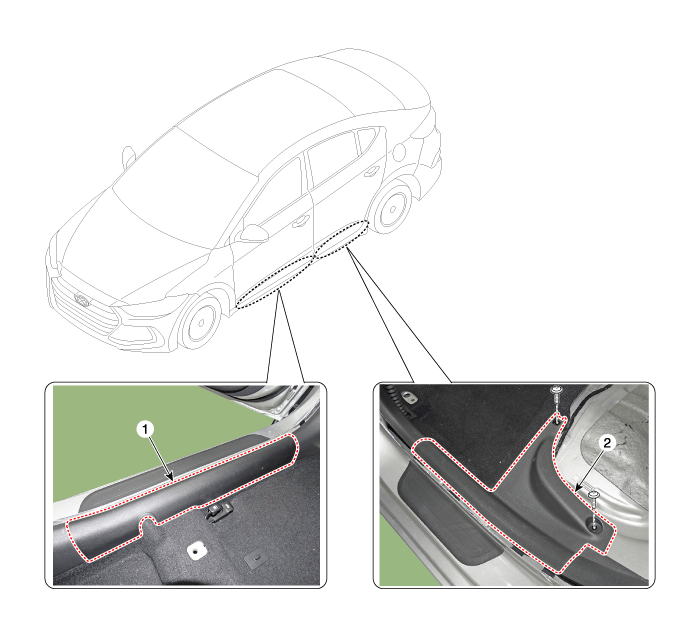
1. Front door scuff trim
|
2. Rear door scuff trim
|
Door Scuff Trim Repair procedures
| • |
Put on gloves to prevent
hand injuries. |
|
| • |
When removing with a
flat-tip screwdriver or remover, wrap protective tape around the
tools to prevent damage to components. |
| • |
When removing the interior
trim pieces, use a plastic panel removal tool not to damage the
surface. |
| • |
Take care not to bend
or scratch the trim and panels. |
|
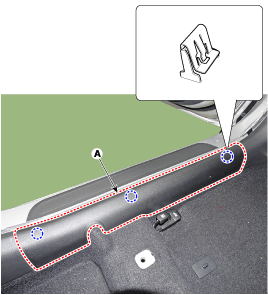
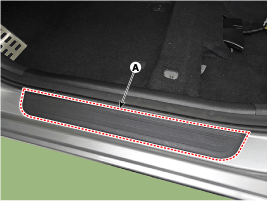
| 1. |
Using a screwdriver or remover,
remove the front door scuff trim (A).
|
| 2. |
To intall, reverse the removal
procedure.
| •
|
Replace any damaged
clips (or pin-type retainers). |
|
|
| • |
Put on gloves to prevent
hand injuries. |
|
| • |
When removing with a
flat-tip screwdriver or remover, wrap protective tape around the
tools to prevent damage to components. |
| • |
When removing the interior
trim pieces, use a plastic panel removal tool not to damage the
surface. |
| • |
Take care not to bend
or scratch the trim and panels. |
|
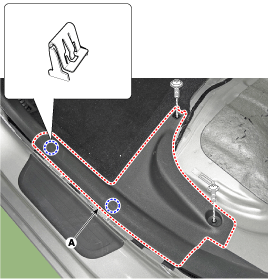
| 1. |
Remove the rear seat cushion
assembly.
(Refer to Rear Seat - "Rear Seat Assembly")
|
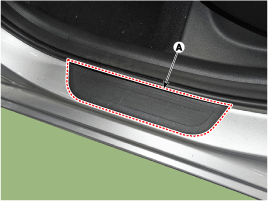
| 2. |
Loosen the mounting screws and
remove the rear door scuff trim (A).
|
| 3. |
To intall, reverse the removal
procedure.
| •
|
Replace any damaged
clips (or pin-type retainers). |
|
|
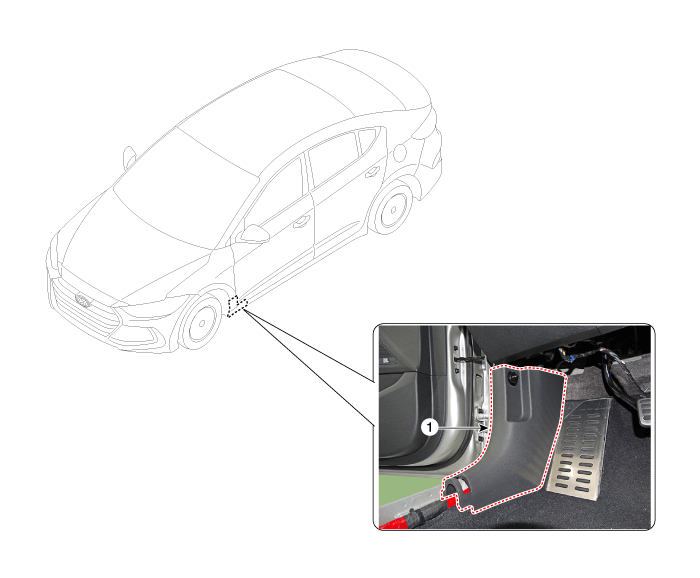
Door Step Trim Components and Components Location
1. Front door step trim
|
2. Rear door step trim
|
Door Step Trim Repair procedures
| • |
Put on gloves to prevent
hand injuries. |
|
| • |
When removing with a
flat-tip screwdriver or remover, wrap protective tape around the
tools to prevent damage to components. |
| • |
When removing the interior
trim pieces, use a plastic panel removal tool not to damage the
surface. |
| • |
Take care not to bend
or scratch the trim and panels. |
|
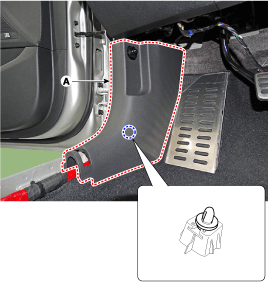
| 1. |
Using a screwdriver or remover,
remove the front door step trim (A).
|
| 2. |
To intall, reverse the removal
procedure.
| •
|
Replace any damaged
clips (or retainers or fasteners). |
|
|
| • |
Put on gloves to prevent
hand injuries. |
|
| • |
When removing with a
flat-tip screwdriver or remover, wrap protective tape around the
tools to prevent damage to components. |
| • |
When removing the interior
trim pieces, use a plastic panel removal tool not to damage the
surface. |
| • |
Take care not to bend
or scratch the trim and panels. |
|
| 1. |
Using a screwdriver or remover,
remove the rear door step trim (A).
|
| 2. |
To intall, reverse the removal
procedure.
| •
|
Replace any damaged
clips (or retainers or fasteners). |
|
|
Cowl Side Trim Components and Components Location
Cowl Side Trim Repair procedures
| • |
Put on gloves to prevent
hand injuries. |
|
| • |
When removing with a
flat-tip screwdriver or remover, wrap protective tape around the
tools to prevent damage to components. |
| • |
When removing the interior
trim pieces, use a plastic panel removal tool not to damage the
surface. |
| • |
Take care not to bend
or scratch the trim and panels. |
|
| 1. |
Remove the front door scuff trim.
(Refer to Interior Trim - "Door Scuff Trim")
|
| 2. |
Remove the hood latch release
handle. (Refer to Hood - "Hood Latch Release Handle")
|
| 3. |
Carefully remove the front door
body side weatherstrip. |
| 4. |
Using a screwdriver or remover,
remove the cowl side trim (A).
|
| 5. |
To intall, reverse the removal
procedure.
| •
|
Replace any damaged
clips (or pin-type retainers). |
|
|
Front Pillar Trim Components and Components Location
Front Pillar Trim Repair procedures
| • |
Put on gloves to prevent
hand injuries. |
|
| • |
When removing with a
flat-tip screwdriver or remover, wrap protective tape around the
tools to prevent damage to components. |
| • |
When removing the interior
trim pieces, use a plastic panel removal tool not to damage the
surface. |
| • |
Take care not to bend
or scratch the trim and panels. |
|
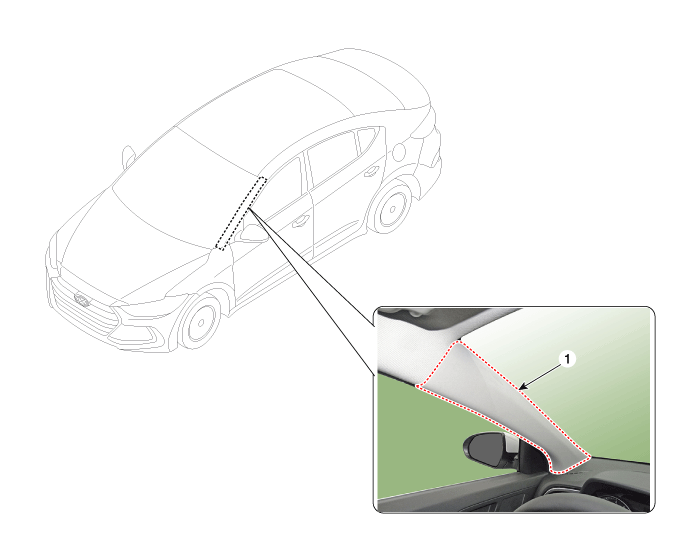
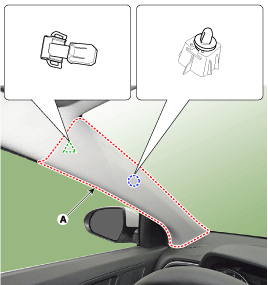
| 1. |
Remove the front pillar trim.
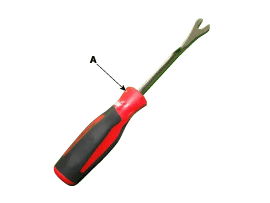
| (1) |
To remove the front pillar
trim, the fastener remover (A) below must be used.
|
| (2) |
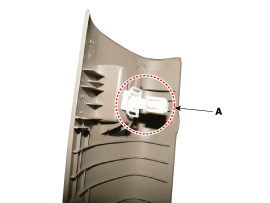
After slightly lifting
up the front pillar trim and putting the tool in, remove the mounting
clip (A) by pulling it.
|
• |
Be sure
to replace the existing clips with new ones when
removing or replacing the front pillar trim. |
|
|
| (3) |
Remove the front pillar
trim (A).
|
|
| 2. |
To intall, reverse the removal
procedure.
| •
|
Replace any damaged
clips (or pin-type retainers). |
| •
|
Be sure to replace
the existing clips with new ones when removing or replacing
the front pillar trim. |
|
|
Center Pillar Trim Components and Components Location

1. Center pillar lower trim
|
2. Center pillar upper trim
|
Center Pillar Trim Repair procedures
[Center pillar lower trim]
| • |
Put on gloves to prevent
hand injuries. |
|
| • |
When removing with a
flat-tip screwdriver or remover, wrap protective tape around the
tools to prevent damage to components. |
| • |
When removing the interior
trim pieces, use a plastic panel removal tool not to damage the
surface. |
| • |
Take care not to bend
or scratch the trim and panels. |
|
| 1. |
Carefully remove the front door
body side weatherstrip. |
| 2. |
Carefully remove the rear door
body side weatherstrip. |
| 3. |
Remove the front door scuff trim.
(Refer to Interior Trim - "Door Scuff Trim")
|
| 4. |
Remove the rear door scuff trim.
(Refer to Interior Trim - "Door Scuff Trim")
|
| 5. |
Using a screwdriver or remover,
remove the center pillar lower trim (A).
|
| 6. |
To intall, reverse the removal
procedure.
| •
|
Replace any damaged
clips (or pin-type retainers). |
|
|
[Center pillar upper trim]
| • |
Put on gloves to prevent
hand injuries. |
|
| • |
When removing with a
flat-tip screwdriver or remover, wrap protective tape around the
tools to prevent damage to components. |
| • |
When removing the interior
trim pieces, use a plastic panel removal tool not to damage the
surface. |
| • |
Take care not to bend
or scratch the trim and panels. |
|
| 1. |
Remove the center pillar lower
trim. (Refer to Interior Trim - "Center Pillar Trim")
|
| 2. |
Remove the anchor seat belt connector.
(Refer to Restraint - "Emergency Fastening Device (EFD)")
|
| 3. |
Using a screwdriver or remover,
remove the center pillar upper trim (A).

|
| 4. |
To intall, reverse the removal
procedure.
| •
|
Replace any damaged
clips (or pin-type retainers). |
|
|
Rear Transverse Trim Components and Components Location

Rear Transverse Trim Repair procedures
| • |
Put on gloves to prevent
hand injuries. |
|
| • |
When removing with a
flat-tip screwdriver or remover, wrap protective tape around the
tools to prevent damage to components. |
| • |
When removing the interior
trim pieces, use a plastic panel removal tool not to damage the
surface. |
| • |
Take care not to bend
or scratch the trim and panels. |
|
| 1. |
Remove the luggage boad (A).

|
| 2. |
Remove the tail gate weatherstrip. |
| 3. |
Loosen the mounting clips and
remove the rear transverse trim (A).

|
| 4. |
To intall, reverse the removal
procedure.
| •
|
Replace any damaged
clips (or pin-type retainers). |
|
|
Luggage Side Trim Components and Components Location

Luggage Side Trim Repair procedures
| • |
Put on gloves to prevent
hand injuries. |
|
| • |
When removing with a
flat-tip screwdriver or remover, wrap protective tape around the
tools to prevent damage to components. |
| • |
When removing the interior
trim pieces, use a plastic panel removal tool not to damage the
surface. |
| • |
Take care not to bend
or scratch the trim and panels. |
|
| 1. |
Remove the rear seat assembly
(Refer to Rear Seat - "Rear Seat Assembly")
|
| 2. |
Carefully remove the rear door
body side weatherstrip. |
| 3. |
Remove the rear door scuff trim.
(Refer to Interior Trim - "Door Scuff Trim")
|
| 4. |
Remove the rear transverse trim.
(Refer to Interior Trim - "Rear Transverse Trim")
|
| 5. |
Loosen the mounting clips and
screws, remove the luggage partition side trim (A).

|
| 6. |
After loosening the mounting
bolts and screws, remove the luggage side trim (A).

|
| 7. |
To intall, reverse the removal
procedure.
| •
|
Replace any damaged
clips (or pin-type retainers). |
|
|
Rear Pillar Trim Components and Components Location

Rear Pillar Trim Repair procedures
| • |
Put on gloves to prevent
hand injuries. |
|
| • |
When removing with a
flat-tip screwdriver or remover, wrap protective tape around the
tools to prevent damage to components. |
| • |
When removing the interior
trim pieces, use a plastic panel removal tool not to damage the
surface. |
| • |
Take care not to bend
or scratch the trim and panels. |
|
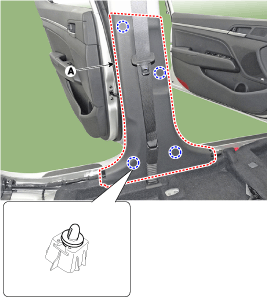
| 1. |
Slighty remove the rear door
body side weatherstrip. |
| 2. |
Remove the rear pillar trim.
| (1) |
To remove the rear pillar
trim, the fastener remover (A) below must be used.
|
| (2) |
After slightly lifting
up the rear pillar trim and putting the tool in, remove the mounting
clip (A) by pulling it.
|
• |
Be sure
to replace the existing clips with new ones when
removing or replacing the rear pillar trim. |
|

|
| (3) |
Remove the rear pillar
trim (A).
|
• |
Be sure
to replace the existing clips (B) with new ones
when removing or replacing the rear pillar trim. |
|

|
|
| 3. |
To intall, reverse the removal
procedure.
| •
|
Replace any damaged
clips (or pin-type retainers). |
|
|
Rear Package Tray Trim Components and Components Location

Rear Package Tray Trim Repair procedures
| • |
Put on gloves to prevent
hand injuries. |
|
| • |
When removing with a
flat-tip screwdriver or remover, wrap protective tape around the
tools to prevent damage to components. |
| • |
Use a plastic panel removal
tool to remove interior trim pieces without marring the surface. |
| • |
Take care not to bend
or scratch the trim and panels. |
|
| 1. |
Remove the rear seat cushion
assembly. (Refer to Rear Seat - "Rear Seat Assembly")
|
| 2. |
Remove the rear seat back assembly.
(Refer to Rear Seat - "Rear Seat Assembly")
|
| 3. |
Slighty remove the rear door
weatherstrip. |
| 4. |
Remove the rear door scuff trim.
(Refer to Interior Trim - "Door Scuff Trim")
|
| 5. |
Remove the rear pillar trim.
(Refer to Interior Trim - "Rear Wheel House Trim")
|
| 6. |
Loosen the clips and screws,
remove the luggage partition side trim (A).
|
| 7. |
Using a screwdriver or remover,
remove the rear wheel house trim (A).

|
| 8. |
After loosening the mounting
bolt, remove the rear seat belt lower anchor (A).
Tightening torque :39.2
~ 53.9 N.m (4.0 ~ 5.5 kgf.m, 28.8 ~ 39.8 lb-ft)
|
[Side]

[Center]

|
| 9. |
Using a screwdriver or remover,
remove the package tray trim (A).

|
| 10. |
To intall, reverse the removal
procedure.
| •
|
Replace any damaged
clips (or pin-type retainers). |
|
|
Components and Components Location
Components (1)
[General Type]
1. Roof trim
2. Sunvisor [LH]
3. Sunvisor [RH]
4. Assist handle
...
Repair procedures
Replacement
•
Put on gloves to prevent
hand injuries.
...
 Hyundai Elantra AD: Interior Trim


