Heater & A/C Control Unit (Manual) Components and Components Location
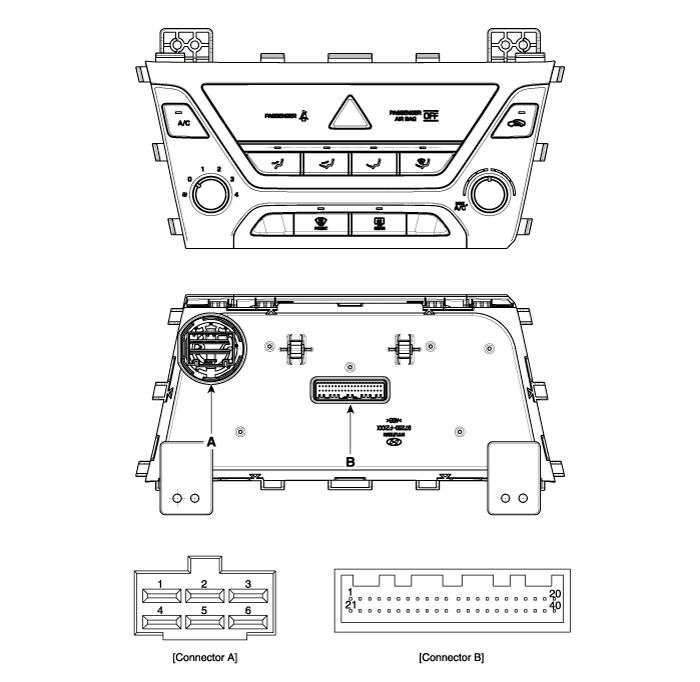
Connector
|
Pin NO
|
Function
|
Connector
|
Pin NO
|
Function
|
A
|
1
|
Low
|
B
|
18
|
ILL- (RHEO)
|
2
|
Common
|
19
|
Sensor ground
|
3
|
Ground
|
20
|
Ground
|
4
|
Middle Low
|
21
|
Battery (+)
|
5
|
Middle High
|
22
|
ISG DC
|
6
|
High
|
23
|
ISG B+
|
B
|
1
|
IGN2
|
24
|
ILL+ (TAIL)
|
2
|
PAB IGN1
|
25
|
Sensor REF (+5V)
|
3
|
HTD (Rear defog indicator)
|
26
|
EVAP sensor (+)
|
4
|
Detent Out (-)
|
27
|
AMB sensor (+)
|
5
|
PTC Relay 2
|
28
|
Mode control actuator (Feedback)
|
6
|
PTC Relay 3
|
29
|
Temperature control actuator (Feedback)
|
7
|
PTC on signal
|
30
|
Intake actuator (Feedback)
|
8
|
PAB Off signal
|
31
|
Mode control actuator (Vent)
|
9
|
SBR
|
32
|
Mode control actuator (Def)
|
10
|
Rear SBR [LH]
|
33
|
Temperature control actuator (Cool)
|
11
|
Rear SBR [Center]
|
34
|
Temperature control actuator (Warm)
|
12
|
Rear SBR [RH]
|
35
|
Intake actuator (Fresh)
|
13
|
ECV+
|
36
|
Intake actuator (Recirculation)
|
14
|
ECV- (Ground)
|
37
|
C_CAN High
|
15
|
Max blower on signal
|
38
|
C_CAN Low
|
16
|
Rear defogging swich (On)
|
39
|
Blower common signal
|
17
|
Hazard signal
|
40
|
Ground
|
Heater & A/C Control Unit (Manual) Repair procedures
| 1. |
Disconnect the negative (-) battery
terminal. |
| 2. |
Remove the glove box upper cover
assembly. (Refer to Body - "Glove Box Upper Cover Assembly")
|
| 3. |
Loosen the mounting screws and
remove the crash pad center lower cover [LH](A).
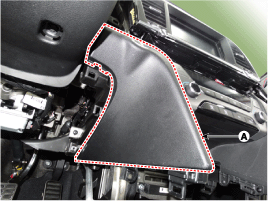
|
| 4. |
After loosening the mounting
screws, remove the A/C & heater controller unit (A).
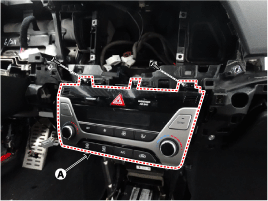
|
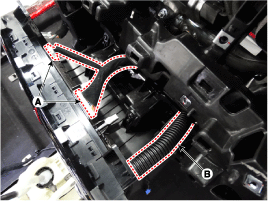
| 5. |
Disconnect the A/C & heater controller
connectors (A) and hose (B).
|
| 6. |
To intall, reverse the removal
procedure.
| •
|
Make sure the
connector are connected in properly. |
| •
|
Replace any damaged
clips (or pin-type retainers). |
|
|
Heater & A/C Control Unit (DATC) Components and Components Location
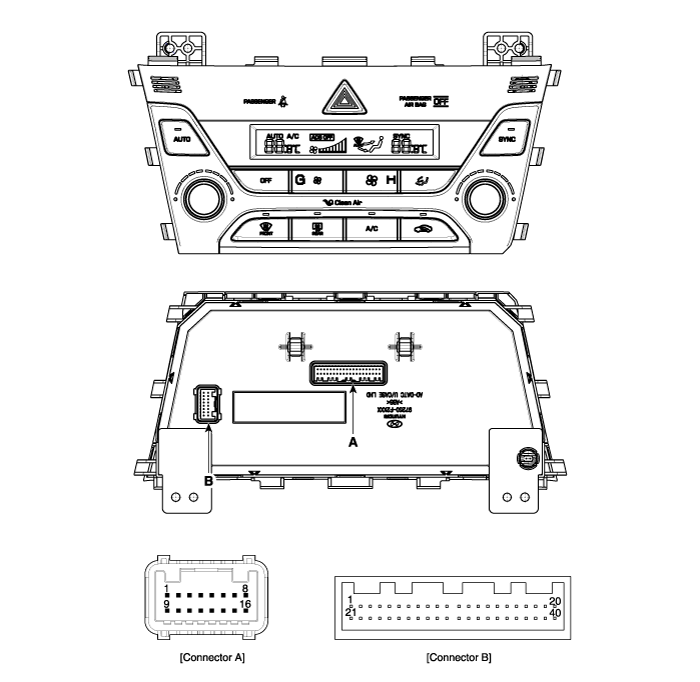
Connector
|
Pin NO
|
Function
|
Connector
|
Pin NO
|
Function
|
A
|
1
|
Battery (+)
|
A
|
21
|
IGN1
|
2
|
IGN2
|
22
|
ILL+ (TAIL)
|
3
|
ISG B+
|
23
|
Sensor ground REF (+5V)
|
4
|
Mode control actuator (Vent)
|
24
|
C_CAN High
|
5
|
Mode control actuator (Def)
|
25
|
C_CAN Low
|
6
|
Mode control actuator (Feedback)
|
26
|
HTD (Rear defog indicator)
|
7
|
Intake actuator (Fresh)
|
27
|
-
|
8
|
Intake actuator (Recirculation)
|
28
|
-
|
9
|
Intake actuator (Feedback)
|
29
|
Passenger's temperature control actuator (Cool)
|
10
|
Defogging actuator (On)
|
30
|
Passenger's temperature control actuator (Warm)
|
11
|
Defogging actuator (Off)
|
31
|
Passenger's temperature control actuator (Feedback)
|
12
|
Defogging actuator (Feedback)
|
32
|
PTC Relay 2
|
13
|
Rear defog switch
|
33
|
PTC Relay 3
|
14
|
Hazard switch
|
34
|
PTC on signal
|
15
|
Driver's temperature control actuator (Cool)
|
35
|
Detent out (-)
|
16
|
Driver'st emperature control actuator (Warm)
|
36
|
-
|
17
|
Driver's temperature control actuator (Feedback)
|
37
|
ECV +
|
18
|
-
|
38
|
ECV - (Ground)
|
19
|
Sensor ground
|
39
|
ILL- (RHEO)
|
20
|
Ground
|
40
|
Ground
|
Connector
|
Pin NO
|
Function
|
Connector
|
Pin NO
|
Function
|
B
|
1
|
Blower motor (+)
|
B
|
9
|
PAB IGN1
|
2
|
FET Drain (Feedback)
|
10
|
Clean signal
|
3
|
FET (Gate)
|
11
|
Ionizer diagnosis
|
4
|
SBR
|
12
|
AMB sensor (+)
|
5
|
Rear SBR (LH)
|
13
|
EVAP sensor (+)
|
6
|
Rear SBR (Center)
|
14
|
Auto defogging sensor signal
|
7
|
Rear SBR (RH)
|
15
|
Photo sensor (-)_LH
|
8
|
PAB Off signal
|
16
|
Photo sensor (-)_RH
|
Heater & A/C Control Unit (DATC) Repair procedures
| 1. |
Self-diagnosis process.
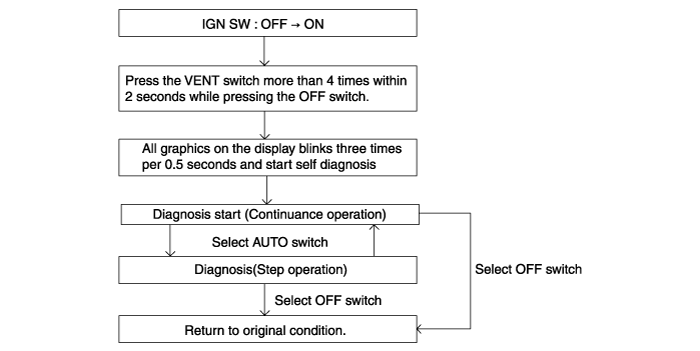
| •
|
When operating
the self-diagnostics, the below fault (self-diagnostics
code) will blink at 0.5 seconds interval on the temperature
display settings (driver's side only) and the remaining
symbols are OFF . |
|
|
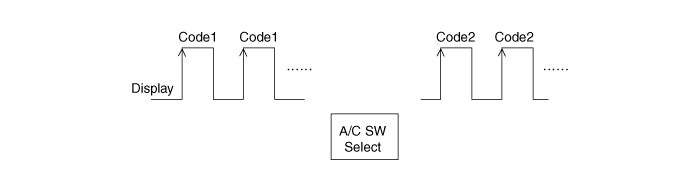
| 2. |
Fault code display
| (1) |
Continuance operation
: DTC code.

|
| (2) |
Continuance operation
: DTC code.

|
| (3) |
STEP operation. A.
Nomal or one fault code is same as a continuance operation.
B. DTC code.
|
|
| 3. |
If fault codes are displayed
during the check, Inspect malfunction causes by referring to fault codes.
Display
|
Fail description
|
0
|
Normal
|
11
|
Incar sensor OPEN
|
12
|
Incar sensor SHORT
|
13
|
Ambient sensor OPEN
|
14
|
Ambient sensor SHORT
|
17
|
Evaporator sensor OPEN
|
18
|
Evaporator sensor SHORT
|
19
|
Driver temp door potentionmeter OPEN or SHORT
|
20
|
Driver temp door potentionmeter Error
|
21
|
Mode door potentionmeter OPEN or SHORT
|
22
|
Mode door potentionmeter Error
|
23
|
Auto defog sensor OPEN
|
24
|
Auto defog sensor SHORT
|
25
|
Intake door potentionmeter OPEN or SHORT
|
26
|
Intake door potentionmeter Error
|
32
|
Passenger temp door potensionmeter OPEN or SHORT
|
33
|
Passenger temp door potention meter Error
|
45
|
APT CAN Signal Error
|
47
|
RPM CAN Signal Error
|
48
|
Vehicle speed CAN Signal Error
|
49
|
Engine coolant temprature CAN Signal Error
|
50
|
Cluster ionizer fault
|
71
|
ECV Fault (OPEN)
|
|
| 4. |
Fail safe
NO
|
Item
|
Fault
|
Fail Safe
|
1
|
Incar sensor
|
Open or Short
|
Control with the value of 25°C(77.0°F)
|
2
|
Amblent sensor
|
Open or Short
|
Control with the value of 20°C(67°F)
|
3
|
Evaporator sensor
|
Open or Short
|
Control with the value of -2°C(28.4°F)
|
4
|
Mode door potentiometer
|
Open or Short
|
Fix vent position, while selecting vent mode.
Fix defrost position, while selecting all except vent mode.
|
5
|
Temperature door potentiometer (MTC)
|
Open or Short
|
If temperature setting 1 ~ 7 step, fix at maximum cooling position.
If temperature setting 8 ~ 15 step, fix at maximum heating position.
|
6
|
Temperature door potentiometer (DATC)
|
Open or Short
|
If temperature setting 17°C(62.6°F) ~ 24.5°C(76.1°F), fix at maximum cooling
position.
If temperature setting 25°C(77°F) ~ 32°C(89.6°F), fix at maximum
heating position.
|
7
|
Intake door potentiometer
|
Open or Short
|
Fix vent position, while selecting vent mode.
Fix defrost position, while selecting all except vent mode.
|
8
|
Engine RPM
|
FFh or NO reception
|
A/C OFF (Control with the value of 650 rpm)
|
9
|
Vehicle speed
|
FFh or NO reception
|
A/C OFF
|
10
|
Engine coolant temperature
|
FFh or NO reception
|
Control with the value of - 2°C(28.4°F)
|
11
|
APS
|
FFh or NO reception
|
Control with the value of 5%
|
12
|
R-TQACNAPVC
(Max Torque limitation of A/C Compressor)
|
FFh or NO reception
|
A/C OFF (Control with the value of 0 Nm)
|
13
|
R-PACNC
(APT Sensor Output Value)
|
FFh or NO reception
|
A/C OFF (Control with the value of 0 Nm)
|
14
|
RLY-AC
(Activation of air conditioner compressor relay)
|
FFh or NO reception
|
FFh
|
|
| 1. |
Disconnect the negative (-) battery
terminal. |
| 2. |
Remove the glove box upper cover
assembly. (Refer to Body - "Glove Box Upper Cover Assembly")
|
| 3. |
Loosen the mounting screws and
remove the crash pad center lower cover [LH](A).
|
| 4. |
After loosening the mounting
screws, remove the A/C & heater controller unit (A).
|
| 5. |
Disconnect the A/C & heater controller
connectors (A) and hose (B).
|
| 6. |
To intall, reverse the removal
procedure.
| •
|
Make sure the
connector are connected in properly. |
| •
|
Replace any damaged
clips. |
|
|
Blower Unit Components and Components Location
Component Location
1. Blower unit assembly
Components
1. Seal
2. Intake duct ca ...
 Hyundai Elantra AD: Controller


