 Hyundai Elantra CN7: Seats
.png)
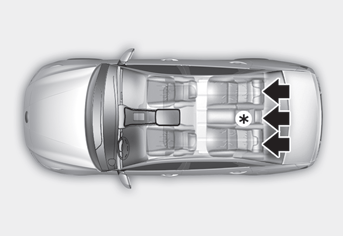
The actual layout of the vehicle may differ from the illustration.
Driver’s seat
(1) Forward and rearward
(2) Seatback angle
(3) Seat cushion height
(4) Seat cushion angle
(5) Lumbar support
Front passenger’s seat
(1) Forward and rearward
(2) Seatback angle
Safety Precautions
Adjusting the seats so that you are sitting in a safe, comfortable position plays an important role in driver and passenger safety together with the seat belts and air bags in an accident.
WARNING
Do not use a cushion that reduces friction between the seat and the passenger. The passenger’s hips may slide under the lap portion of the seat belt during an accident or a sudden stop. Serious or fatal internal injuries could result because the seat belt cannot operate properly.
Air bags
You can take steps to reduce the risk of being injured by an inflating air bag. Sitting too close to an air bag greatly increases the risk of injury in the event the air bag inflates.
The National Highway Traffic Safety Administration (NHTSA) recommends that drivers allow at least 10 inches (25 cm) between the center of the steering wheel and their chest.
WARNING
To reduce the risk of serious injury or death from an inflating air bag, take the following precautions:
- Adjust the driver’s seat as far to the rear as possible while maintaining the ability to maintain full control of the vehicle.
- Adjust the front passenger seat as far to the rear as possible.
- Hold the steering wheel by the rim with hands at the 9 o’clock and 3 o’clock positions to minimize the risk of injuries to your hands and arms.
- NEVER place anything or anyone between the steering wheel and the air bag.
- Do not allow the front passenger to place feet or legs on the dashboard to minimize the risk of leg injuries.
Seat belts
Always fasten your seat belt before starting any trip.
At all times, passengers should sit upright and be properly restrained. Infants and small children must be restrained in appropriate child restraint systems. Adults and children who have outgrown a booster seat must be restrained using the seat belts.
WARNING
Take the following precautions when adjusting your seat belt:
- NEVER use one seat belt for more than one occupant.
- Always position the seatback upright with the lap portion of the seat belt snug and low across the hips.
- NEVER allow children or small infants to ride on a passenger’s lap.
- Do not route the seat belt across your neck, across sharp edges, or reroute the shoulder strap away from your body.
- Do not allow the seat belt to become caught or jammed.
Front Seats
WARNING
Take the following precautions when adjusting your seat:
- NEVER attempt to adjust the seat while the vehicle is moving. The seat could respond with unexpected movement and may cause loss of vehicle control resulting in an accident.
- Do not place anything under the front seats. Loose objects in the driver’s foot area could interfere with the operation of the foot pedals, causing an accident.
- Do not allow anything to interfere with the normal position and proper locking of the seatback.
- Do not place a cigarette lighter on the floor or seat. When you operate the seat, gas may exit out of the lighter causing a fire.
- Use extreme caution when picking up small objects trapped under the seats or between the seat and the center console. Your hands might be cut or injured by the sharp edges of the seat mechanism.
- If there are occupants in the rear seats, be careful while adjusting the front seat position.
- Make sure that the seat is locked in place after the adjustment. If not, the seat might move unexpectedly resulting in an accident.
CAUTION
To prevent injury:
- Do not adjust your seat while wearing your seat belt. Moving the seat cushion forward may cause strong pressure on your abdomen.
- Do not allow your hands or fingers to get caught in the seat mechanisms while the seat is moving.
Manual adjustment
The front seat can be adjusted by using the levers located on the outside of the seat cushion. Before driving, adjust the seat to the proper position so that you can easily control the steering wheel, foot pedals and controls on the instrument panel.
.png)
Forward and rearward adjustment
To move the seat forward or rearward:
1. Pull up the seat slide adjustment lever and hold it.
2. Slide the seat to the position you desire.
3. Release the lever and make sure the seat is locked in place. Move forward and rearward without using the lever. If the seat moves, it is not locked properly.
.png)
Seatback angle
To recline the seatback:
1. Lean forward slightly and lift up the seatback lever.
2. Carefully lean back on the seat and adjust the seatback to the position you desire.
3. Release the lever and make sure the seatback is locked in place. (The lever MUST return to its original position for the seatback to lock.)
Reclining seatback
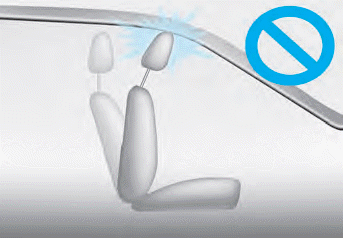
Sitting in a reclined position when the vehicle is in motion can be dangerous. Even when buckled up, the protection of your restraint system (seat belts and air bags) is greatly reduced by reclining your seatback.
WARNING
NEVER ride with a reclined seatback when the vehicle is moving.
Riding with a reclined seatback increases your chance of serious or fatal injuries in the event of a collision or sudden stop.
Drivers and passengers should ALWAYS sit well back in their seats, properly belted, and with the seatbacks upright.
Seat belts must be snug against your hips and chest to work properly. When the seatback is reclined, the shoulder belt cannot do its job because it will not be snug against your chest. Instead, it will be in front of you. During an accident, you could be thrown into the seat belt, causing neck or other injuries.
The more the seatback is reclined, the greater chance the passenger’s hips will slide under the lap belt or the passenger’s neck will strike the shoulder belt.
Seat cushion height (for driver’s seat, if equipped)
.png)
To change the height of the seat cushion:
- Push down on the lever several times, to lower the seat cushion.
- Pull up on the lever several times, to raise the seat cushion.
Power adjustment
The front seat can be adjusted by using the control switches located on the outside of the seat cushion.Before driving, adjust the seat to the proper position so that you can easily control the steering wheel, foot pedals and controls on the instrument panel.
WARNING
NEVER allow children in the vehicle unattended. The power seats are operable when the vehicle is turned off.
NOTICE
To prevent damage to the seats:
- Always stop adjusting the seats when the seat has moved as far forward or rearward as possible.
- Do not adjust the seats for longer than necessary when the vehicle is turned off. This may result in unnecessary battery drain.
- Do not operate two or more seats at the same time. This may result in an electrical malfunction.
Forward and rearward adjustment
.png)
To move the seat forward or rearward:
1. Push the control switch forward or rearward.
2. Release the switch once the seat reaches the desired position.
Seatback angle
.png)
To adjust the seatback:
1. Rotate the top of control switch forward or rearward.
2. Release the switch once the seatback reaches the desired position.
Reclining seatback
Sitting in a reclined position when the vehicle is in motion can be dangerous. Even when buckled up, the protection of your restraint system (seat belts and air bags) is greatly reduced by reclining your seatback.
WARNING
NEVER ride with a reclined seatback when the vehicle is moving. Riding with a reclined seatback increases your chance of serious or fatal injuries in the event of a collision or sudden stop. Driver and passengers should ALWAYS sit well back in their seats, properly belted, and with the seatbacks upright.
Seat belts must be snug against your hips and chest to work properly. When the seatback is reclined, the shoulder belt cannot do its job because it will not be snug against your chest. Instead, it will be in front of you. During an accident, you could be thrown into the seat belt, causing neck or other injuries. The more the seatback is reclined, the greater chance the passenger’s hips will slide under the lap belt or the passenger’s neck will strike the shoulder belt.
.png)
Seat cushion tilt (1) (if equipped)
To change the angle of the front part of the seat cushion: Push the front portion of the control switch up to raise or down to lower the front part of the seat cushion. Release the switch once the seat reaches the desired position.
Seat cushion height (2) (if equipped)
To change the height of the seat cushion: Push the rear portion of the control switch up to raise or down to lower the height of the seat cushion. Release the switch once the seat reaches the desired position.
Lumbar support (for driver’s seat, if equipped)
.png)
The lumbar support can be adjusted by pressing the lumbar support switch. Press the front portion of the switch (1) to increase support or the rear portion of the switch (2) to decrease support.
Seatback pocket
.png)
The seatback pocket is provided on the back of the front seatbacks.
WARNING
To prevent the Occupant Classification System from malfunctioning:
Do not hang onto the front passenger’s seatback.
CAUTION
Do not put heavy or sharp objects in the seatback pockets. In an accident they could come loose from the pocket and injure occupants.
Rear Seats
Folding the rear seat
The rear seatbacks can be folded to facilitate carrying long items or to increase the luggage capacity of the vehicle.
WARNING
- Never allow passengers to sit on top of the folded down seatback while the vehicle is moving. This is not a proper seating position and no seat belts are available for use. This could result in serious injury or death in case of an accident or sudden stop.
- Objects carried on the folded down seatback should not extend higher than the top of the front seatbacks. This could allow cargo to slide forward and cause injury or damage during sudden stops.
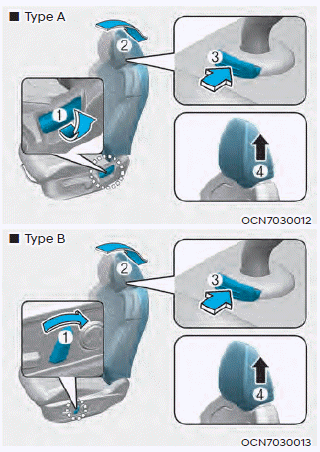
To fold down the rear seatback:
1. Set the front seatback to the upright position and if necessary, slide the front seat forward.
.png)
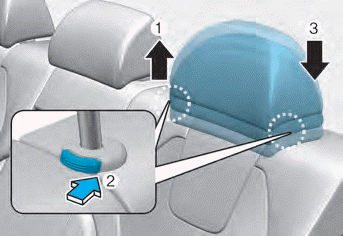
2. Lower the rear head restraints to the lowest position by pushing and holding the release button and pushing down on the head restraint.
.png)
3. Pull on the seatback folding lever located in the trunk.
.png)
Type A
.png)
Type B
4. Fold the seatback toward the front of the vehicle.
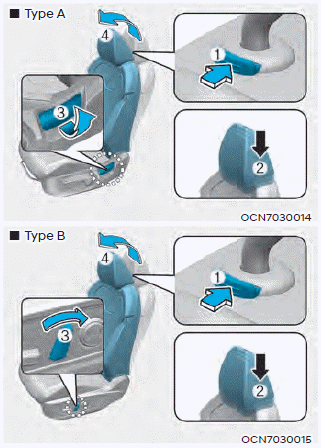
5. To use the rear seat, lift and pull the seatback rearward. Pull the seatback firmly until it clicks into place. Make sure the seatback is locked in place.
WARNING
When returning the rear seatback from a folded to an upright position, hold the seatback and return it slowly. Ensure that the seatback is completely locked into its upright position by pushing on the top of the seatback. In an accident or sudden stop, an unlocked seatback could allow cargo to move forward with great force and enter the passenger compartment, which could result in serious injury or death.
WARNING
Do not place objects in the rear seats, since they cannot be properly secured and may hit vehicle occupants in a collision causing serious injury or death.
WARNING
Make sure the vehicle is off, the shift button is in P (Park), and the parking brake is securely applied whenever loading or unloading cargo. Failure to take these steps may allow the vehicle to move if the shift button is inadvertently moved to another position.
Armrest
.png)
The armrest is located in the center of the rear seat. Pull the armrest down from the seatback to use it.
Head Restraints
The vehicle’s front and rear seats have adjustable head restraints. The head restraints provide comfort for passengers, but more importantly they are designed to help protect passengers from whiplash and other neck and spinal injuries during an accident, especially in a rear impact collision.
WARNING
To reduce the risk of serious injury or death in an accident, take the following precautions when adjusting your head restraints:
- Always properly adjust the head restraints for all passengers BEFORE starting the vehicle.
- NEVER let anyone ride in a seat with the head restraints removed or reversed.
.png)
- Adjust the head restraints so the middle of the head restraint is at the same height as the height of the top of the eyes.
- NEVER adjust the head restraint position of the driver’s seat when the vehicle is in motion.
- Adjust the head restraint as close to the passenger’s head as possible. Do not use a seat cushion that holds the body away from the seatback.
- Make sure the head restraint locks into position after adjusting it.
NOTICE
To prevent damage, NEVER hit or pull on the head restraints.
CAUTION
When there are no occupants in the rear seats, adjust the height of the head restraint to the lowest position. The rear seat head restraint can reduce the visibility of the rear area.
Front seat head restraints
.png)
Both the driver’s and passenger’s front seat are equipped with adjustable head restraints for the safety and comfort.
Adjusting the height up and down
.png)
To raise the head restraint:
1. Pull it up to the desired position (1).
To lower the head restraint:
1. Push and hold the release button (2) on the head restraint support.
2. Lower the head restraint to the desired position (3).
Forward and rearward adjustment
.png)
The head restraint can be adjusted forward to 3 different positions by pulling the head restraint forward to the desired detent. To adjust the head restraint to it’s furthest rearwards position, pull it fully forward to the farthest position and release it.
NOTICE
If you recline the seatback towards the front with the head restraint and seat cushion raised, the head restraint may come in contact with the sunvisor or other parts of the vehicle.
Removal/Reinstallation
To remove the head restraint:
1. Recline the seatback (2) rearward using the seatback angle lever (1).
2. Raise the head restraint as far as it can go.
3. Press the head restraint release button (3) while pulling the head restraint up (4).
WARNING
NEVER allow anyone to travel in a seat with the head restraint removed.
To reinstall the head restraint:
1. Put the head restraint poles (2) into the holes while pressing the release button (1).
2. Adjust the head restraint to the appropriate height.
3. Adjust the seatback (4) forward using the seatback angle lever (3).
WARNING
Always make sure the head retraint locks into position after reinstalling and adjusting it properly.
Rear seat head restraints
The rear seats are equipped with head restraints in all the seating positions for the passenger’s safety and comfort.
Adjusting the height up and down
To raise the head restraint:
1. Pull it up to the desired position (1). To lower the head restraint:
1. Push and hold the release button (2) on the head restraint support.
2. Lower the head restraint to the desired position (3).
Seat Warmers
Front seat warmers
Seat warmers are provided to warm the seats during cold weather.
WARNING
The seat warmers can cause a SERIOUS BURN, even at low temperatures and especially if used for long periods of time.
Passengers must be able to feel if the seat is becoming too warm so they can turn it off, if needed.
People who cannot detect temperature change or pain to the skin should use extreme caution, especially the following types of passengers:
- Infants, children, elderly or disabled persons, or hospital outpatients.
- People with sensitive skin or who burn easily.
- Fatigued individuals.
- Intoxicated individuals.
- People taking medication that can cause drowsiness or sleepiness.
WARNING
NEVER place anything on the seat that insulates against heat when the seat warmer is in operation, such as a blanket or seat cushion. This may cause the seat warmer to overheat, causing a burn or damage to the seat.
NOTICE
To prevent damage to the seat warmers and seats:
- Never use a solvent such as paint thinner, benzene, alcohol or gasoline to clean the seats.
- Do not place heavy or sharp objects on seats equipped with seat warmers.
- Do not change the seat cover. It may damage the seat warmer or air ventilation system.

While the engine is running, push either of the switches to warm the driver’s seat or front passenger’s seat.
During mild weather or under conditions where the operation of the seat warmer is not needed, keep the switches in the OFF position.
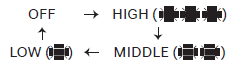
• Manual temperature control
Each time you push the switch, the temperature setting of the seat is changed as follows:
-- Front seat
• Automatic temperature control
The seat warmer starts to automatically control the seat temperature in order to prevent low-temperature burns after being manually turned ON.
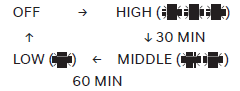
You may manually press the switch to increase seat temperature. However, it soon returns the automatic mode again.
- When pressing the switch for more than 1.5 seconds with the seat warmer operating, the seat warmer will turn OFF.
- The seat warmer defaults to the OFF position whenever the ignition switch is in the ON position. However, if the Auto Comfort Control function is ON, the driver’s seat warmer will turn on and off depending on the ambient temperature.
- Auto Comfort Control (for driver’s seat, if equipped)
The seat warmer automatically controls the seat temperature depending on the ambient temperature when the engine is running. If the seat warmer switch is pushed, the seat warmer will have to be controlled manually.To use this function, it must be activated from the Settings menu in the AVN system screen. For more details, refer to the separately supplied Car Infotainment System manual.


