 Hyundai Elantra MD/UD: Rear Seat. Repair procedures
Replacement
Seat Assembly Replacement
| 1. |
After loosening the mounting bolts, then remove the rear seat
cushion (A).
|
| 2. |
Disconnect the rear seat heater connectors (A).
|
| 3. |
After loosening the mounting bolts, then remove the rear seat
back (A).
|
| 4. |
Installation is the reverse of removal.
|
Seat Back Cover Replacement [RH]
|
| 1. |
Remove the rear seat assembly.
|
| 2. |
Push the lock pin (B), remove the headrest (A).
|
| 3. |
After loosening the mounting screws, then remove the rear seat
back webbing guide (A).
|
| 4. |
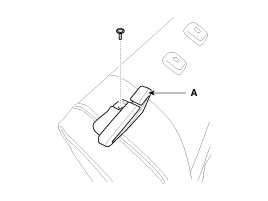
Remove the armrest cap (B).
|
| 5. |
After loosening the mounting bolt, then remove the armrest (A).
|
| 6. |
After loosening the mounting screws, then remove the armrest board
(A).
|
| 7. |
Using a screwdriver or remover, remove the seat back cover (A).
|
| 8. |
Remove the protector (A).
|
| 9. |
Pull out the headrest guides (A) while pinching the end of the
guides, and remove them.
|
| 10. |
Remove the seat back cover from the frame.
|
| 11. |
After removing the velcro tape (B) on the rear of seat back and
remove the seat back cover (A).
|
| 12. |
Installation is the reverse of removal.
|
Seat Back Cover Replacement [LH]
|
| 1. |
Remove the rear seat assembly.
|
| 2. |
Push the lock pin (B), remove the headrest (A).
|
| 3. |
After loosening the mounting screws, then remove the rear seat
back webbing guide (A).
|
| 4. |
Using a screwdriver or remover, remove the seat back cover (A).
|
| 5. |
Remove the protector (A).
|
| 6. |
Pull out the headrest guides (A) while pinching the end of the
guides, and remove them.
|
| 7. |
Remove the seat back cover from the frame.
|
| 8. |
After removing the velcro tape (B) on the rear of seat back and
remove the seat back cover (A).
|
| 9. |
Installation is the reverse of removal.
|
Rear Seat Cushion Cover Replacement
|
| 1. |
Remove the rear seat cushion.
|
| 2. |
Remove the clips (A).
|
| 3. |
After removing the hog-ring clips (B) on the rear of seat cushion
and remove the seat cushion cover (A).
|
| 4. |
Installation is the reverse of removal.
|


