Specifications
Item
|
Type
|
Bulb Watt (W)
|
Front
|
Head lamp
(Halogen)
|
Halogen
|
Low beam / High beam
|
9005L+ / H7LL
|
60 / 55
|
Turn signal lamp / Position lamp
|
PY28W/8W
|
28/8
|
HID + D.B.L
|
Low beam / High beam
|
D5S / H7LL
|
25W / 55
|
Turn signal lamp
|
PY28W/8W
|
28/8
|
Side marker
|
W5W
|
5
|
Daytime Running Light (DRL)
|
P21W
|
21
|
Door mirror turn signal lamp
|
LED
|
LED
|
Rear
|
Rear combination
|
Bulb Type
|
Tail lamp
|
P21/5W
|
5
|
Turn signal lamp
|
PY27W
|
27
|
Back up lamp
|
W16W
|
16
|
Side Marker
|
W5W
|
5
|
Tail / Stop lamp
|
PY21/5W
|
21
|
LED Type
|
Stop / Tail lamp
|
LED
|
LED
|
Back up lamp
|
W 16W
|
16
|
Turn signal lamp
|
PY27W
|
27
|
Side Marker
|
W5W
|
5
|
Stop lamp
|
LED
|
LED
|
License plate lamp
|
W5W
|
5
|
Interior
|
Map lamp
|
W10
|
10
|
Room lamp
|
FESTOON
|
8
|
Luggage lamp
|
FESTOON
|
5
|
Vanity lamp
|
FESTOON
|
5
|
Components and Components Location

1. Head lamp (Low)
2. Head lamp (High)
3. Head lamp (Low - HID)
4. Fog lamp / Daytime Running Light (DRL)
5. Position lamp / Turn signal lamp
|
6. Side marker
7. Turn signal lamp (Door mirror)
8. Vanity lamp
9. Map lamp
|

1. Tail lamp
2. Stop lamp
3. Back up lamp
4. Turn signal lamp
|
5. High mounted stop lamp
6. Lisence lamp
7. Room lamp
8. Side marker
|
Head Lamps Components and Components Location
[Standard]

1. Head lamp (Low)
2. Head lamp (High)
3. Turn signal lamp
|
4. Dust cap
5. Position lamp
6. Side marker
|
[HID]

1. Head lamp (Low - HID)
2. Head lamp (High)
3. Turn signal lamp
|
4. Dust cap
5. Side marker
|
Head Lamps Description and Operation
| 1. |
Bulb
| (1) |
Elements Xenon gas
: Xenon gas activates the initial reaction for rapid illuminating.
Molybdenum electrode: anode arcingMetal halide salts : color
composing component
|
| (2) |
Lightening principle
When Xenon gas and metal halide salt will discharge the molybdenum
anode in a capsule, it emits light.
|
|
| 2. |
Ignitor Ignitor (A) is an electromagnetic
transformer that receives current from ballast and boost voltage to light
on the arc light source in any environment.

|
| 3. |
Ballast
| (1) |
Ballast (A) delivers
an instant high voltage pulse to the ignitor electrode, to initialize
discharge in the source. |
| (2) |
Ballast supplies the
stable power to the bulb and the ignitor during initialization and
normal state of arc.
|
|
Head Lamps Repair procedures
| Head Lamp Aiming Instructions |
[Mechanical Aiming]
The head lamps should be aimed with the proper beam-setting
equipment, and in accordance with the equipment manufacturer's instructions.
| • |
If there are any regulations
pertinent to the aiming of head lamps in the area where the vehicle
is to be used, adjust so as to meet those requirements.
|
|
Alternately turn the adjusting gear to adjust the head lamp aiming. If beam-setting
equipment is not available, proceed as follows :
| 1. |
Inflate the tires to the specified
pressure and remove any loads from the vehicle except the driver, spare
tire, and tools. |
| 2. |
The vehicle should be placed
on a flat floor. |
| 3. |
. Draw vertical lines (Vertical
lines passing through respective head lamp centers) and a horizontal line
(Horizontal line passing through center of head lamps) on the screen. |
| 4. |
With the head lamp and battery
in normal condition, aim the head lamps so the brightest portion falls on
the horizontal and vertical lines. A : Vertical (High beam / Low beam)
| (1) |
Head lamp

|
|
Head Lamp and Fog Lamp Aiming Point


| 1. |
Head Lamp (Low beam)
| A. |
With the low beam turned
on, adjust the cut-off line to be located as shown in the picture
below. |
| B. |
If head lamp leveling
device is equipped, adjust the head lamp leveling device switch
with 0 positions. |

|
| 2. |
Turn the front fog lamp on without
the driver aboard. The cut-off line should be projected in the allowable
range (shaded region)

|
Head Lamp Fogging
Check the below instruction procedure when the head lamp is
fogged.

| 1. |
Disconnect the negative (-) battery
terminal. |
| 2. |
Remove the front bumper cover.
(Refer to Body - "Front Bumper Cover")
|
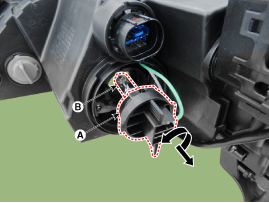
| 3. |
Disconnect the head lamp connector
(A).
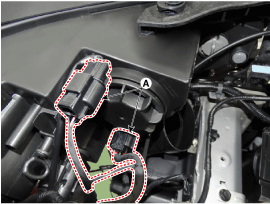
|
| 4. |
Remove the head lamp (B) mounting
bolts.

| •
|
Take care that
holding clip (A) is not to be damaged. |
|
|
| 1. |
Install the head lamp assembly
after connecting the connector. |
| 2. |
Install the front bumper corver. |
| 3. |
Connect the negative (-) battery
terminal. |
[Side Marker Lamp]
| 1. |
Remove the ignition key from
the vehicle. |
| 2. |
Remove the bulb socket (B) and
side marker bulb (A) from the lamp assembly.

|
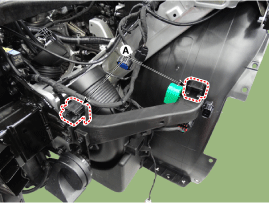
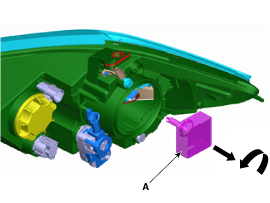
[Daytime Running Light (DRL)]
| 1. |
Remove the ignition key from
the vehicle. |
| 2. |
Remove the front bumper corver. |
| 3. |
Remove the front fog lamp assembly
(A) after loosening the mounting screws.
|
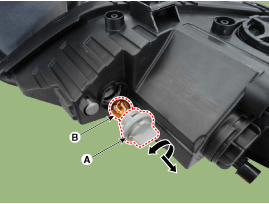
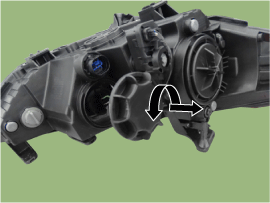
[Turn Signal Lamp]
| 1. |
Turn the head lamp power off. |
| 2. |
Remove the bulb socket (B) and
turn signal lamp bulb (A) from the lamp assembly.
|
[Bulb (Low Beam)]
| 1. |
Turn the head lamp power off. |
| 2. |
Remove the bulb caps from the
head lamp assembly after turning in the counter clock-wise direction.
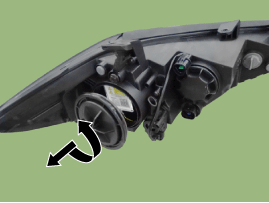
|
| 3. |
Remove the head lamp low beam
bulb (B) after removing the socket (A) from the head lamp assembly. [Standard
(Halgogen)]
[HID]
|
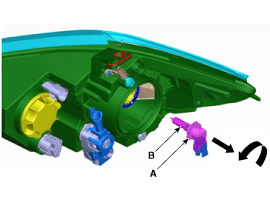
[Bulb (High Beam)]
| 1. |
Turn the head lamp power off. |
| 2. |
Remove the bulb caps from the
head lamp assembly after turning in the counter clock-wise direction.
|
| 3. |
Remove the head lamp high beam
bulb (A) after disengaing the retaining clip (B) and disconnect the lamp
connector.
|
Room Lamp Repair procedures
[Room Lamp]
| 1. |
Disconnect the negative (-) battery
terminal. |
| 2. |
Using a screwdriver or remover,
Separate the room lamp lens (A) from the room lamp.
| •
|
Put on gloves
to prevent hand injuries. |
| •
|
When removing
with a flat-tip screwdriver or remover, wrap protective
tape around the tools to prevent damage to components.
|
|
|
| 3. |
If it is necessary to replace
the bulb, remove the bulb (A) after disengaging the room lamp lens. |
| 4. |
Disengage the room lamp (B) after
loosening the mounting screws.

| •
|
When removing
the room lamp, be careful of the direction in which the
tool is inserted. |
| •
|
Use caution when
inserting the tool in the opposite direction, as the room
lamp is damaged. |

|
|
| 5. |
Remove the room lamp assembly
after disconnect the room lamp connector.
|
[Vanity Lamp]
| 1. |
Separate the vanity Lamp (A)
from the roof trim after disengaging the mounting clip (B).

|
[Room Lamp]
| 1. |
Install the room lamp after connect
the connector. |
| 2. |
Install the room lamp lens |
| 3. |
Connect the negative (-) battery
terminal. |
[Vanity Lamp]
| 1. |
Install the vanity lamp. |
| 2. |
Connect the negative (-) battery
terminal. |
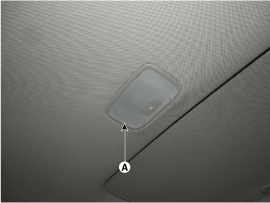
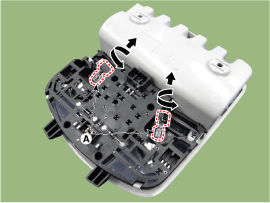
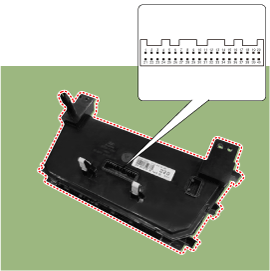
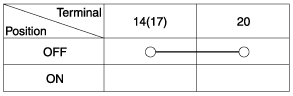
Overhead Console Lamp Repair procedures
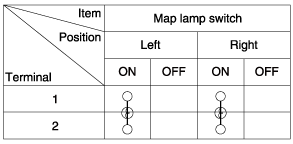
| 1. |
Remove the overhead console lamp
assembly then check for continuity between terminals. If the continuity
is not as specified, replace the map lamp switch.

|
| 1. |
Disconnect the negative (-) battery
terminal. |
| 2. |
Remove the mounting screws (2EA).
And then remove the overhead console (A).

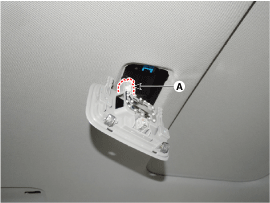
|
| 3. |
Remove the overhead console after
disconnect the connector (A).
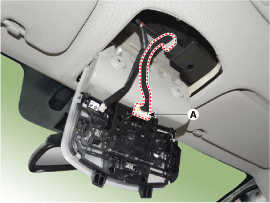
|
| 4. |
Remove the overhead console lamp
(B) by turning the socket.
|
| 1. |
Install the overhead console
lamp after connecting the connector. |
| 2. |
Install the lens after tightening
2 screws. |
Hazard Lamp Switch Repair procedures
| 1. |
Check for continuity between
terminals. If the continuity is not as specified, replace the hazard lamp
switch.
Manual (Auto)
|
| • |
Wrap the protective tape
on the tool to disassemble with the screwdriver or remover. |
| • |
e caution in keeping
and handling during disassembling/assembling because it is easily
contaminated with lubricant and oil. |
| • |
Use caution for the crash
pad garnish and door trim upper garnish made of timber (Real wood)
because they can be scratched or picked. |
| • |
Be careful not to scratch
the door trim and other parts. |
|
| 1. |
Disconnect the negative (-) battery
terminal. |
| 2. |
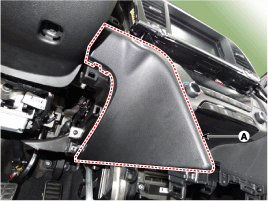
Remove the glove box upper cover
assembly. (Refer to Body - "Glove Box Upper Cover Assembly")
|
| 3. |
Loosen the mounting screws and
remove the crash pad center lower cover [LH] (A).
|
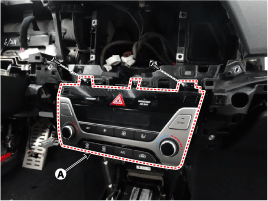
| 4. |
After loosening the mounting
screws, remove the A/C & heater controller unit (A).
|
| 5. |
Disconnect the A/C & heater controller
connectors (A) and hose (B).

|
| 1. |
Install the center facia panel
switch assembly. |
| 2. |
Connect the negative (-) battery
terminal. |
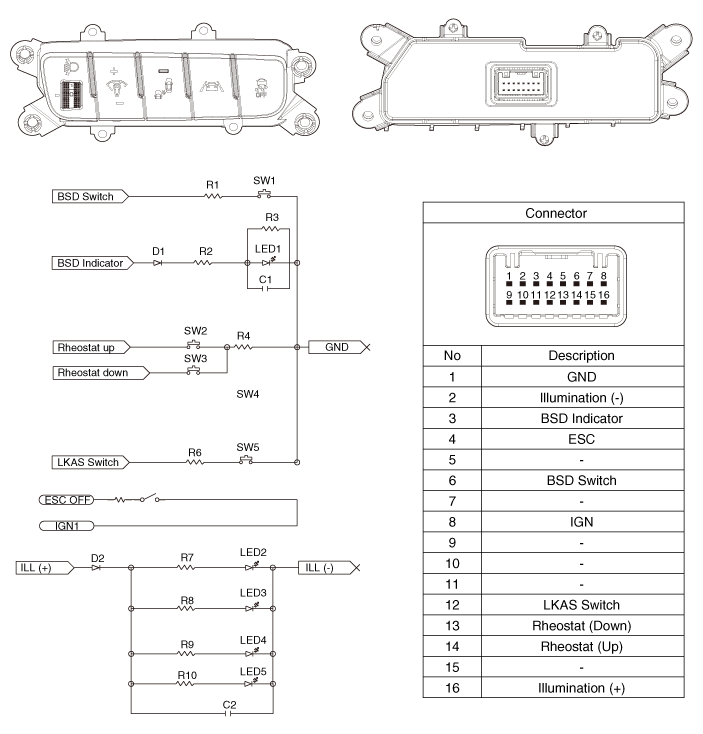
Rheostat Components and Components Location
Rheostat Repair procedures
| 1. |
Disconnect the negative (-) battery
terminal. |
| 2. |
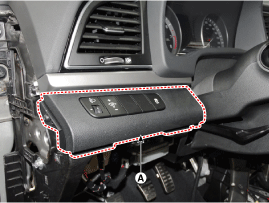
Remove the crash pad lower panel.
(Refer to Body - "Crash Pad Lower Panel")
|
| 3. |
Disconnect the rheostat switch
connector (A).
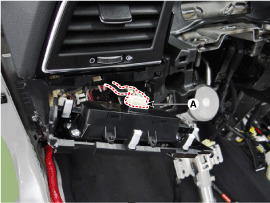
|
| 4. |
Check for intensity of new rheostat
switch. If the light intensity of the lamps changes smoothly without any
flickering when the rheostat is turned, it can be assumed that the rheostat
is normal.
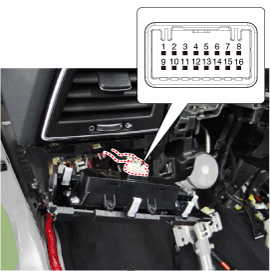
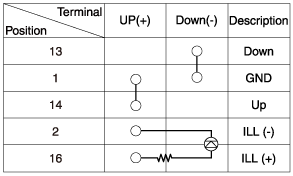
|
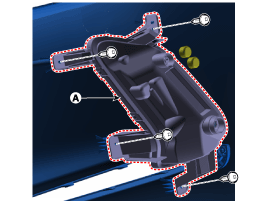
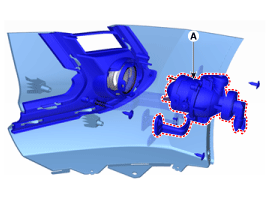
Front Fog Lamps Repair procedures
| 1. |
Disconnect the negative (-) battery
terminal. |
| 2. |
Remove the front bumper. (Refer
to Body - "Front Bumper Cover")
|
| 3. |
Disconnect the front fog lamp
connector (A). |
| 4. |
Remove the front fog lamp assembly
(A) after loosening the mounting nut.
|
| 1. |
Install the front fog lamp assembly. |
| 2. |
Connect the front fog lamp connector. |
| 3. |
Install the front bumper. |
| 4. |
Connect the negative (-) battery
terminal. |
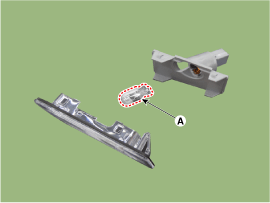
License Lamps Repair procedures
| 1. |
Disconnect the negative (-) battery
terminal. |
| 2. |
Remove the trunk lid panel.
(Refer to Body - "Trunk Lid Trim")
|
| 3. |
Remove the license lamp (A) after
disengaging the license lamp mounting clip (B).
|
| 4. |
Replace the bulb (A) after removing
a lens.
|
| 1. |
Install the license lamp assembly. |
| 2. |
Install the trunk lid panel. |
| 3. |
Connect the negative (-) battery
terminal. |
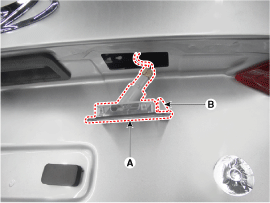
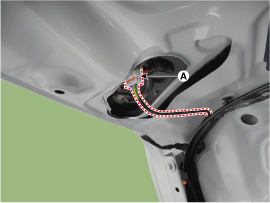
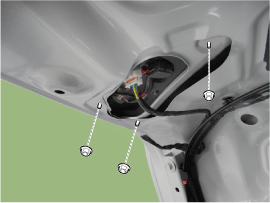
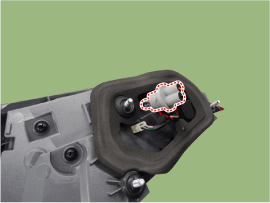
High Mounted Stop Lamp Repair procedures
| 1. |
Disconnect the negative (-) battery
terminal. |
| 2. |
Remove the rear package tray
trim. (Refer to Body - "Rear Package Tray Trim")
|
| 3. |
Remove the high mounted stop
lamp assembly (A) after loosening the mounting nuts.
|
| 1. |
Install the rear high mounted
stop lamp. |
| 2. |
Install the package tray trim. |
| 3. |
Connect the negative (-) battery
terminal. |
Rear Combination Lamp Repair procedures
| 1. |
Disconnect the negative (-) battery
terminal. |
| 2. |
Remove the outside rear combination
lamp assembly (B) after disconnecting the connector (A).
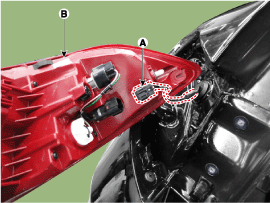
|
| 3. |
Remove the bulb (A) after turning
it in the counter clock-wise direction. [LED Type]

[Bulb Type]
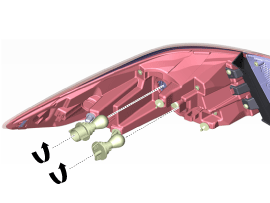
|
| 4. |
Disconnect the inside rear combination
lamp connector (A) after removing the rear combination lamp cover.
|
| 5. |
Remove the inside rear combination
lamp assembly after loosening the nuts.
|
| 6. |
If it is necessary to replace
the bulb, remove the bulb after removing the tailgate cover.
|
| 1. |
Install the inside combination
lamp assembly after assembling the bulb. |
| 2. |
Install the rear combination
lamp assembly after assembling the bulbs and connecting the lamp connector. |
Components and Components Location
Component Location
1. Sunroof
2. Sunroof switch
3. Sunroof motor & controller
Schematic Diagrams
C ...
Specifications
Specifications
Items
Specifications
Rated voltage
5V
Load
Max. 1mA (Relay load)
Illuminations (LUX)
...
 Hyundai Elantra AD: Lighting System


