 Hyundai Elantra AD: If You Have a Flat Tire
With Spare Tire
WARNING
Changing a tire can be dangerous. Follow the instructions in this section when changing a tire to reduce the risk of serious injury or death.
CAUTION
Be careful as you use the jack handle to stay clear of the flat end. The flat end has sharp edges that could cause cuts.
Jack and tools
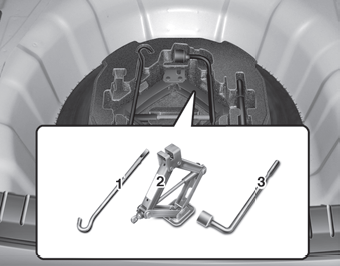
➀ Jack handle
② Jack
③ Wheel lug nut wrench
The jack, jack handle, and wheel lug nut wrench are stored in the luggage compartment under the luggage box cover.
The jack is provided for emergency tire changing only.
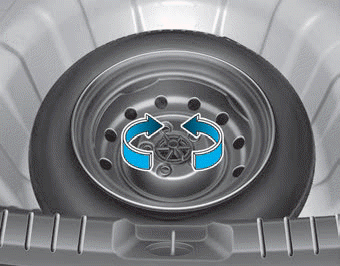
Turn the winged hold down bolt counterclockwise to remove the spare tire.
Store the spare tire in the same compartment by turning the winged hold down bolt clockwise.
To prevent the spare tire and tools from "rattling", store them in their proper location.
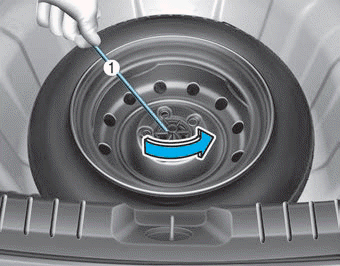
If it is hard to loosen the tire holddown wing bolt by hand, you can loosen it easily using the jack handle.
1. Put the jack handle (1) inside of the tire hold-down wing bolt.
2. Turn the tire hold-down wing bolt counterclockwise with the jack handle.
Changing tires
WARNING
A vehicle can slip or roll off of a jack causing serious injury or death to you or those nearby. Take the following safety precautions:
- Never place any portion of your body under a vehicle that is supported by a jack.
- NEVER attempt to change a tire in the lane of traffic. ALWAYS move the vehicle completely off the road on level, firm ground away from traffic before trying to change a tire. If you cannot find a level, firm place off the road, call a towing service for assistance.
- Be sure to use the jack provided with the vehicle.
- ALWAYS place the jack on the designated jacking positions on the vehicle and NEVER on the bumpers or any other part of the vehicle for jacking support.
- Do not start or run the engine while the vehicle is on the jack.
- Do not allow anyone to remain in the vehicle while it is on the jack.
- Keep children away from the road and the vehicle.
Follow these steps to change your vehicle's tire:
1. Park on a level, firm surface.
2. Move the shift lever into P (Park) or into R (Reverse) if equipped with a manual transmission, apply the parking brake, and place the ignition switch in the LOCK/OFF position.
3. Press the hazard warning flasher button.
4. Remove the wheel lug nut wrench, jack, jack handle, and spare tire from the vehicle.

5. Block both the front and rear of the tire diagonally opposite of the tire you are changing.
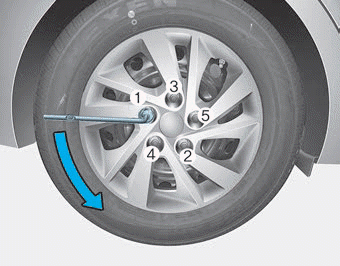
6. Loosen the wheel lug nuts counterclockwise one turn each in the order shown above, but do not remove any lug nuts until the tire has been raised off of the ground.
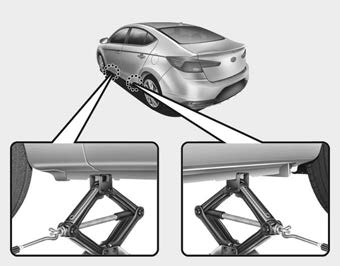
7. Place the jack at the designated jacking position under the frame closest to the tire you are changing. The jacking positions are plates welded to the frame with two notches. Never jack any other position or part of the vehicle. Doing so may damage the side seal molding or other parts of the vehicle.
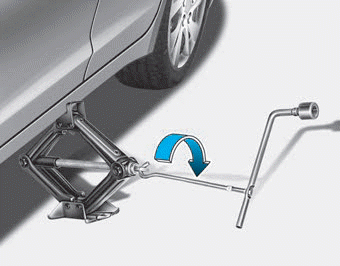
8. Insert the jack handle into the jack and turn it clockwise, raising the vehicle until the tire clears the ground. Make sure the vehicle is stable on the jack.
9. Loosen the lug nuts with the wheel lug nut wrench and remove them with your fingers. Remove the wheel from the studs and lay it flat on the ground out of the way. Remove any dirt or debris from the studs, mounting surfaces, and wheel.
10. Install the spare tire onto the studs of the hub.
11. Tighten the lug nuts with your fingers onto the studs with the smaller end of the lug nuts closest to the wheel.
12. Lower the vehicle to the ground by turning the jack handle counterclockwise.
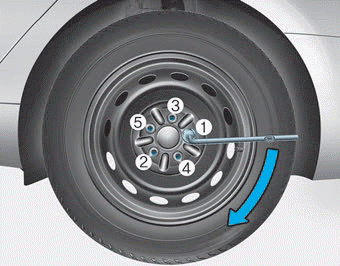
13. Use the wheel lug nut wrench to tighten the lug nuts in the order shown. Double-check each lug nut until they are tight. After changing tires, have an authorized HYUNDAI dealer tighten the lug nuts to their proper torque as soon as possible. The wheel lug nut should be tightened to 79~94 lbf·ft (11~13 kgf·m).
If you have a tire gauge, check the tire pressure (see "Tires and Wheels" in chapter 8 for tire pressure instructions.). If the pressure is lower or higher than recommended, drive slowly to the nearest service station and adjust it to the recommended pressure. Always reinstall the valve cap after checking or adjusting tire pressure. If the cap is not replaced, air may leak from the tire. If you lose a valve cap, buy another and install it as soon as possible. After changing tires, secure the flat tire and return the jack and tools to their proper storage locations.
NOTICE
Check the tire pressure as soon as possible after installing a spare tire. Adjust it to the recommended pressure.
CAUTION
Your vehicle has metric threads on the studs and lug nuts. Make certain during tire changing that the same nuts that were removed are reinstalled. If you have to replace your lug nuts make sure they have metric threads to avoid damaging the studs and ensure the wheel is properly secured to the hub. Consult an authorized HYUNDAI dealer for assistance.
If any of the equipment such as the jack, lug nuts, studs, or other equipment is damaged or in poor condition, do not attempt to change the tire and call for assistance.
Use of compact spare tires
Compact spare tires are designed for emergency use only. Drive carefully on the compact spare tire and always follow the safety precautions.
WARNING
To prevent compact spare tire failure and loss of control possibly resulting in an accident:
- Use the compact spare tire only in an emergency. • NEVER operate your vehicle over 50 mph (80 km/h).
- Do not exceed the vehicle's maximum load rating or the load carrying capacity shown on the sidewall of the compact spare tire.
- Do not use the compact spare tire continuously. Repair or replace the original tire as soon as possible to avoid failure of the compact spare tire.
When driving with the compact spare tire mounted to your vehicle:
- Check the tire pressure after installing the compact spare tire. The compact spare tire should be inflated to 60 psi (420 kPa).
- Do not take this vehicle through an automatic car wash while the compact spare tire is installed.
- Do not use the compact spare tire on any other vehicle because this tire has been designed especially for your vehicle.
- The compact spare tire’s tread life is shorter than a regular tire. Inspect your compact spare tire regularly and replace worn compact spare tires with the same size and design, mounted on the same wheel.
- Do not use more than one compact spare tire at a time.
NOTICE
When the original tire and wheel are repaired and reinstalled on the vehicle, the lug nut torque must be set correctly. The correct lug nut tightening torque is 79~94 lbf·ft (11~13 kgf·m).
CAUTION
To prevent damaging the compact spare tire and your vehicle:
- Drive slowly enough for the road conditions to avoid all hazards, such as a potholes or debris.
- Avoid driving over obstacles. The compact spare tire diameter is smaller than the diameter of a conventional tire and reduces the ground clearance approximately 1 inch (25 mm).
- Do not use tire chains on the compact spare tire. Because of the smaller size, a tire chain will not fit properly.
- Do not use the compact spare tire on any other wheels, nor should standard tires, snow tires, wheel covers or trim rings be used with the compact spare wheel.
Jack label
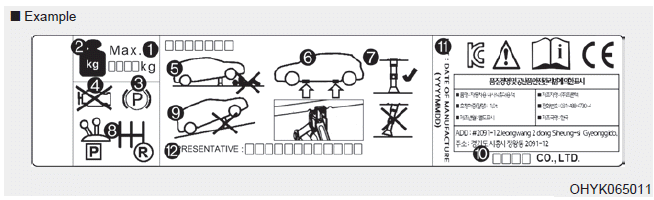
The actual Jack label in the vehicle may differ from the illustration.
For more detailed specifications, refer to the label attached to the jack.
1. Model Name
2. Maximum allowable load
3. When using the jack, set your parking brake.
4. When using the jack, stop the engine.
5. Do not get under a vehicle that is supported by a jack.
6. The designated locations under the frame
7. When supporting the vehicle, the base plate of jack must be vertical under the
lifting point.
8. Shift into Reverse gear on vehicles with manual transmission or move the shift
lever to the P (Park) position on vehicles with Intelligent Variable Transmission
(IVT)/dual clutch transmission.
9. The jack should be used on firm level ground.
10. Jack manufacture
11. Production date
12. Representative company and address
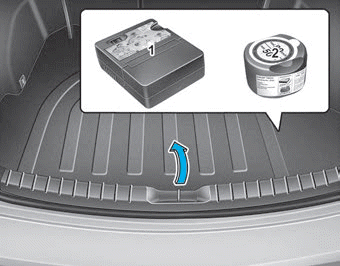
With Tire Mobility Kit (TMK, if equipped) - Type A
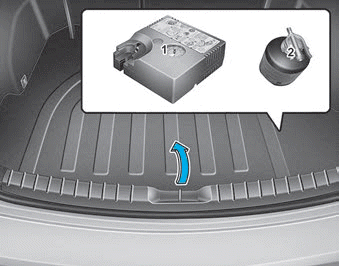
For safe operation, carefully read and follow the instructions in this manual before use.
(1) Compressor
(2) Sealant bottle
The Tire Mobility Kit is a temporary fix to the tire and we recommend that the system be inspected by an authorized HYUNDAI dealer.
CAUTION
When two or more tires are flat, do not use the tire mobility kit because the supported one sealant of Tire Mobility Kit is only used for one flat tire.
WARNING
Do not use the Tire Mobility Kit to repair punctures in the tire walls. This can result in an accident due to tire failure.
WARNING
Have your tire repaired as soon as possible. The tire may loose air pressure at any time after inflating with the Tire Mobility Kit.
Introduction
With the Tire Mobility Kit you stay mobile even after experiencing a tire puncture.
The system of compressor and sealing compound effectively and comfortably seals most punctures in a passenger car tire caused by nails or similar objects and reinflates the tire.
After you ensured that the tire is properly sealed you can drive cautiously on the tire (distance up to 200 km (120 miles)) at a max. speed of 80 km/h (50 mph) in order to reach a service station or tire dealer to have the tire replaced.
It is possible that some tires, especially with larger punctures or damage to the sidewall, cannot be sealed completely.
Air pressure loss in the tire may adversely affect tire performance.
For this reason, you should avoid abrupt steering or other driving maneuvers, especially if the vehicle is heavily loaded or if a trailer is in use.
The Tire Mobility Kit is not designed or intended as a permanent tire repair method and is to be used for one tire only. This instruction shows you step by step how to temporarily seal the puncture simply and reliably.
Read the section "Notes on the safe use of the Tire Mobility Kit".
WARNING
Do not use the TMK if a tire is severely damaged by driving run flat or with insufficient air pressure.
Only punctured areas located within the tread region of the tire can be sealed using the TMK.
Notes on the safe use of the Tire Mobility Kit
- Park your car at the side of the road so that you can work with the Tire Mobility Kit away from moving traffic.
- To be sure your vehicle will not move, even when you're on fairly level ground, always set your parking brake.
- Only use the Tire Mobility Kit for sealing/inflation passenger car tires. Only punctured areas located within the tread region of the tire can be sealed using the tire mobility kit.
- Do not use on motorcycles, bicycles or any other type of tires.
- When the tire and wheel are damaged, do not use Tire Mobility Kit for your safety.
- Use of the Tire Mobility Kit may not be effective for tire damage larger than approximately 6 mm (0.24 in). If the tire cannot be made roadworthy with the Tire Mobility Kit, we recommend that you contact an authorized HYUNDAI dealer.
- Do not use the Tire Mobility Kit if a tire is severely damaged by driving run flat or with insufficient air pressure.
- Do not remove any foreign objects such as nails or screws that have penetrated the tire.
- Provided the car is outdoors, leave the engine running. Otherwise operating the compressor may eventually drain the car battery.
- Never leave the Tire Mobility Kit unattended while it is being used.
- Do not leave the compressor running for more than 10 min. at a time or it may overheat.
- Do not use the Tire Mobility Kit if the ambient temperature is below -30°C (-22°F).
- In case of skin contact with the sealant, wash the area thoroughly with plenty of water. If the irritation persists, seek medical attention.
- In case of eye contact with the sealant, flush your eyes for at least 15 minutes. If the irritation persists, seek medical attention.
- In case of swallowing the sealant, rinse the mouth and drink plenty of water. However, never give anything to an unconscious person and seek medical attention immediately.
- Long time exposure to the sealant may cause damage to bodily tissue such as kidney, etc.
Components of the Tire Mobility Kit
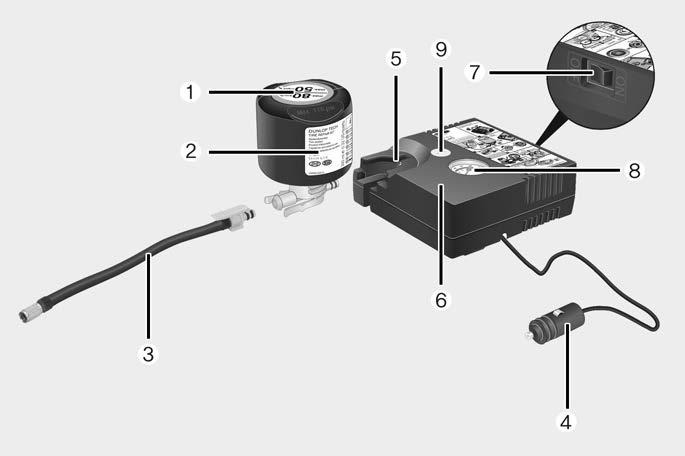
1. Speed-restriction label
2. Sealant bottle and label with speed restriction
3. Filling hose from sealant bottle to wheel
4. Connectors and cable for the power outlet direct connection
5. Holder for the sealant bottle
6. Compressor
7. ON/OFF switch
8. Pressure gauge for displaying the tire inflation pressure
9. Button for reducing the tire inflation pressure
Connectors, cable and connection hose are stored in the compressor housing.
Strictly follow the specified sequence, otherwise the sealant may escape under high pressure.
WARNING
Expired sealant
Do not use the Tire sealant after the sealant has expired (i.e. past the expiration date on the sealant container). This can increase the risk of tire failure.
WARNING
Sealant
- Keep out of reach of children.
- Avoid contact with eyes.
- Do not swallow.
Using the Tire Mobility Kit
CAUTION
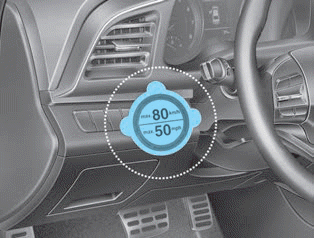
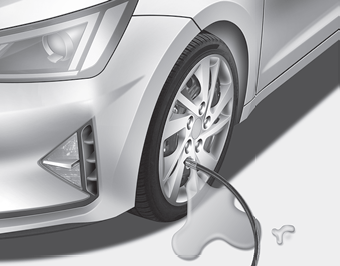
Detach the speed restriction label (1) from the sealant bottle (2), and place it in a highly visible place inside the vehicle such as on the steering wheel to remind the driver not to drive too fast.
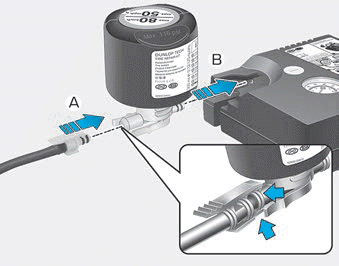
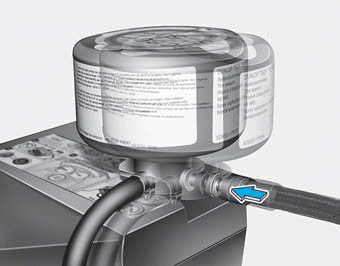
1. Shake the sealant bottle (2).
2. Connect the filling hose (3) to the sealant bottle (2) in a (A) direction and connect the sealant bottle to the compressor (6) in a B direction.
3. Ensure that the compressor is switched OFF.

4. Unscrew the valve cap from the valve of the detective wheel and screw the filling hose (3) of the sealant bottle onto the valve.
NOTICE
Securely install the sealant filling hose to the valve. If not, sealant may flow backward, possibly clogging the filling hose.
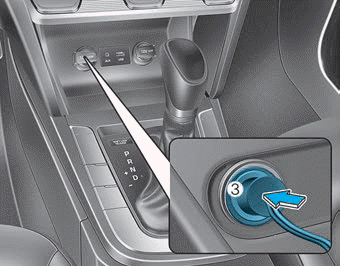
5. Plug the compressor power cord (4) into the vehicle power outlet.
NOTICE
Only use the front passenger side power outlet when connecting the power cord.
6. With the ignition switch in the ON position, switch on the compressor and let it run for approximately 5~7 minutes to fill the sealant up to proper pressure. (refer to the Tire and Wheels, chapter 8). The inflation pressure of the tire after filling is unimportant and will be checked/corrected later.
Be careful not to overinflate the tire and stay away from the tire when filling it.
CAUTION
Tire pressure
Do not attempt to drive your vehicle if the tire pressure is below 200 kPa (29 psi). This could result in an accident due to sudden tire failure.
7. Switch off the compressor.
8. Detach the hoses from the sealant bottle connector and from the tire valve.
Return the Tire Mobility Kit to its storage location in the vehicle.
Distributing the sealant
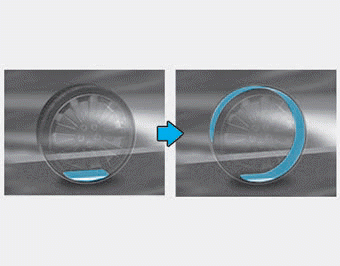
9. Immediately drive approximately 7~10 km (4~6 miles or, about 10min) to evenly distribute the sealant in the tire.
Do not exceed a speed of 80 km/h (50 mph). If possible, do not fall below a speed of 20 km/h (12 mph).
While driving, if you experience any unusual vibration, ride disturbance or noise, reduce your speed and drive with caution until you can safely pull off of the side of the road.
Call for road side service or towing. When you use the Tire Mobility Kit, the tire pressure sensors and wheel may be damaged by sealant, remove the sealant stained with tire pressure sensors and wheel and inspect in authorized dealer.
Checking the tire inflation pressure
1. After driving approximately 7~10 km (4~6 miles or about 10 min), stop at a safety location.
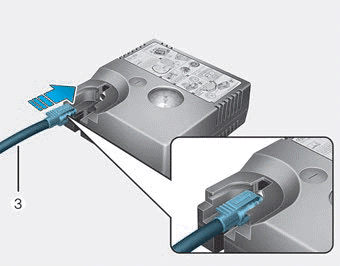
2. Connect the filling hose (3) directly into the compressor
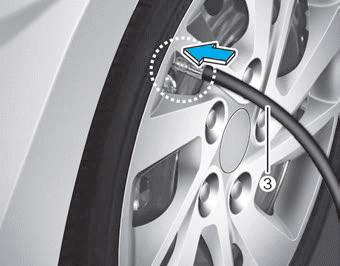
3. Connect the other end of the filling hose (3) directly into the valve.
4. Plug the compressor power cord into the vehicle power outlet.
5. Adjust the tire inflation pressure to the recomended tire inflation. With the ignition swithched on, proceed as follows.
- To increase the inflation pressure : Switch on the compressor. To check the
current inflation pressure setting, briefly switch off the compressor.
- To reduce the inflation pressure: Press the button (9) on the compressor.
NOTICE
Do not let the compressor run for more than 10 minutes, otherwise the device will overheat and may be damaged.
Information
The pressure gauge may show higher than actual reading when the compressor is running. To get an accurate tire reading, the compressor needs to be turned off.
CAUTION
If the inflation pressure is not maintained, drive the vehicle a second time, refer to Distributing the sealant. Then repeat steps 1 to 4.
Use of the TMK may be ineffectual for tire damage larger than approximately 4 mm (0.16 in).
We recommend that you contact an authorized HYUNDAI dealer if the tire cannot be made roadworthy with the Tire Mobility Kit.
WARNING
The tire inflation pressure must be at least 220 kPa (32 psi). If it is not, do not continue driving.
Call for road side service or towing.
CAUTION
Tire pressure sensor
The sealant on the tire pressure sensor and wheel should be removed when you replace the tire with a new one and inspect the tire pressure sensors at an authorized dealer.
Information
When reinstalling the repaired or replaced tire and wheel on the vehicle, tighten the wheel lug nut to 11~13 kgf·m (79~94 lbf·ft).
With Tire Mobility Kit (TMK, if equipped) - Type B
For safe operation, carefully read and follow the instructions in this manual before use.
(1) Compressor
(2) Sealant bottle
The Tire Mobility Kit is a temporary fix to the tire and the tire should be inspected by an authorized HYUNDAI dealer as soon as possible.
CAUTION
One sealant bottle for one tire
When two or more tires are flat, do not use the tire mobility kit because the supported one sealant of Tire Mobility Kit is only used for one flat tire.
WARNING
Tire wall
Do not use the Tire Mobility Kit to repair punctures in the tire walls. This can result in an accident due to tire failure.
WARNING
Temporary fix
Have your tire repaired as soon as possible. The tire may lose air pressure at any time after inflating with the Tire Mobility Kit.
Introduction
With the Tire Mobility Kit you stay mobile even after experiencing a tire puncture.
The compressor and sealing compound system effectively and comfortably seals most punctures in a passenger car tire caused by nails or similar objects and reinflates the tire.
After you ensure that the tire is properly sealed you can drive cautiously on the tire (distance up to 120 miles (200 km)) at a max. speed of (50mph (80 km/h)) in order to reach a service station or tire dealer for the tire replacement.
It is possible that some tires, especially with larger punctures or damage to the sidewall, cannot be sealed completely.
Air pressure loss in the tire may adversely affect tire performance. For this reason, you should avoid abrupt steering or other driving maneuvers, especially if the vehicle is heavily loaded or if a trailer is in use.
The Tire Mobility Kit is not designed or intended as a permanent tire repair method and is to be used for one tire only.
This instruction shows you step by step how to temporarily seal the puncture simply and reliably. Read the section "Notes on the safe use of the Tire Mobility Kit".
Notes on the safe use of the Tire Mobility Kit
- Park your car at the side of the road so that you can work with the Tire Mobility Kit away from moving traffic.
- To be sure your vehicle will not move, even when you’re on fairly level ground, always set your parking brake.
- Only use the Tire Mobility Kit for sealing/inflation passenger car tires. Only punctured areas located within the tread region of the tire can be sealed using the tire mobility kit.
- Do not use on motorcycles, bicycles or any other type of tires. • When the tire and wheel are damaged, do not use Tire Mobility Kit for your safety.
- Use of the Tire Mobility Kit may not be effective for tire damage larger than approximately 0.24 inch (6 mm).
- Please contact the nearest authorized HYUNDAI dealer if the tire cannot be made roadworthy with the Tire Mobility Kit.
- Do not use the Tire Mobility Kit, if a flat tire or an under-inflated tire is further severely damaged by being continuously driven.
- Do not remove any foreign objects such as nails or screws that have penetrated the tire.
- Provided the car is outdoors, leave the engine running. Otherwise operating the compressor may eventually drain the car battery.
- Never leave the Tire Mobility Kit unattended while it is being used.
- Do not leave the compressor running for more than 10 minutes at a time or it may overheat.
- Do not use the Tire Mobility Kit if the ambient temperature is below -22°F (-30°C).
- In case of skin contact with the sealant, wash the area thoroughly with plenty of water. If the irritation persists, seek medical attention.
- In case of eye contact with the sealant, flush your eyes for at least 15 minutes. If the irritation persists, seek medical attention.
- In case of swallowing the sealant, rinse the mouth and drink plenty of water. However, never give anything to an unconscious person and seek medical attention immediately
- Long time exposure to the sealant may cause damage to bodily tissue such as kidney, etc.
Components of the Tire Mobility Kit
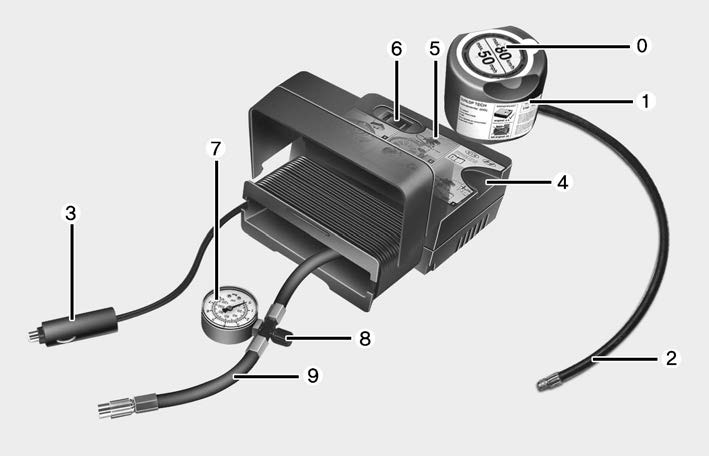
0. Speed restriction label
1. Sealant bottle and label with speed restriction
2. Filling hose from sealant bottle to wheel
3. Connectors and cable for power outlet direct connection
4. Holder for the sealant bottle
5. Compressor
6. ON/OFF switch
7. Pressure gage for displaying the tire inflation pressure
8. Screw cap for reducing tire inflation pressure
9. Hose to connect compressor and sealant bottle or compressor and wheel
Connectors, cable and connection hose are stored in the compressor housing.
Strictly follow the specified sequence, otherwise the sealant may escape under high pressure.
WARNING
Do not use the tire sealant after the sealant has expired (i.e. pasted the expiration date on the sealant container). This can increase the risk of tire failure.
WARNING
- Keep out of reach of children.
- Avoid contact with eyes.
- Do not swallow.
Using the Tire Mobility Kit
1. Detach the speed restriction label (0) from the sealant bottle (1), and place it in a highly visible place inside the vehicle such as on the steering wheel to remind the driver not to drive too fast.
2. Screw the connection hose (9) onto the connector of the sealant bottle.
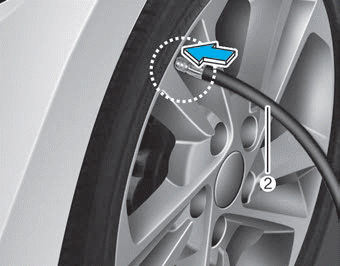
3. Unscrew the valve cap from the valve of the flat tire and screw the filling hose (2) of the sealant bottle onto the valve.
CAUTION
Securely install the sealant filling hose to the valve. If not, sealant may flow backward, possibly clogging the filling hose.
4. Insert the sealant bottle into the housing (4) of the compressor so that the bottle is upright.
5. Ensure that the compressor is switched off.
6. Plug the compressor power cord (3) into the vehicle power outlet.
7. With the ignition switch in the ON position, switch on the compressor and let it run for approximately 5~7 minutes to fill the sealant up to proper pressure. (refer to the Tire and Wheels, chapter 8). The inflation pressure of the tire after filling is unimportant and will be checked/corrected later.
Be careful not to overinflate the tire and stay away from the tire when filling it.
CAUTION
Do not attempt to drive your vehicle if the tire pressure is below 29 psi (200 kpa). This could result in an accident due to sudden tire failure.
8. Switch off the compressor.
9. Detach the hoses from the sealant bottle connector and from the tire valve.
Return the Tire Mobility Kit to its storage location in the vehicle.
WARNING
Do not leave your vehicle running in a poorly ventilated area for extended periods of time. Carbon monoxide poisoning and suffocation can occur.
Distributing the sealant
10. Immediately drive approximately 4~6 miles (7~10 km or about 10 minutes) to evenly distribute the sealant in the tire.
Do not exceed a speed of 50 mph (80 km/h). If possible, do not fall below a speed of 12 mph (20 km/h).
While driving, if you experience any unusual vibration, ride disturbance or noise, reduce your speed and drive with caution until you can safely pull off of the side of the road.
Call for road side service or towing.
When you use the Tire Mobility Kit, the tire pressure sensors and wheel may be damaged by sealant, have it inspected at an authorized dealer.
Checking the tire inflation pressure

1. After driving approximately 4~6 miles (7~10 km or about 10 minutes), stop at a safe location.
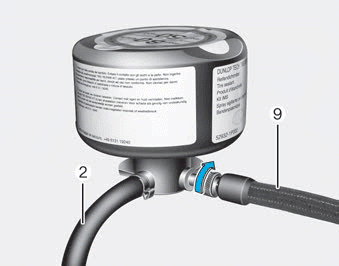
2. Connect hose (9) of the compressor directly to the tire valve.
3. Plug the compressor power cord into the vehicle power outlet.
4. Adjust the tire inflation pressure to the recommended tire inflation. With the ignition switched on, proceed as follows.
- To increase the inflation pressure:
Switch on the compressor. To check the current inflation pressure setting, briefly switch off the compressor.
- To reduce the inflation pressure:
Loosen the screw cap (8) on the compressor hose.
Information
The pressure gage may show higher than actual reading when the compressor is running. To get an accurate tire pressure, the compressor needs to be turned off.
CAUTION
When you use the Tire Mobility Kit including sealant not approved by HYUNDAI, the tire pressure sensors may be damaged by sealant. The sealant on the tire pressure sensor and wheel should be removed when you replace the tire with a new one and inspect the tire pressure sensors at an authorized HYUNDAI dealer.
Information
When reinstalling the repaired or replaced tire and wheel on the vehicle, tighten the wheel lug nut to 79~94 lbf·ft (11~13 kgf·m).


