Components and Components Location
Repair procedures
| • |
Put on gloves to prevent
hand injuries. |
|
| • |
When removing with a
flat-tip screwdriver or remover, wrap protective tape around the
tools to prevent damage to components. |
|
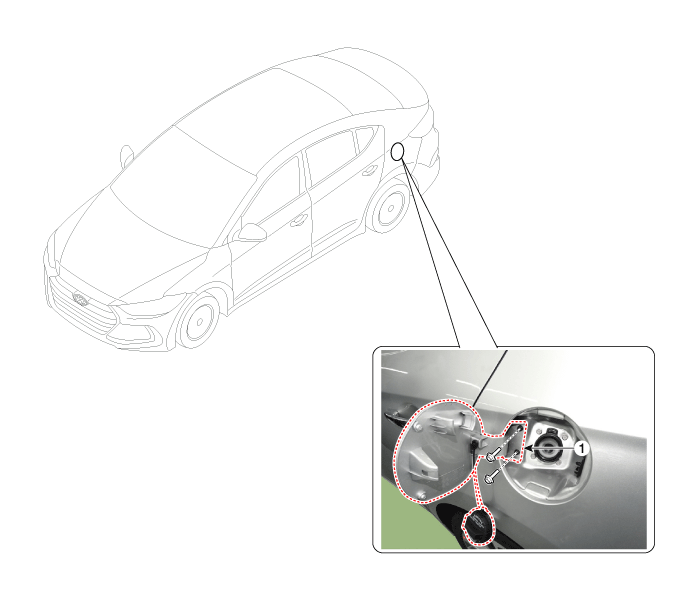
| 1. |
Open the fuel filler door (A).

|
| 2. |
Loosen the mounting bolts and
remove the fuel filler door (A).
Tightening torque :
3.9 ~ 5.9 N.m (0.4 ~ 0.6 kgf.m, 2.9 ~ 4.3 lb-ft)
|
|
| 3. |
To intall, reverse the removal
procedure.
| •
|
Make sure the
fuel filler door locks / unlocks and opens / closes properly.
|
|
|
| • |
When removing with a
flat-tip screwdriver or remover, wrap protective tape around the
tools to prevent damage to components. |
| • |
Take care not to scratch
the body surface. |
|
| 1. |
Remove the front seat assembly.
(Refer to Front Seat - "Front Seat Assembly")
|
| 2. |
Remove the rear seat assembly.
(Refer to rear Seat - "Rear Seat Assembly")
|
| 3. |
Remove the floor console assembly.
(Refer to Floor Console - "Floor Console Assembly")
|
| 4. |
Remove the center pillar lower
trim. (Refer to Interior Trim - "Center Pillar Trim")
|
| 5. |
Remove the cowl side trim.
(Refer to Interior Trim - "Cowl Side Trim")
|
| 6. |
Remove the luggage side trim.
(Refer to Interior Trim - "Cowl Side Trim")
|
| 7. |
Remove the floor carpet. (Refer
to "Floor carpet")
|
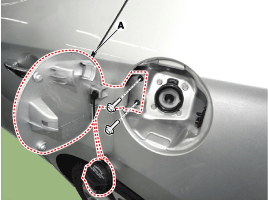
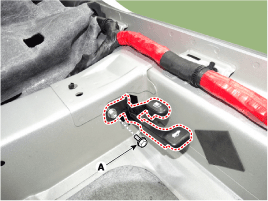
| 8. |
Loosen the mounting bolt and
remove the fuel filler door catch (A).
Tightening torque :
7.8 ~ 11.8 N.m (0.8 ~ 1.2 kgf.m, 5.8 ~ 8.7 lb-ft)
|
|
| 9. |
Disconnect the fuel filler door
barcket (A), remove the cable (B).
|
| 10. |
To intall, reverse the removal
procedure.
| •
|
Make sure the
fuel filler door locks / unlocks and opens / closes properly.
|
|
|
| 1. |
Remove the front seat assembly
[LH]. (Refer to Front Seat - "Front Seat Assembly")
|
| 2. |
Remove the front door scuff trim
[LH]. (Refer to Interior Trim - "Front Door Scuff Trim")
|
| 3. |
Remove the cowl side trim [LH].
(Refer to Interior Trim - "Cowl Side Trim")
|
| 4. |
Remove the floor console assembly.
(Refer to Floor Console - "Floor Console Assembly")
|
| 5. |
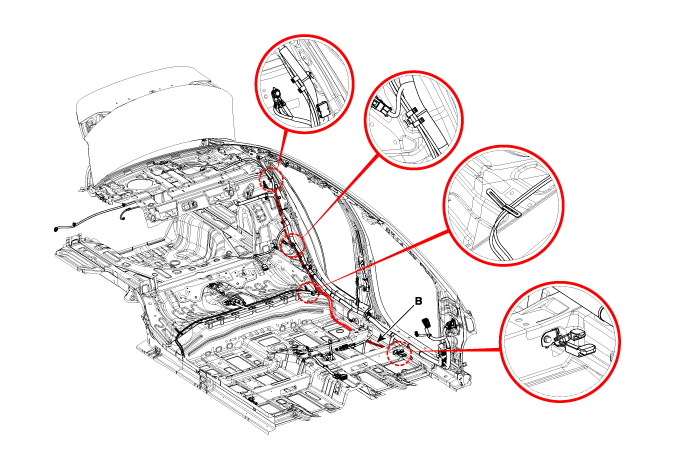
Separate the floor carpet to
obtain space for removing the rear heating duct. |
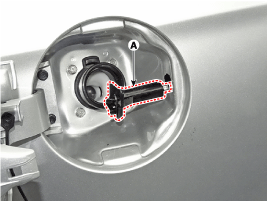
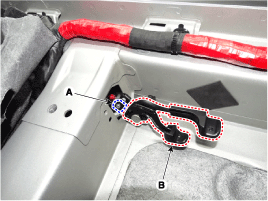
| 6. |
Loosen the fuel filler door catch
mounting bolt (A).
Tightening torque :
7.8 ~ 11.8 N.m (0.8 ~ 1.2 kgf.m, 5.8 ~ 8.7 lb-ft)
|
|
| 7. |
Detach the cable (A) and remove
the fuel filler door catch (B).
|
| 8. |
To intall, reverse the removal
procedure.
| •
|
Make sure the
fuel filler door locks / unlocks and opens / closes properly.
|
|
|
Repair procedures
Adjustment
1.
Place the car on a flat surface
and check whether the body and trunk lid are well-aligned.
2.
After loosening the trunk li ...
Components and Components Location
Components
1. Front door trim
2. Front door belt inside weatherstrip
3. Front door module
4. Front door quadrant inner cover ...
 Hyundai Elantra AD: Fuel Filler Door


