Components and Components Location
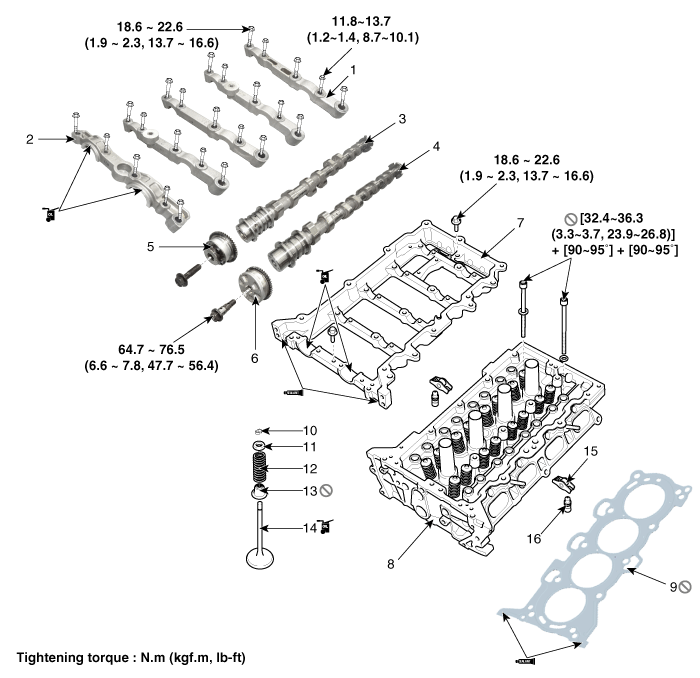
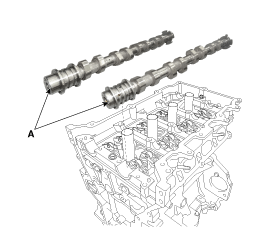
1. Camshaft bearing cap
2. Camshaft front bearing cap
3. Exhaust camshaft
4. Intake camshaft
5. Exhaust CVVT assembly
6. Intake CVVT assembly
|
7. Cam carrier
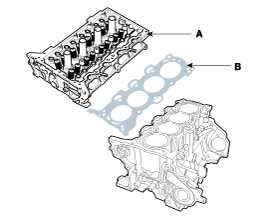
8. Cylinder head
9. Cylinder head gasket
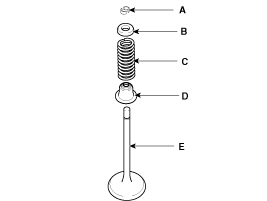
10. Retainer lock
11. Retainer
12. Valve spring
|
13. Valve stem seal
14. Valve
15. Swing arm
16. Hydraulic lash adjuster (HLA)
|
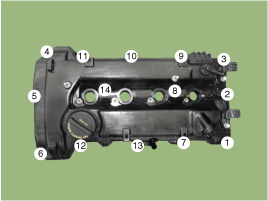
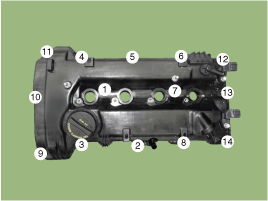
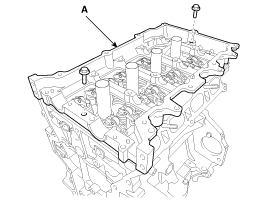
Cylinder Head Cover Components and Components Location
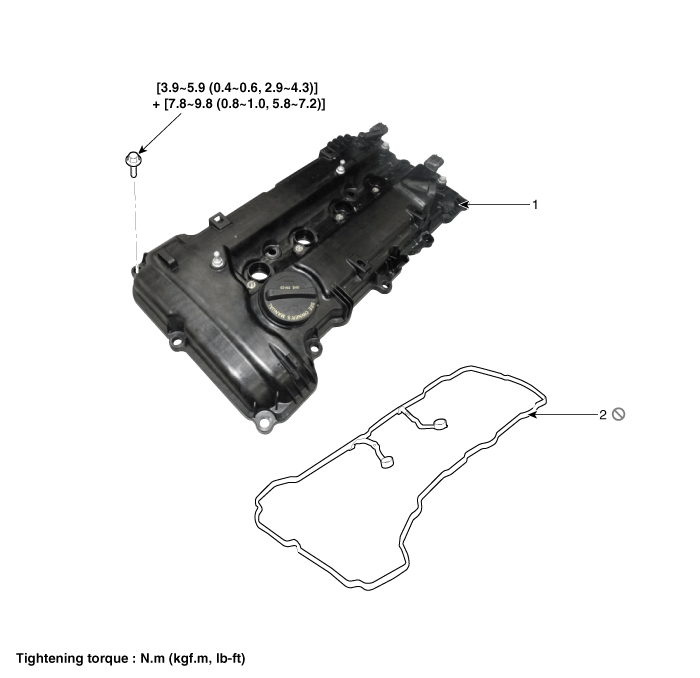
1. Cylinder head cover
|
2. Cylinder head cover gasket
|
Cylinder Head Cover Repair procedures
| • |
Use fender covers to
avoid damaging painted surfaces. |
| • |
To avoid damage, unplug
the wiring connectors carefully while holding the connector portion.
|
|
| • |
Mark all wiring and hoses
to avoid misconnection.
|
|
| 1. |
Remove the engine cover. (Refer
to Engine And Transaxle Assembly - "Engine Cover")
|
| 2. |
Disconnect the battery negative
terminal. |
| 3. |
Disconnect the wiring connectors
and harness clamps and remove the connector brackets around the cylinder
head cover.
|
| 4. |
Remove the air duct and air cleaner
assembly. (Refer to Intake And Exhasut System - "Air Cleaner")
|
| 5. |
Remove the ignition coils.
(Refer to Engine Electrical System - “Ignition Coil”)
|
| 6. |
Remove the engine oil level gauge.
(Refer to Lubrication System - “Oil Level Gauge & Pipe”)
|
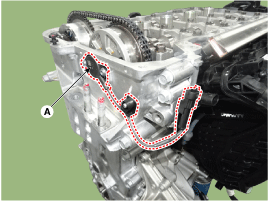
| 7. |
Disconnect the positive crankcase
ventilation (PCV) hose (A).
|
| 8. |
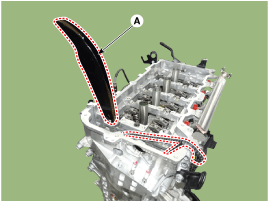
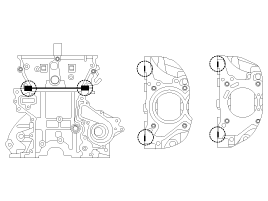
Remove the cylinder head cover
(A).
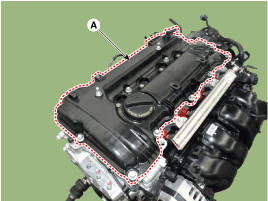
| •
|
Unfasten the
bolts in the sequence as shown. |
|
|
| 1. |
Install cylinder head cover.
| (1) |
The hardening sealant
located on the cylinder head cover and the gap between the timing
chain cover and the cam carrier should be removed before assembling
cylinder head cover. |
| (2) |
Apply engine oil on the
lip portion of the oil seal on the cover and outer surface of the
spark plug pipes. |
| (3) |
After applying sealant
on the gap between the timing chain cover and the cam carrier, it
should be assembled within 5 minutes.
Bead width : 2.0 ~
3.0 mm (0.08 ~ 0.12 in.)Sealant : Threebond 1217H or
equivalent
|
|
| (4) |
Install the cylinder
head cover by tightening the bolts, in several passes, in the sequence
as shown.
Tightening torque
1st step:
3.9 ~ 5.9 N.m (0.4 ~ 0.6 kgf.m, 2.9 ~ 4.3 lb-ft)2nd step:
7.8 ~ 9.8 N.m (0.8 ~ 1.0 kgf.m, 5.8 ~ 7.2 lb-ft)
|
|
| •
|
Do not reuse
cylinder head cover gasket. |
| •
|
Before installing
the cylinder head cover, make sure the cylinder head cover
gasket is not separated from the cylinder head cover gasket
groove. |
| •
|
The engine running
or pressure test should not be performed within 30 minutes
after the cylinder head cover was assembled. |
|
|
| 2. |
Install the other parts reverse
order of removal. |
CVVT & Camshaft Components and Components Location
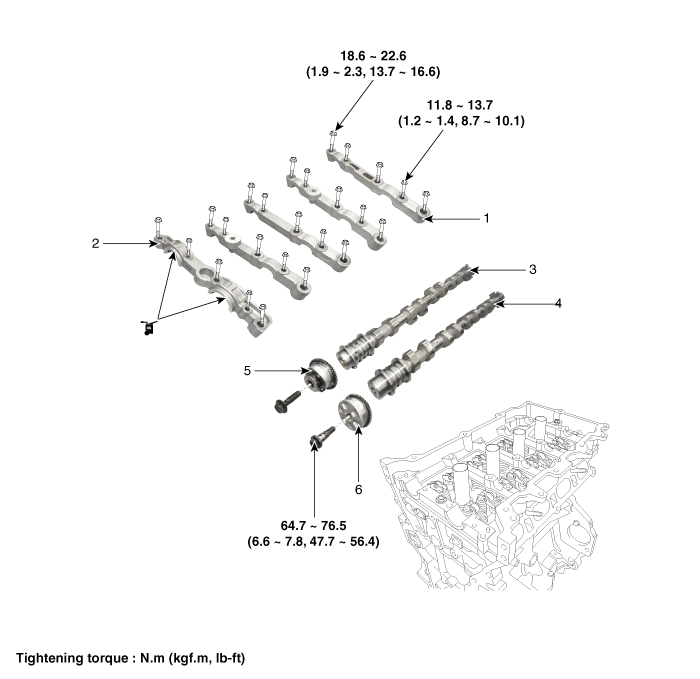
1. Camshaft bearing cap
2. Camshaft front bearing cap
3. Exhaust camshaft
|
4. Intake camshaft
5. Exhaust CVVT assembly
6. Intake CVVT assembly
|
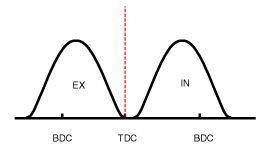
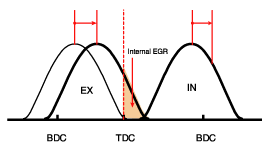
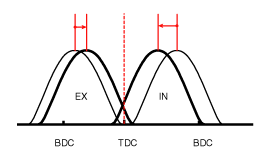
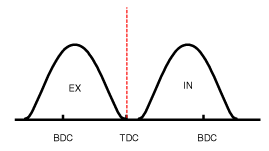
CVVT & Camshaft Description and Operation
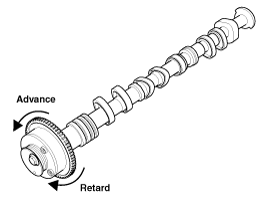
Continuous Variable Valve Timing (CVVT) system advances or retards the valve timing
of the intake and exhaust valve in accordance with the ECM control signal which
is calculated by the engine speed and load.
By controlling CVVT, the valve over-lap
or under-lap occurs, which makes better fuel economy and reduces exhaust gases (NOx,
HC) and improves engine performance through reduction of pumping loss, internal
EGR effect, improvement of combustion stability, improvement of volumetric efficiency,
and increase of expansion work.
This system consist of
| - |
the CVVT Oil Control Valve (OCV)
which supplies the engine oil to the cam phaser or runs out the engine oil
from the cam phaser in accordance with the ECM PWM (Pulse With Modulation)
control signal, |
| - |
and the Cam Phaser which varies
the cam phase by using the hydraulic force of the engine oil. |
The engine oil getting out of the CVVT oil control valve varies the cam phase in
the direction (Intake Advance/Exhaust Retard) or opposite direction (Intake Retard/Exhaust
Advance) of the engine rotation by rotating the rotor connected with the camshaft
inside the cam phaser.
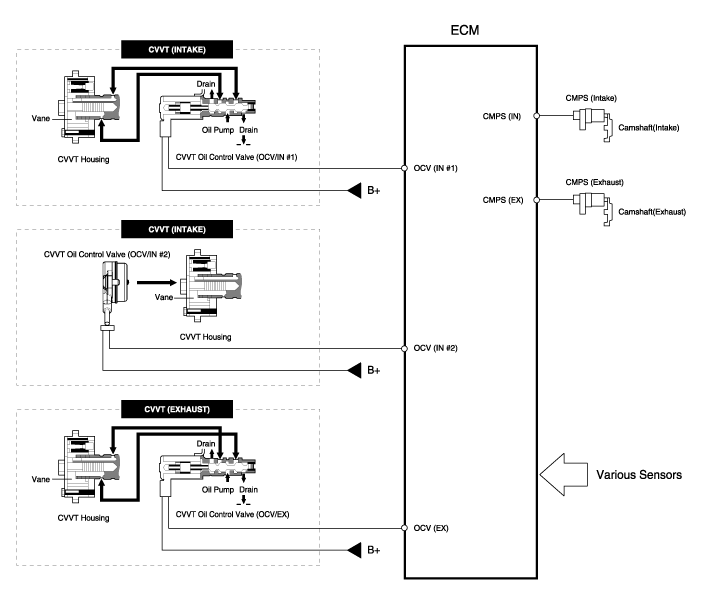
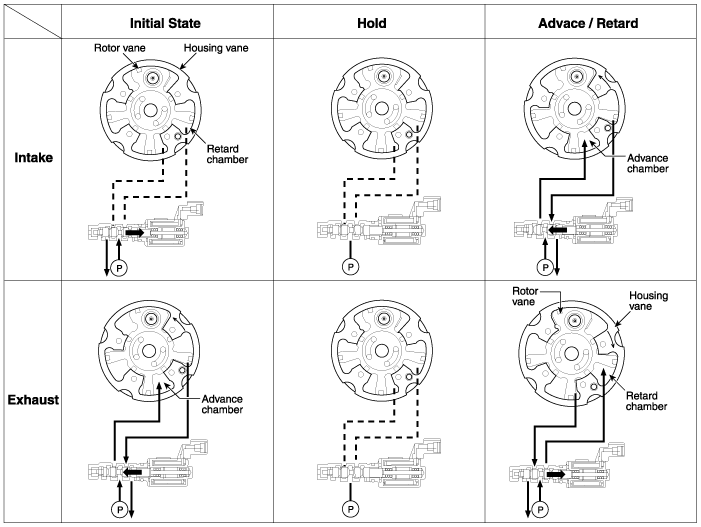
The CVVT has the mechanism rotating the rotor vane with hydraulic force generated
by the engine oil supplied to the advance or retard chamber in accordance with the
CVVT oil control valve control.
| • |
A separate solenoid valve
is installed on the chain cover in the intake side for closing and
releasing a separate lock pin. |
|
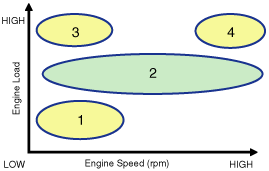
(1) Low Speed / Low Load
|
(2) Part Load
|
|
|
(3) Low Speed / High Load
|
(4) High Speed / High Load
|
|
|
Driving
Condition
|
Exhaust Valve
|
Intake Valve
|
Valve
Timing
|
Effect
|
Valve
Timing
|
Effect
|
(1) Low Speed
/Low Load
|
Completely
Advance
|
* Valve Under-lap
* Improvement of combustion stability
|
Completely
Retard
|
* Valve Under-lap
* Improvement of combustion stability
|
(2) Part Load
|
Retard
|
* Reduction of HC
|
Retard
|
* Delays the closing time of intake valve to reduce pumping loss
* Increases expansion work
|
(3) Low Speed
/High Load
|
Retard
|
* Increase of expansion work
|
Advance
|
* Prevention of intake back flow (Improvement of volumetric efficiency)
|
(4) High Speed
/High Load
|
Advance
|
* Reduction of pumping loss
|
Retard
|
* Improvement of volumetric efficiency
|
CVVT & Camshaft Repair procedures
| • |
Use fender covers to
avoid damaging painted surfaces. |
| • |
To avoid damage, unplug
the wiring connectors carefully while holding the connector portion.
|
|
| • |
Mark all wiring and hoses
to avoid misconnection. |
| • |
Turn the crankshaft pulley
so that the No. 1 piston is at top dead center. |
|
Timing chain cover removal is not required for this procedure.
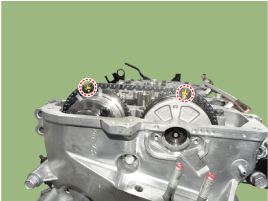
| 1. |
Remove the cylinder head cover.
(Refer to Cylinder Head Assembly - “Cylinder Head Cover”)
|
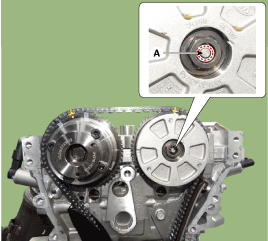
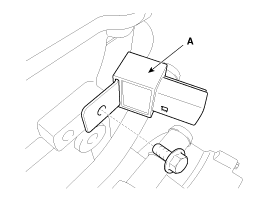
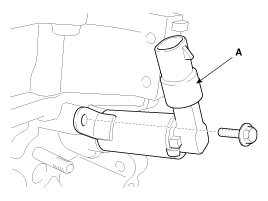
| 2. |
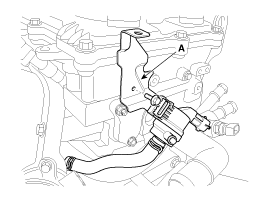
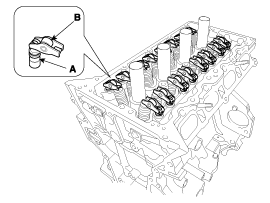
Remove the intermediate lock
CVVT actuator (A).
|
| 3. |
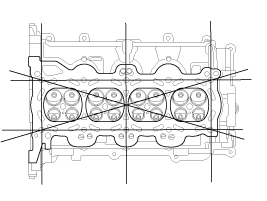
Set No.1 cylinder to TDC (Top
dead center) on compression stroke.
| (1) |
Turn the crankshaft pulley
and align its groove with the timing mark of the timing chain cover.
|
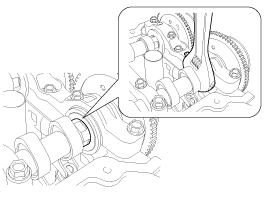
| (2) |
Check that the TDC marks
of the intake and exhaust CVVT sprockets are in straight line on
the cylinder head surface as shown in the illustration. If not,
turn the crankshaft by one revolution (360°) more.
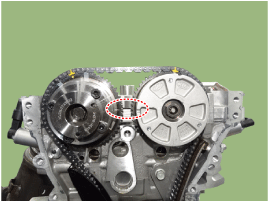
|
| (3) |
Mark the timing chains
corresponding to the timing marks of the CVVT sprockets.
|
|
| 4. |
Remove the crankshaft damper
pulley. (Refer to Timing System - “Crankshaft Damper Pulley”)
|
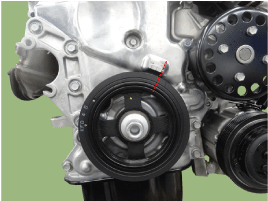
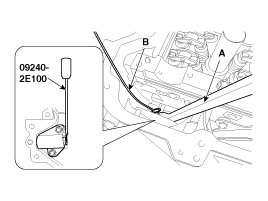
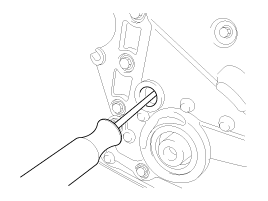
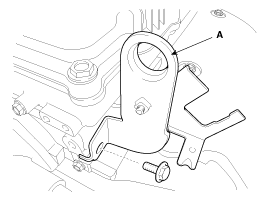
| 5. |
Remove the service plug bolt
(A) with the gasket (B).
|
| 6. |
Remove the tensioner arm bolt
(A).
|
| 7. |
Push down the tensioner arm (A).
|
| 8. |
Remove the camshaft bearing caps.
|
| 9. |
Remove the exhaust camshaft (A)
first, then intake camshaft (B).

|
| 10. |
Remove the tensioner arm (A).
| •
|
To hold the timing
chain, tie it with strap. |
|
|
| 11. |
Remove the CVVT assembly (A)
from the camshaft.
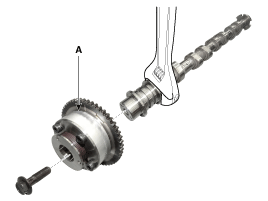
| •
|
When removing
the CVVT assembly bolt, hold the camshaft with a wrench
to prevent the camshaft from rotating. |
|
|
Camshaft
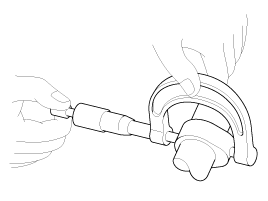
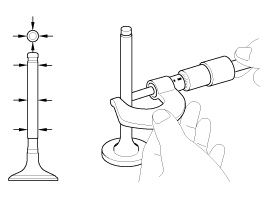
| 1. |
Inspect the cam lobes. Using
a micrometer, measure the cam lobe height.
If the cam lobe height is less than specification, replace the camshaft.
Cam heightIntake: 39.0
mm (1.5354 in.)
Exhaust: 39.0 mm (1.5354 in.)
|
|
| 2. |
Check the surface of the camshaft
journal for wear.
If the journal is worn excessively, replace the camshaft.
|
| 3. |
Inspect the camshaft journal
clearance.
| (1) |
Clean the bearing caps
and camshaft journals. |
| (2) |
Place the camshafts on
the cylinder head. |
| (3) |
Lay a strip of plastigage
across each of the camshaft journal.

|
| (4) |
Install the bearing caps
and tighten the bolts with specified torque.
Tightening torque
M6 bolts:
11.8 ~ 13.7 N.m (1.2 ~ 1.4 kgf.m, 8.7 ~ 10.1 lb-ft)M8
bolts:
18.6 ~ 22.6 N.m (1.9 ~ 2.3 kgf.m, 13.7 ~ 16.6 lb-ft)
|
|
• |
Do not
turn the camshaft. |
|
|
| (5) |
Remove the bearing caps. |
| (6) |
Measure the plastigage
at its widest point. If the oil clearance is greater than specification,
replace the camshaft. If necessary, replace the bearing caps and
cylinder head as a set.
Bearing oil clearance
Standard:
0.032 ~ 0.062 mm (0.00126 ~ 0.00244 in.)
|
|
|
| 4. |
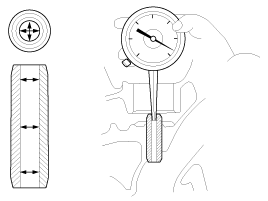
Inspect the camshaft end play.
| (1) |
Install the camshaft
bearing caps. |
| (2) |
Using a dial indicator,
measure the end play while moving the camshaft back and forth.
If the end play is greater than specification, replace the camshaft.
If necessary, replace the bearing caps and cylinder head as a set
Camshaft end play
Standard:
0.10 ~ 0.19 mm (0.0039 ~ 0.0075 in.)
|
|
| (3) |
Remove the camshafts.
|
|
Continuously variable valve timing (CVVT) Assembly
| 1. |
Inspect the CVVT for smooth rotation.
| (1) |
Clamp the camshaft using
a vise. Be careful not to damage the cam lobes and journals in the
vise. |
| (2) |
Check that the CVVT is
locked by turning it clockwise or counterclockwise. It must not
rotate. |
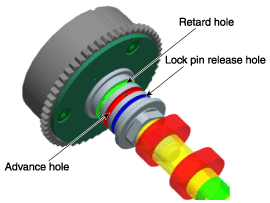
| (3) |
Intake CVVT : Seal one
of the two advance holes in the camshaft journal with tape. Exhaust
CVVT : Seal one of the two retard holes in the camshaft journal
with tape.
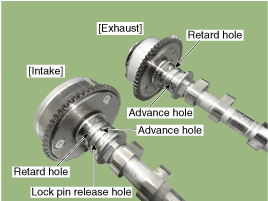
|
| (4) |
Intake CVVT :
| (1) |
press the center
of the valve bolt (A). |
| (2) |
Apply approx.
50 kPa (0.5 kgf /cm?, 7 psi ) of compressed air into the
lock pin release hole to release the lock.
Exhaust CVVT : Apply approx. 150 kPa (1.5 kgf /cm? 21 psi
) of compressed air into the unsealed retard hole to release
the lock. |
|
• |
Cover
the oil paths with a piece of cloth when applying
compressed air to prevent oil from spraying. |
|
|
| (5) |
Intake CVVT : With compressed
air applied, rotate the CVVT into the advance direction (counterclockwise)
within its phasing range and check that the CVVT turns smoothly.
Exhaust CVVT : With compressed air applied, rotate the CVVT into
the retard direction (clockwise) and check that the CVVT turns smoothly.
CVVT phasing range
Intake : 40° (20° advance and 20° retard from the initial
position)
Exhaust : 20°±1° (from the most advanced position to the
most retarded position)
|
|
| (6) |
Intake CVVT :
| A. |
Move to the center
to check that lock pin closes well. |
| B. |
Rotate the CVVT
into the most retarded position (clockwise) and then check
that the CVVT is locked. |
Exhaust CVVT :
| A. |
Rotate the CVVT
into the most advanced position (counterclockwise) and then
check that the CVVT is locked. |
|
|
| 1. |
Install the CVVT assembly (A)
to the camshaft.
Tightening torque :64.7
~ 76.5 N.m (6.6 ~ 7.8 kgf.m, 47.7 ~ 56.4 lb-ft)
|
| •
|
When installing
the CVVT assembly bolt, hold the camshaft with a wrench
to prevent the camshaft from rotating. |
|
|
| 2. |
Compress the piston of the tensioner
using a handy bar (A) and then insert a stopper pin (B) into the hole on
the tensioner to hold the compressed piston.
|
| 3. |
Place the intake camshaft (A)
and then insert the tensioner arm (B) along the timing chain.
|
| 4. |
Place the exhaust camshaft (A).

| •
|
The timing marks
of each CVVT sprocket should be matched with timing marks
(painted link) of timing chain when installing the timing
chain. |
|
|
| 5. |
Install the camshaft bearing
caps.
Tighten the bolts, in several passes, in the sequence as shown.
Tightening torqueM6 bolts:
11.8 ~ 13.7 N.m (1.2 ~ 1.4 kgf.m, 8.7 ~ 10.1 lb-ft)M8 bolts:
18.6 ~ 22.6 N.m (1.9 ~ 2.3 kgf.m, 13.7 ~ 16.6 lb-ft)
|
| •
|
Be careful not
to change the position and direction of bearing caps.
|
|
|
| 6. |
Using a suitable tool, move the
tensioner arm to align the tensioner bolt hole with the service hole.
|
| 7. |
Install the tensioner arm bolt
(A).
Tightening torque:18.6
~ 22.6 N.m (1.9 ~ 2.3 kgf.m, 13.7 ~ 16.6 lb-ft)
|
|
| 8. |
Remove the stopper pin from the
tensioner. |
| 9. |
Turn the crankshaft two turns
in the operating direction (clockwise), and then check that the TDC marks
of the CVVT sprockets are in straight line on the cylinder head surface.
|
| 10. |
Install a service plug bolt (A)
with a gasket.
Tightening torque:29.4
~ 39.2 N.m (3.0 ~ 4.0 kgf.m, 21.7 ~ 28.9 lb-ft)
|
| •
|
Do not reuse
the service plug bolt and gasket. |
|
|
| 11. |
Install the intermediate lock
CVVT actuator (A).
Tightening torque :8.8
~ 9.8 N.m (0.9 ~ 1.0 kgf.m, 6.5 ~ 7.2 lb-ft)
|
| •
|
Always use new
actuator bolts. |
| •
|
The residue inside
of the chain-cover bolt hole should be disposed before locking. |
| •
|
The actuator
bolts should be locked to the regulated torque. |
|
|
| 12. |
Install the other parts reverse
order of removal. |
Cylinder Head Components and Components Location
1. Camshaft bearing cap
2. Camshaft front bearing cap
3. Exhaust camshaft
4. Intake camshaft
5. Exhaust CVVT assembly
6. Intake CVVT assembly
|
7. Cam carrier
8. Cylinder head
9. Cylinder head gasket
10. Retainer lock
11. Retainer
12. Valve spring
|
13. Valve stem seal
14. Valve
15. Swing arm
16. Hydraulic lash adjuster (HLA)
|
Cylinder Head Repair procedures
Engine removal is not required for this procedure.
| • |
Use fender covers to
avoid damaging painted surfaces. |
| • |
To avoid damaging the
cylinder head, wait until the engine coolant temperature drops below
normal temperature (20°C [68°F]) before removing it. |
| • |
When handling a metal
gasket, take care not to fold the gasket or damage the contact surface
of the gasket. |
| • |
To avoid damage, unplug
the wiring connectors carefully while holding the connector portion. |
|
| • |
Mark all wiring and hoses
to avoid misconnection. |
| • |
Turn the crankshaft pulley
so that the No. 1 piston is at TDC (Top dead center).
|
|
| 1. |
Remove the engine cover. (Refer
to Engine And Transaxle Assembly - "Engine Cover")
|
| 2. |
Remove the air duct and air cleaner
assembly. (Refer to Intake And Exhasut System - "Air Cleaner")
|
| 3. |
Remove the battery. (Refer
to Engine Electrical System - "Battery")
|
| 4. |
Remove the ECM (Engine Control
Module). (Refer to Engine Control / Fuel System - "Engine Control Module
(ECM)")
|
| 5. |
Remove the battery tray. (Refer
to Engine Electrical System - "Battery")
|
| 6. |
Remove the engine room under
cover. (Refer to Engine And Transaxle Assembly - "Engine Room Under Cover")
|
| 7. |
Drain the coolant. (Refer to
Cooling System - “Coolant”)
|
| 8. |
Disconnect the fuel hose (A)
and purge control solenoid valve (PCSV) hose (B).
|
| 9. |
Remove the vacuum pipe (A).
Tightening torque:9.8 ~
11.8 N.m (1.0 ~ 1.2 kgf.m, 7.2 ~ 8.7 lb-ft)
|
|
| 10. |
Remove the condenser (A).
Tightening torque:9.8 ~
11.8 N.m (1.0 ~ 1.2 kgf.m, 7.2 ~ 8.7 lb-ft)
|
|
| 11. |
Remove the purge control solenoid
valve (PCSV) bracket (A).
Tightening torque:9.8 ~
11.8 N.m (1.0 ~ 1.2 kgf.m, 7.2 ~ 8.7 lb-ft)
|
|
| 12. |
Remove the delivery pipe. (Refer
to Engine Control/Fuel System - “Delivery Pipe”)
|
| 13. |
Remove the cylinder head cover.
(Refer to Cylinder Head Assembly - “Cylinder Head Cover”)
|
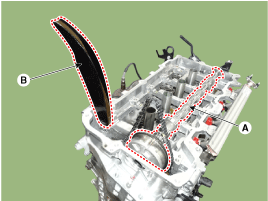
| 14. |
Remove the timing chain. (Refer
to Timing System - “Timing Chain”)
|
| 15. |
Remove the exhaust manifold.
(Refer to Intake And Exhaust System - “Exhaust Manifold”)
|
| 16. |
Remove the intake manifold.
(Refer to Intake And Exhaust System - “Intake Manifold”)
|
| 17. |
Remove the water temperature
control assembly. (Refer to Cooling System - “Water Temperature Control
Assembly”)
|
| 18. |
Remove the heater pipe. (Refer
to Cooling System - "Thermostat")
|
| 19. |
Remove the intake CVVT assembly
(A) and exhaust CVVT assembly (B).
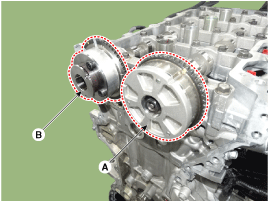
| •
|
When removing
the CVVT assembly bolt, hold the camshaft with a wrench
to prevent the camshaft from rotating. |
|
|
| 20. |
Remove the camshaft.
| (1) |
Remove the camshaft bearing
cap (A) by loosening the bolts in the sequence as shown.

|
| (2) |
Remove the camshafts
(A).
|
|
| 21. |
Remove the cam carrier (A).
|
| 22. |
Remove the hydraulic lash adjuster
(HLA) (A) and the swing arm (B).

| •
|
The HLA and swing
arm should be kept together as pairs during storage after
removal and reinstallation. |
|
|
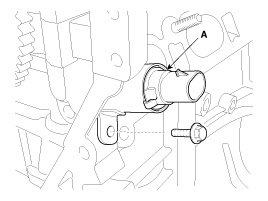
| 23. |
Remove the oil control adapter
(A) with the gasket (B).
|
| 24. |
Remove the intake oil control
valve (OCV) (A).
|
| 25. |
Remove the exhaust oil control
valve (OCV) (A).
|
| 26. |
Remove the rear engine hanger
(A).
|
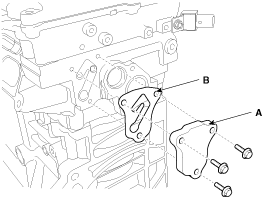
| 27. |
Remove the spark plugs. (Refer
to Engine Electrical System - “Spark Plug”)
|
| 28. |
Remove the cylinder head.
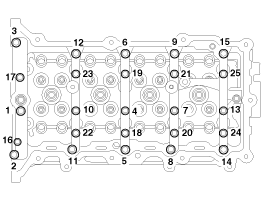
| (1) |
Using bit socket (12PT),
uniformly loosen and remove the cylinder head bolts, in several
passes, in the sequence as shown.
|
• |
Head
warpage or cracking could result from removing bolts
in an incorrect order. |
|
|
| (2) |
Lift the cylinder head
(A) from the dowels on the cylinder block and place the cylinder
head on wooden blocks on a bench.
|
• |
Be careful
not to damage the contact surfaces of the cylinder
head and cylinder block. |
|
|
| (3) |
Remove the cylinder head
gasket (B).
|
|
| • |
Identify, valves and
valve springs as they are removed so that each item can be reinstalled
in its original position. |
|
| 1. |
Remove the valves.
| (1) |
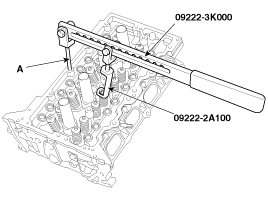
Using the SST (09222-3K000,
09222-2A100), compress the valve spring and remove the retainer
lock (A).
|
• |
When
installing the SST, insert the front support (A)
directly into the bolt hole on the cylinder head. |
|
|
• |
Do not
press valve retainer more than 12 mm (0.47 in.). |
|
|
| (2) |
Remove the spring retainer
(B). |
| (3) |
Remove the valve spring
(C). |
| (4) |
Remove the valve (D).
|
| (5) |
Using needle-nose pliers,
remove the valve stem seal (E).
|
• |
Do not
reuse the valve stem seals. |
|
|
|
Cylinder Head
| 1. |
Inspect for flatness.
Using a precision straight edge and feeler gauge, measure the contacting
surface of the cylinder block and the manifolds for warpage.
Flatness of cylinder head
gasket surface:Less than 0.05 mm (0.0020 in.) for total area
Less than 0.02 mm (0.0008 in.) for a section of 100 mm (3.9370 in.)
X 100 mm (3.9370 in.)
|
Flatness of manifold mounting
surface:
Less than 0.10 mm (0.0039 in.)
|
|
| 2. |
Inspect for cracks. Check the
combustion chamber, intake ports, exhaust ports and cylinder block surface
for cracks. If cracked, replace the cylinder head.
|
Valve And Valve Spring
| 1. |
Inspect valve stems and valve
guides.
| (1) |
Using a caliper gauge,
measure the inside diameter of the valve guide.
Valve guide inner
diameterIntake: 5.500 ~ 5.512 mm (0.21654 ~ 0.21701 in.)
Exhaust: 5.500 ~ 5.512 mm (0.21654 ~ 0.21701 in.)
|
|
| (2) |
Using a micrometer, measure
the diameter of the valve stem.
Valve stem outer diameter
Intake: 5.465 ~ 5.480 mm (0.21516 ~ 0.21575 in.)
Exhaust: 5.458 ~ 5.470 mm (0.21488 ~ 0.21535 in.)
|
|
| (3) |
Subtract the valve stem
diameter measurement from the valve guide inside diameter measurement.
If the clearance is greater than specification, replace the valve
or the cylinder head.
Valve stem-to-guide
clearance[Standard]
Intake : 0.020 ~ 0.047 mm (0.00079 ~ 0.00185 in.)Exhaust
: 0.030 ~ 0.054 mm (0.00118 ~ 0.00213 in.)
|
|
|
| 2. |
Inspect the valves.
| (1) |
Check the valve is ground
to the correct valve face angle. |
| (2) |
Check that the surface
of the valve for wear. If the valve face is worn, replace the
valve.
|
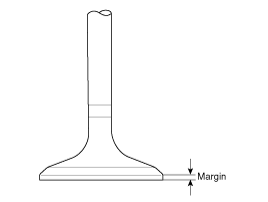
| (3) |
Check the valve head
margin thickness. If the margin thickness is less than specification,
replace the valve.
Margin[Standard]
Intake: 1.30 mm (0.0512 in.)Exhaust: 1.26 mm (0.0496
in.)
|
|
| (4) |
Check the valve length.
Valve length[Standard]
Intake: 102.22 mm (4.0244 in.)Exhaust: 104.04 mm (4.0961
in.)
[Limit]Intake: 101.97 mm (4.0146 in.)
Exhaust: 103.79 mm (4.0862 in.)
|
|
| (5) |
Check the surface of
the valve stem tip for wear. If the valve stem tip is worn, replace
the valve.
|
|
| 3. |
Inspect the valve seats and the
valve guides.
| (1) |
Check the valve seat
for evidence of overheating and improper contact with the valve
face. If the valve seat is worn, replace the cylinder head.
|
| (2) |
Check the valve guide
for wear.If the valve guide is worn, replace the cylinder head.
|
|
| 4. |
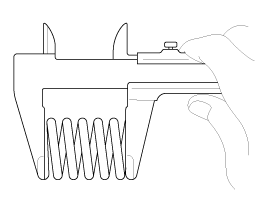
Inspect the valve springs.
| (1) |
Using a steel square,
measure the out-of-square of valve spring. |
| (2) |
Using a vernier calipers,
measure the free length of valve spring.
If the free length is not as specified, replace the valve spring.
Valve spring[Standard]
Free length: 45.93 mm (1.8083 in.)Load : 19.6 ± 1.0kg
/ 37.0mm
(43.21 ± 2.20 lb / 1.4567 in)45.7 ± 1.8kg / 27. 0mm
(100.75 ± 3.97 lb / 1.0630 in)Out-of-square : Less than
1.5°
|
|
|
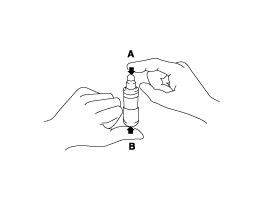
Hydraulic Lash Adjuster (HLA)
With the HLA filled with engine oil, hold A and
press B by hand.
If B moves, replace the HLA.
Problem
|
Possible cause
|
Action
|
1. Temporary noise when starting a cold engine
|
Normal
|
This noise will disappear after the oil in the engine reaches the normal pressure.
|
2. Continuous noise when the engine is started after parking more than 48 hours
|
Oil leakage of the high pressure chamber on the HLA, allowing air to get in
|
Noise will disappear within 15 minutes when engine runs at 2000-3000 rpm.
If it doesn’t disappear, refer to step 7 below.
|
3. Continuous noise when the engine is first started after rebuilding cylinder
head
|
Insufficient oil in cylinder head oil gallery
|
4. Continuous noise when the engine is started after excessively cranking the
engine by the starter motor or band
|
| • |
Oil leakage of the high-pressure
chamber in the HLA, allowing air to get in |
| • |
Insufficient oil in the
HLA |
|
5. Continuous noise when the engine is running after changing the HLA
|
| •
|
Do not run engine
at a speed higher than 3000 rpm, as this may damage the
HLA. |
|
|
6. Continuous noise during idle after high engine speed
|
Engine oil level too high or too low
|
| • |
Drain or add oil as necessary. |
|
Excessive amount of air in the oil at high engine speed
|
Check oil supply system.
|
Deteriorated oil
|
Check oil quality.
If deteriorated, replace with specified type.
|
7. Noise continues for more than 15 minutes
|
Low oil pressure
|
Check oil pressure and oil supply system of each part of engine.
|
Faulty HLA
|
Remove the cylinder head cover and press HLA down by hand.
If it moves, replace the HLA.
|
| • |
Thoroughly clean all
parts to be assembled. |
| • |
Before installing the
parts, apply fresh engine oil to all sliding and rotating surface. |
| • |
Replace oil seals with
new ones. |
|
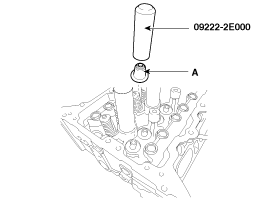
| 1. |
Install the valves.
| (1) |
Using the SST (09222-2E000),
push in a new stem seal (A).
|
• |
Do not
reuse old valve stem seals. |
|
• |
Incorrect
installation of the seal could result in oil leakage
past the valve guides. |
|
|
| (2) |
Install the valve, valve
spring and spring retainer.
|
• |
Place
the valve springs so that the side coated with enamel
faces toward the valve spring retainer and then
installs the retainer. |
|
|
| (3) |
Using the SST (09222-3K000,
09222-2A100), compress the spring and install the retainer locks.
Before releasing the valve spring compressor, ensure that the retainer
locks are correctly in place after pushing down and releasing the
compressor handle 2 ~ 3 times.
|
• |
When
installing the SST, insert the front support (A)
directly into the bolt hole on the cylinder head. |
|
|
• |
Do not
press valve retainer more than 12 mm (0.47 in.). |
|
|
|
| • |
Thoroughly clean all
parts to be assembled. |
| • |
Always use new cylinder
head and manifold gaskets. |
| • |
Always use new cylinder
head bolts. |
| • |
The cylinder head gasket
is a metal gasket. Take care not to bend it. |
| • |
Rotate the crankshaft
to set the No.1 piston at TDC (Top dead center) on compression stroke.
|
|
| 1. |
Install the cylinder head gasket
(B) on the cylinder block.
| (1) |
Remove hardening sealant,
oil, dust, moisture and harmful foreign materials from the cylinder
block and the cylinder head. |
| (2) |
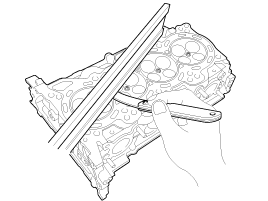
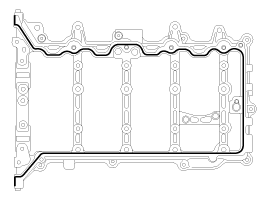
Apply liquid gasket on
the edge of the cylinder block. |
| (3) |
Install the cylinder
head gasket with the dowel pins of the cylinder block. |
| (4) |
Apply liquid gasket on
the edge of the cylinder head gasket.
|
• |
Apply
liquid gasket on the edge of the cylinder block
and cylinder head gasket. |
|
Sealant:
Threebond 1217H or equivalent
|
|
• |
Assemble
the cylinder head gasket and the cylinder head within
5 minutes after applying sealant. |
|
|
|
| 2. |
Place the cylinder head (A) carefully
to protect damage to the head gasket during installation.
|
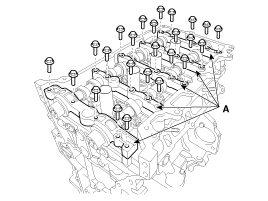
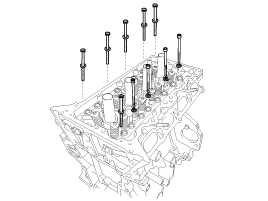
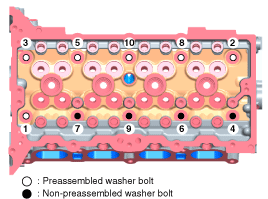
| 3. |
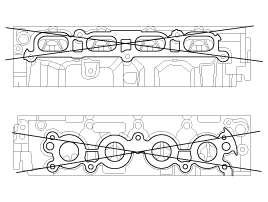
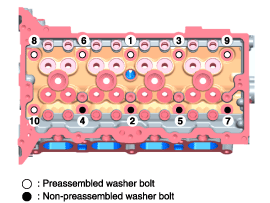
Install the cylinder head bolts
with washers. Using SST (09221-4A000), install and tighten the 10 cylinder
head bolts, in several passes, in the sequence as shown.
Tightening torque1st step:
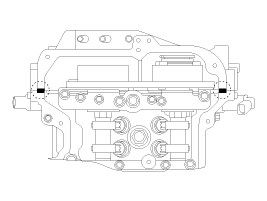
32.4 ~ 36.3 N.m (3.3 ~ 3.7 kgf.m, 23.9 ~ 26.8 lb-ft)2nd step:
90~95°
3rd step: 90~95°
|
| •
|
Do not reuse
the cylinder head bolts. |
| •
|
Do not apply
engine oil on the bolt threads to achieve correct torque. |
| •
|
Remove the extruded
sealant within 5 minutes after installing cylinder head
bolts. |
| •
|
The engine running
or pressure test should not be performed within 30 minutes
after installing cylinder head bolts. |
| •
|
Be careful not
to change the installing position of the preassembled washer
bolts and non-preassembled washer bolts. |
| •
|
When installing
the washer of the non-preassembled washer bolts, the round
and chamfer of washers should be faced up. |
|
|
| 4. |
Install the rear engine hanger
(A).
Tightening torque:34.3
~ 39.2N.m (3.5 ~ 4.0kgf.m, 25.3 ~ 28.9lb-ft)
|
|
| 5. |
Install the exhaust oil control
valve (OCV) (A).
Tightening torque:9.8 ~
11.8 N.m (1.0 ~ 1.2 kgf.m, 7.2 ~ 8.7 lb-ft)
|
|
| 6. |
Install the intake oil control
valve (OCV) (A).
Tightening torque:9.8 ~
11.8 N.m (1.0 ~ 1.2 kgf.m, 7.2 ~ 8.7 lb-ft)
|
| •
|
Do not reuse
the OCV when dropped. |
| •
|
Keep the OCV
filter clean. |
| •
|
Do not hold the
OCV sleeve (A) during servicing. |
| •
|
When the OCV
is installed on the engine, do not move the engine with
holding the OCV yoke. |
|
|
| 7. |
Install the oil control adapter
(A) with a new gasket (B).
Tightening torque:9.8 ~
11.8 N.m (1.0 ~ 1.2 kgf.m, 7.2 ~ 8.7 lb-ft)
|
|
| 8. |
Install the hydraulic lash adjuster
(HLA)(A) and the swing arm (B).
| (1) |
When installing HLA,
it should be held upright so that engine oil in HLA may not spill
and assured that dust does not adhere to HLA. |
| (2) |
HLA should be inserted
carefully to the cylinder head not to spill engine oil. If engine
oil has spilled out of the lash adjuster, HLA bleeding should be
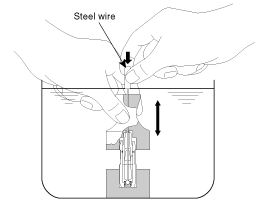
performed according to the below procedure.
HLA bleeding procedureStroke the lash adjuster in engine oil
by pushing its cap 4 to 5 times while pushing the ball down slightly
using a hard steel wire. Be careful not to give the ball a hard
push because the ball weighs just several grams.
If installing with engine oil spilling out of the lash adjuster
and air in it, it might make an abnormal noise.
|
|
| 9. |
Install the cam carrier.
| (1) |
Using a gasket scraper,
remove all the old packing material from the gasket surfaces.
|
| (2) |
The sealant locations
on the cam carrier and the cylinder head must be free of harmful
foreign materials, oil, dust and moisture. Spray cleaner on the
surface and wipe with a clean duster. |
| (3) |
After applying liquid
sealant on the bottom surface of the cam carrier, assemble the cam
carrier. Continuous bead of sealant should be applied to prevent
any path from oil leakage.
Bead width: 2.5 ~
3.5 mm (0.10 ~ 0.14 in.)Sealant: Threebond 1217H or equivalent
|
|
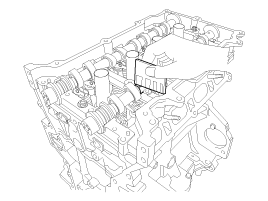
| (4) |
Place the cam carrier
(A) on the cylinder head. The dowel pins on the cam carrier and
holes on the cylinder head should be used as a reference in order
to assemble the cam carrier in exact position. |
| (5) |
Fasten the cam carrier
bolts.
Tightening torque:
18.6 ~ 22.6 N.m (1.9 ~ 2.3 kgf.m, 13.7 ~ 16.6 lb-ft)
|
|
• |
Assemble
the cam carrier within 5 minutes after applying
sealant. |
|
• |
Assemble
the camshaft bearing cap within 5 minutes after
assembling the cam carrier. |
|
• |
The engine
running or pressure test should not be performed
within 30 minutes after assembling the cam carrier. |
|
|
|
| 10. |
Install the camshafts.
| (1) |
Place the intake and
exhaust camshafts (A) on the cam carrier.
|
| (2) |
Install the camshaft
bearing cap (A).
Tighten the bolts, in several passes, in the sequence as shown.
Tightening torque
M6 bolts:
11.8 ~ 13.7 N.m (1.2 ~ 1.4 kgf.m, 8.7 ~ 10.1 lb-ft)M8
bolts:
18.6 ~ 22.6 N.m (1.9 ~ 2.3 kgf.m, 13.7 ~ 16.6 lb-ft)
|
|
• |
Be careful
not to change the position and direction of bearing
caps. |
|
|
|
| 11. |
Install the intake CVVT assembly
(A) and exhaust CVVT assembly (B).
Tightening torque:64.7
~ 76.5 N.m (6.6 ~ 7.8 kgf.m, 47.7 ~ 56.4 lb-ft)
|
|
When removing the CVVT assembly bolt, hold the camshaft with a wrench
to prevent the camshaft from rotating. |
|
| 12. |
Install the other parts reverse
order of removal. |
| 13. |
Add all the necessary fluids
and check for leaks. Connect GDS. Check for codes, note, and clear. Recheck. |
| • |
Refill engine with engine
oil. |
| • |
Refill a radiator and
a reservoir tank with engine coolant. |
| • |
Clean battery posts and
cable terminals and assemble. |
| • |
Inspect for fuel leakage.
|
| - |
After assembling the
fuel line, turn on the ignition switch (do not operate the starter)
so that the fuel pump runs for approximately two seconds and fuel
line pressurizes. |
| - |
Repeat this operation
two or three times, then check for fuel leakage at any point in
the fuel line. |
| • |
Bleed air from the cooling
system. |
| - |
(Refer to Cooling System
- "Coolant") |
|
Components and Components Location
Components
1. Intake camshaft
2. Exhaust camshaft
3. Intake CVVT assembly
4. Exhaust CVVT assembly
5. Timing chain
6. Tim ...
Components and Components Location
Components
1. Piston ring
2. Snap ring
3. Piston pin
4. Piston
5. Connecting rod
6. ...
 Hyundai Elantra AD: Cylinder Head Assembly


